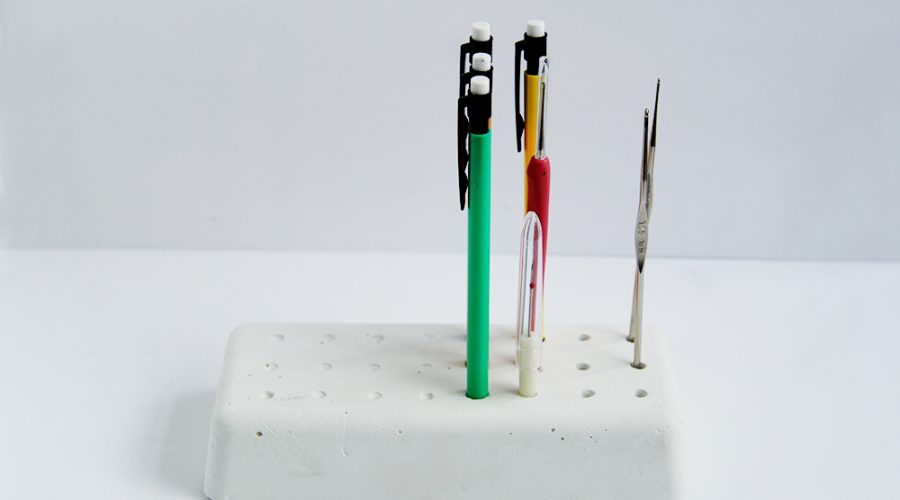
My love for marble is going nowhere. I’ve already shared a few marbling DIY’s with you here on the blog (see my Marbled Gem Stone post above) and the more I see others experimenting with the pattern, the more I want that swirly little bad boy in my life. I’ve got some idea I want to make a start on this weekend and can hopefully share with you guys soon, but until then I’m going to share my favourite Marble DIY from some awesome bloggers below. Make sure you go and check them out!
DIY Concrete Bracelets
Do you guys read Brit + Co? I’ve been a long time reader of the site and in the past year I’ve watched the website grow and become a fantastic resource (and work distraction), so I’m actually over the moon to announce I am now a freelance DIY-er for Brit + Co. How flippin exciting! The great thing about the site is that you have your own profile and can save your favourites to come back to. One of my favourites has to be this hilarious article that makes me really want to watch Friends all over again! This is… Read More
DIY Woven Wall Hanging
If you’ve ever delved into the world of knitting or crochet I’m betting you have enough yarn stashed away to clothe a small army (ok, a very small army… of children). My studio is full of bundles of left over scraps and balls bought with the best intentions so I decided to gather up a few and give them a purpose in life using my new (DIY) peg loom. I’d seen a lot of woven wall hangings floating around the Pinosphere (like that?) and wanted to give it a go! 1. Cut and thread metre lengths of a neutral coloured yarn into… Read More
How to Make a Peg Loom
It’s always really tricky when posting tutorials of two parts. Which part do I post first? The two tutorials I’m indirectly referring to today are (this post) How to Make a Peg Loom and a DIY Woven Wall Hanging tutorial that I’ve decided is coming later on this week. I’m so excited about sharing the wall hanging but thought I’d better hold back and prepare you all with the tools required to make it first! So here we are, make this tutorial in preparation for Tuesdays Tutorial. And while you’re at it come over and follow Fall For DIY on… Read More
Make it Easy: Geometric Design Zippie Purse
You guys are a savvy bunch. I’m pretty sure there’s a lot of things I have ideas for and want to make that you don’t need a full on tutorial for, like this lineal zipper purse. Grap a sharpie and draw away. Easy. Materials: Zip up Purse + Fine tip Sharpie
Fall For DIY | Enamelled Rings
I do love a good statement ring. Lately if I wear anything on my fingers it has to be something with a little pizzazz and a lot of presence! When I saw rings made from precious stone I knew I wanted to give it a go and chose this enamel technique to give them a shiny luxurious quality. I’ve also use three different ways to create the gold edging; gold leaf, gold spray paint and gold enamel paint. Pick your poison! Materials: Epoxy Putty Wire Instructions: 1. Mix equal amounts of putty until you have an even consistency. Separate this… Read More
How to Make a DIY Silicone Mould
NOTE: DO NOT USE THIS TUTORIAL TO MAKE EDIBLE ITEMS OR ON SKIN! SILICONE HAS A LOT OF CHEMICALS IN IT! I’m working on a variation of this How to make a DIY silicone mould tutorial that is food safe and you can use for chocolates and cakes etc. If you’re interested in being the first to find out about that then sign up to our mailing list or follow us on social. We’re back with probably one of my favourite tutorials that has so much potential. This DIY is something I’ve been working on for ages! Being able to… Read More
DIY Minimal Statement Resin Bracelet
Minimal statement jewellery is big news this year with oversized pearls, nudes and transparent materials being used in contrast with the glitz and glam of precious stones and sparkly details. This clean and bold bracelet oozes understated charm and is a perfect addition to springs minimal trends. Materials: Resin Container for mixing Bracelet Mould Instructions: 1. Firstly measure how much resin you need by filling your mould with water and pouring it into your mixing container. Then mark a line at the water height. You will need to make at least this much resin. 2. Mix your resin and catalyst together… Read More
- « Previous Page
- 1
- …
- 69
- 70
- 71
- 72
- 73
- …
- 86
- Next Page »