NOTE:
DO NOT USE THIS TUTORIAL TO MAKE EDIBLE ITEMS OR ON SKIN! SILICONE HAS A LOT OF CHEMICALS IN IT!
I’m working on a variation of this How to make a DIY silicone mould tutorial that is food safe and you can use for chocolates and cakes etc. If you’re interested in being the first to find out about that then sign up to our mailing list or follow us on social.
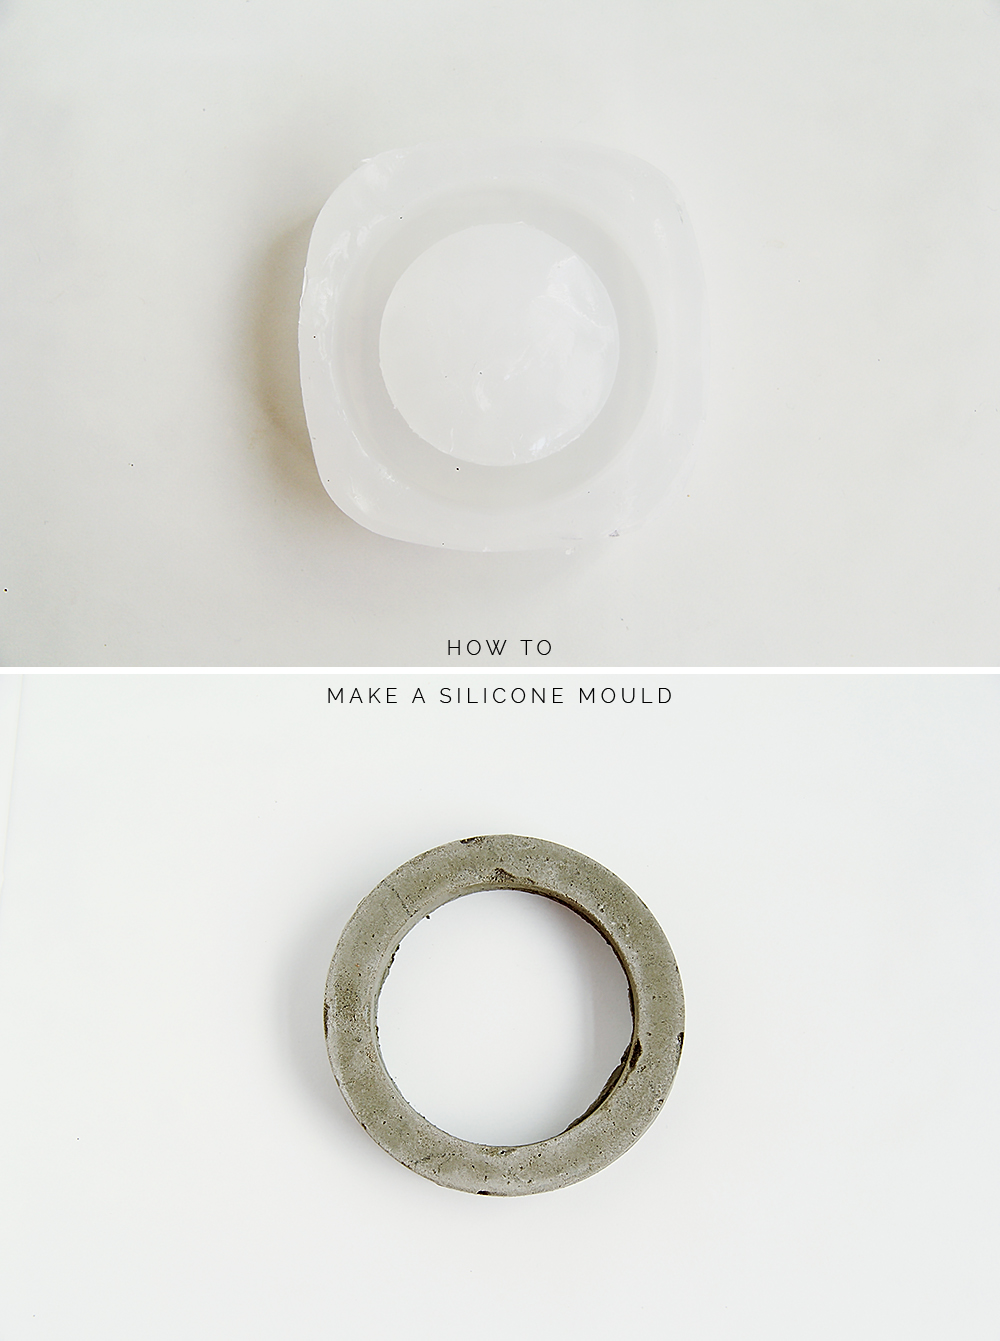
We’re back with probably one of my favourite tutorials that has so much potential. This DIY is something I’ve been working on for ages! Being able to quickly and easily make a mould means I can make clay, resin and concrete (to name a few) versions of pretty much anything I like… Think of the possibilities!
This is a really easy and fast way of making a silicone mould. You can quickly take casts of anything solid and durable, then remove it when the silicone is set after about 20 minutes! Your mould is then ready to go!
So, like I say I have been working on this for a long time. The idea originally came from this post, which was awesome but I found it a was lacking a few key details so I recreated it here. I tried several different materials, techniques and combinations so some of the details in the pictures may change – so read through carefully!
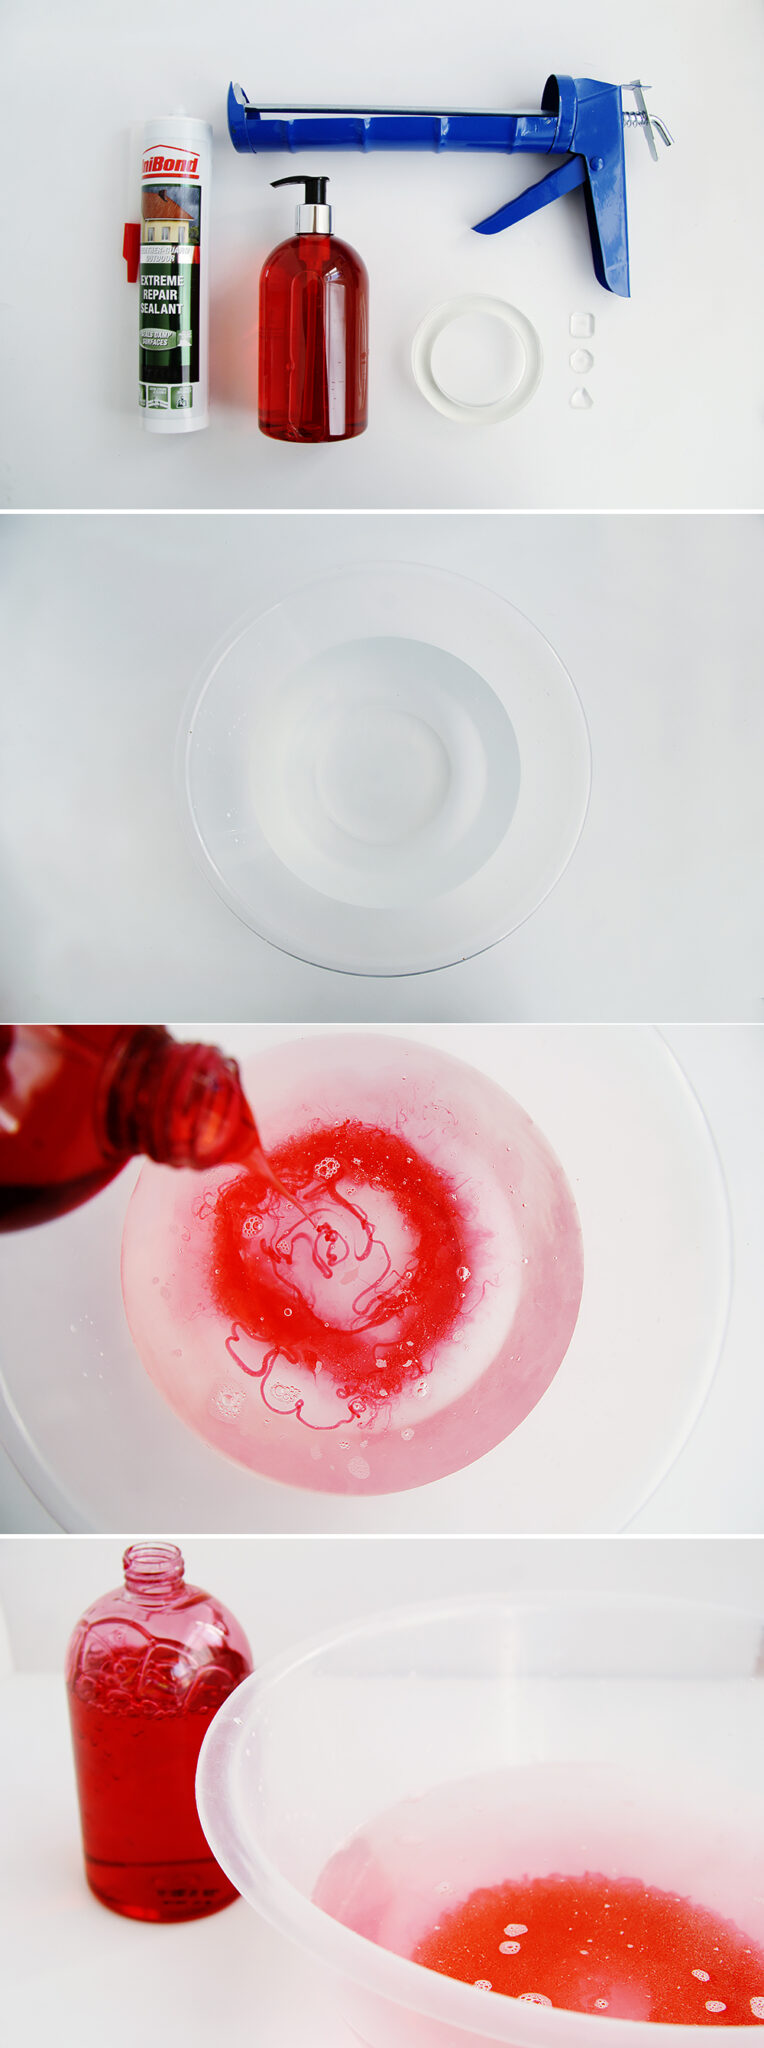
Materials:
– Silicone Sealant – So this is important. It has to say silicone on it! I tried with different sealants and some worked… some really did not. The one in the picture below worked ok, but the best I tried was a “bathroom silicone sealant” which produced the final mould.
– Latex gloves (I was very irresponsible and didn’t wear any)
– Caulking gun – to get the silicone out.
– Hand soap
– A positive to make the mould out of
– Bowl or bucket that isn’t used for food (because you’re not going to want to eat of of it again!)
Instructions:
1. Mix your soap and water together. I’ve done it roughly about 1 part soap to 10 parts water.
Whoa! We’ve changed soap colour here. This tutorial took a few times to get right, so we now have purple soap for the rest of the DIY. Like magic!

2. Cut the end off the silicone and without using the nozzle squeeze it all out using the caulking gun. If you’re making a small mould you can just use a little and save the rest for another time.
3. Work the silicone until it is not sticky. I used both my hands to pull and squeeze the silicone whilst it was submerged in the water for about 5 minutes.
4. Keeping it wet transfer into a container. This step was not in the original tutorial but as the silicone drys it gets very sticky so you want it somewhere it won’t make a huge mess! The soapy water keeps stops it from sticking to your hands so don’t dry them yet either.
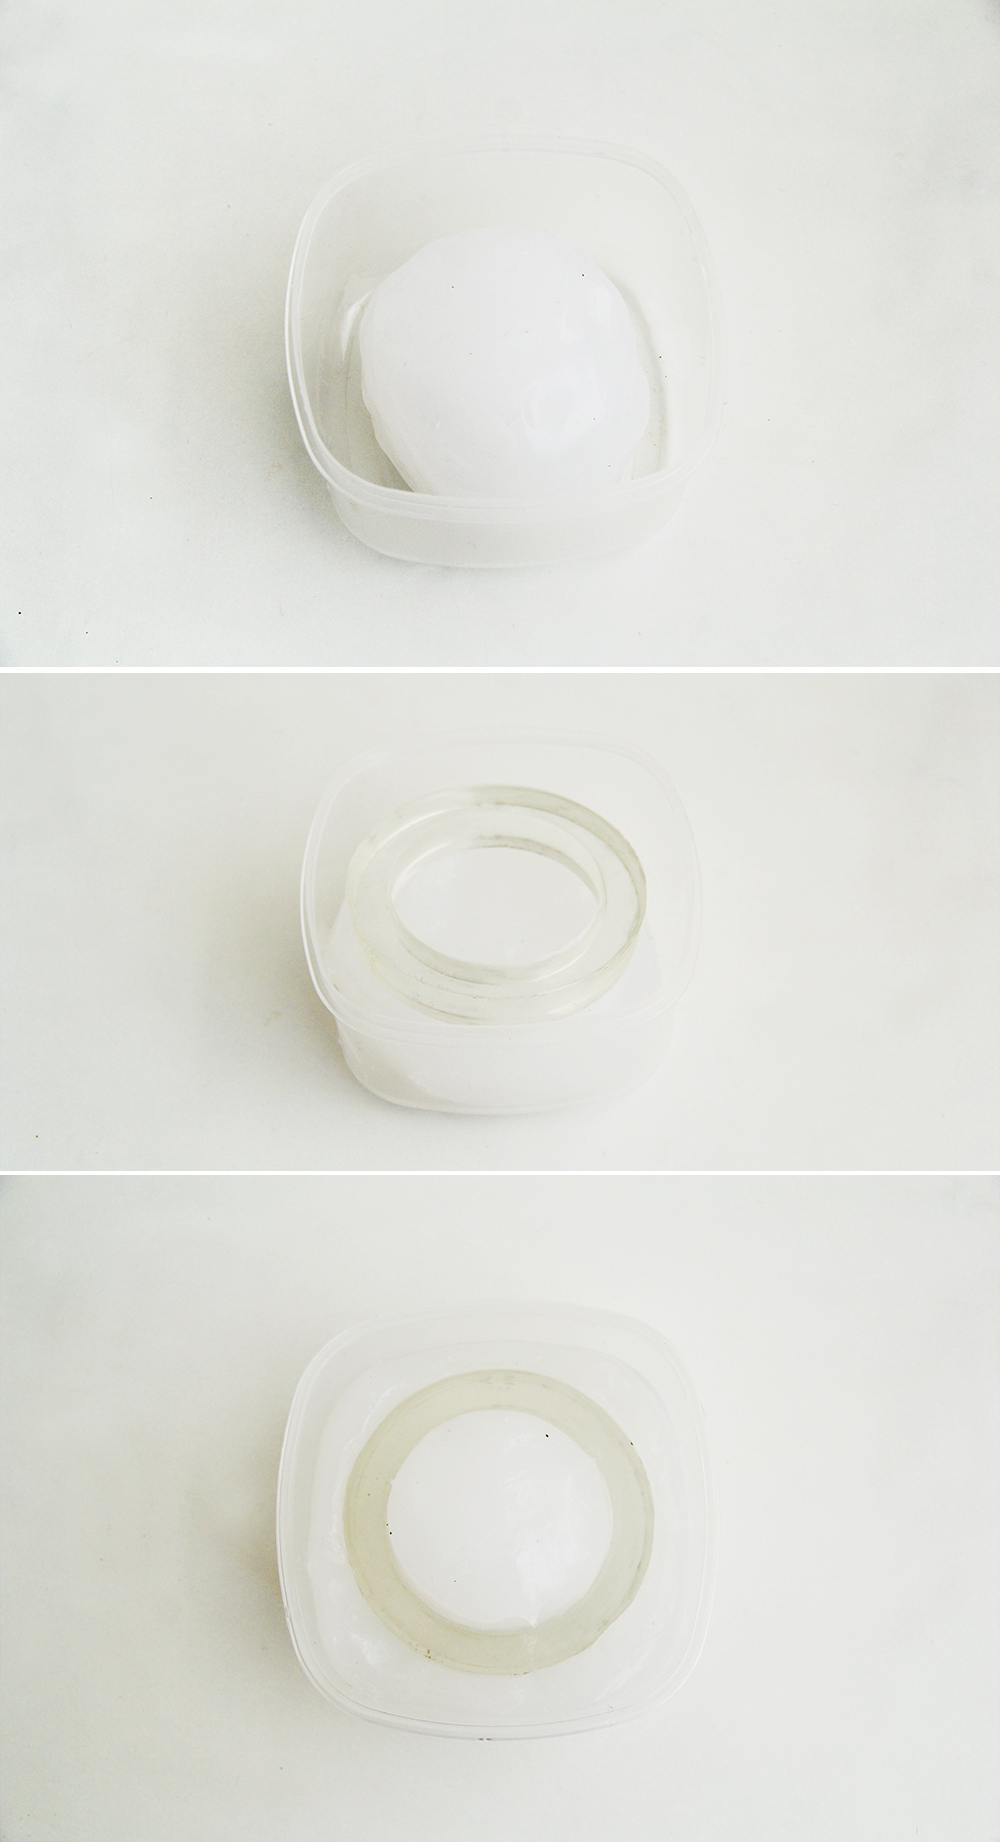
5. Press your object into the silicone to create the mould. You’ll want something with smooth edges that the silicone will peal off easily. This resin bracelet was perfect.
6. Leave the object in your resin until the mould is firm. This doesn’t take very long. Mine was set in just a couple of hours! Carefully peel the object out of the mould and the mould out of the container (so you can use it again!)
You might be wondering why I needed to make a silicone mould of a bracelet that I just made from a mould I already have…. right? Silicone moulds are ace for different materials and I needed something more flexible for a very special tutorial I’ll be able to share really soon with you! In the meantime I’ll probably be making moulds of everything I can think of, so expect to see more of this!

Click through below and follow Fall For DIY to get loads more DIY’s and tutorials like this one!


Hey, do you think this will work for candle molds? I’d really appreciate your response, thanks for a great tutorial!
I don’t see why not, but I haven’t tested the silicone with heat myself yet. I might do a few experiments and come back to you to make sure.
Most silicone handles up to 400 degrees quite easily. It should be fine. You just want to make sure you don’t have air pockets in the mold that may expand at a different ratio.
Hi I am from England, UK and am having trouble finding a silicone that will work…. I have tried all purpose silicone translucent but it hasn’t worked. Could you please offer me some advise on which brand works the best? Thank you
Hey Harriet!
I’ve used a few different brands but I normally go to Wilkinsons because their silicone is really cheap and it works well. Try the silisone with the sea lion on the tube ;)
Hope that helps! xx
Hiya, I use 100% silicone Silirub 2 which I buy quite cheaply online. Couldn’t get ordinary bathroom sealant to work.
Hi Hrriet i work in trade my self and most translucents are that good ive tried most and i recommend using decorators caulk fat hog it comes in white brown or magnolia sadly not tanslicent but id say its best bet its flexably so its perfect for molding
It has to be in very cold water ,and 100% silicone the brand doesn’t matter just needs to be 100% silicone
Wow i very love it . But I’ve seen some website mix silicone with power. What the best way? plsssssss.
With powder makes it so you can mold it around very intricate object so it wont stick and makes it malleable like playdough. you cant use quick dry for these and make sure you have time to work with it as it make take a bit to add enough corn starch or baby powder before it solidifies. You can roll it out like dough. The mold technique shown has to be placed in a container or a bowl with smooth edges so you can remove it afterwards.
Corn starch is usually used
My brother made beautiful candles using his own hand made silicone molds. He replicated textured glassware by making a silicone mold of it. The wired wick was inserted later through a hole that he drilled with a very small heated drill bit in the candle’s center. I have a white round bowl-shaped candle that looks like milk glass. It is stunning. I never could bear to burn it, and it looks as nice today as it did 15 years ago when he gave it to me.
Hi Sally. Do you know if his mold stood up to alot of pours ? I need to be able to make a mold that will handle years of use.
Hi, I was just wondering could I use this Mixture to make a mould of my hand? Or of my hand holding my daughters hand? Or would I need a different type of mixture to make a mold like that?
Technically you could but it gets really sticky and would stick to you hands and the chemicals can seep into your skin so you both would have to be wearing gloves and would have to be holding hands in the same position for 2-8 hrs!! a very long time.
Its best to get a casting kit specifically made for that.
You can make a mold of your hands using wax. (be careful not to get it too hot!) It just needs to be at a temperature to where it is melted. Cool it to about 105*. (only melt wax over a double boiler, not direct heat ‘cos it will ignite!) Have a bucket of cold water close. Lather your hands up with vaseline or lotion. Dip your hands into the wax to coat and then quickly into the cold water. Keep dipping from wax to cold water until the wax builds up into a pretty sturdy mold. Then ever so carefully work your hands out. Usually easiest for the smallest hand to come out first. You will then have a one-time-mold that you can fill with plaster of paris. You can then carefully chip the wax away or melt it. Don’t be too impatient and try to remove the wax too soon. Even thought the plaster initially sets in 1/2 hour or so, I would let it set up for a day or two. You can basically use these directions for some extra hints and then fill the mold with plaster: https://galileo-camps.com/why-galileo/blog/diy-make-a-wax-hand/
yes I am very interested in making silicone molds for candles as well. I love this tutorial but I am not sure if this silicone would hold up to the heat of candle wax and not become sticky with use.
I need to make a translucent mold of a 3D object about 7 inches tall. I tried with the silicon before on a smaller item and it never dried. Any advice?
Sorry but what do you mean by 10 parts water to one part soap and would you be able to use washing up liquid to make a mould this way to please Jacqueline mcclurg
What kind of rain would I need to fill it with if I wanted to make something similar to a pop socket.
It works pretty well on candles. I created colored and scented candles with silicone mould.
Amazing, thanks for getting in touch and letting us know. You’re making me want to make candles now. Oh the possibilities!
I saw your question and I’m sure this would be fine for candle molds once it’s been shaped and cured.
Try using high temperature silicone, should still work
http://spottymoz.com
Yes! It just can’t be Burning or Boiling Hot If this was real silacone you could put the candle was at any temp. So your anwser is Yes you can use this for candle molds!
Silicone is a popular choice for candle molds for several reasons. Firstly, it is flexible and durable, which makes it easy to remove the candle from the mold. This also means that the same mold can be used multiple times, making it a cost-effective option in the long run.
Additionally, silicone is heat-resistant, which means that it can withstand high temperatures without melting or deforming. This is particularly important when making candles, as the melted wax can be quite hot.
Silicone is also non-stick, which means that candles made in silicone molds are less likely to stick and break when removed from the mold. This is particularly important for intricate or delicate molds, where a clean and easy release is essential.
Finally, silicone is easy to clean and maintain, which makes it a convenient option for candle-makers. Overall, silicone is a versatile and reliable choice for candle mold.
This looks awesome, but I’ve got a couple of questions: Do you leave the object in the silicone until it dries, or take it out immediately? Also, how long does the silicone take to set up?
Thanks!
Hi Alicia! I completely forgot to put these details in the post. Thanks for reminding me! Leave the object in the silicone. It’s easy to remove once the silicone is set, which only takes about 1-2 hours. Really quick!
Hi,
Can you use anything you want to make a mould?
Like a polymer clay object or oreo cookie or something.
Or will that permanently stick to the silicone?
Maybe put oil on the object?
Thanks for reading :-)
Hope you can help.
Vaseline !
What if you were going to make a mold of a vase how would you do that. Or a animal
Hi, I am needing to make a mold of my daughter for her Halloween costume, I need a mold of her whole body but in parts. Would this method work and would it hurt her in any way?
Hey Kayla,
I wouldn’t use this technique on skin. The caulk has some pretty strong chemicals in it. What about using plaster of paris bandages instead?
As it cures it releases acetic acid. If you use this on your daughter, she won’t need a Halloween costume – she’ll look like a ravaged-flesh zombie for the rest of her days. Possibly with the bargain effect of some lung damage for you both.
You can buy product that are specially designed for this purpose:
https://www.dwrplastics.com/product-information/5622b19b3b079/Thixo-Body-Moulding-Rubber-1kg-Kit
Acetic acid is vinegar.
In reply to Courtney Phillips – acetic acid is vinegar yes, but vinegar is a very dilute solution of acetic acid. Less than 6% normally. You wouldn’t want anything more concentrated on your chips or on your skin because it’s corrosive.
Will this mould work on a penis? Is it safe?
Ah, so cool! I’ve been wanting to do this for a while to make resin bracelets! Also, can’t wait to see what you’ve come up with for the new site :)
I’m curious do you need to coat object with anything before sinking it in the silicone?
Hi Helen,
I didn’t coat the bracelet, but as it was resin it has a nice shiny outer layer anyway. Plastics and other hard shiny surfaces should be ok as well. I imagine any surfaces that might be porous like fabric or wood might need a layer of glue or vaseline over the top. I’ll be experimenting loads with this technique so I’ll see what I can find out!
Thanks for your question!
Just don’t try to make a mould of a silicone object. Silicone doesn’t play well with silicone!
Ha! Thanks for adding that Patrick. Good advice!
Yep! You’re right! I found out the hard way and had to throw an expensive mold away. lol
will dry silicone stick to fresh silicone? I am looking to make a mold of a sculpture, in which I hope to be able to put lets say several layers of silicone one by one to make the mold thick, and then I will make a mothermold out of plaster.
just wondering what materials could be used as a food grade source.
buying molding kits for fondant etc. are expensive. but some of those molds are also silicone. or even using the rubber dip that you can find have you tried that as a molding source? TIA
Hi Catolie,
For food grade silicon, I am using Amazing mold putty. You can buy it easily online. It is working well with fondant, resin, clay and you can bake it.
Have fun :-)
Fantastic! Thank you Eve x
Hey,
I’m pretty sure you can’t use this silicone with food items. The smell alone is a bit chemically. I have also bought silicone molds for fondant, but I’m afraid I don’t know how you can make a safe mold for food. Have you tried pressing shapes into compact brown sugar and using this as a mold?
Please do not advice something you do not have any knowledge of it.
Silicon for food uses and the Silicon for windows as a very different chemical with in.
Silicon for windows will keep bacteria on the surface… When a Silicon for food use will not.
If people get food poisoning after your advice you will be Unfortunately directly responsible.
Please don’t be lazy and do the minimum research and don’t advice on a hunch.
Hello Maxim!
If you read through the comments you’ll see I have advised very strongly against using this with food. I have used it only for clay or concrete to create jewellery or other small trinkets.
Maxim perhaps you should fully read comments before responding. She wasn’t remotely telling anyone to use this on food safe items.
How dare you call her lazy LMFAOOOO when you were the lazy one not reading her comments to see she did NOT advise using for food. Cheesh.
Fran NEVER advised anyone to use hardware store silicone for bakeware or on skin dummy . Did you even read any of her replies when people asked??
She did not advice using this with food or on skin
She has commented several times about NOT using silicon for food!! Read all the post before jumping in on someone’s conversation and being completely rude and uncalled for.
You can make a mold for fondant from fondant. Use some of your old fondant (use your older stuff for this) and dust with cornstartch. Stick what you want to mold and take out and let dry. I saw a video on youtube. The lady use practically anything–mcdonald toys, toy cars–whatever you want. Paint and you have a great fondant decoration for your cake.
Any 100% silicone should work for food. If it needs a very high heat you should buy a silicone for that. The caulk smells like vinegar because that is the major curing ingredient. You can use it for soap molds too. If you mold an ore cookie the worse problem will be cleaning nasty cookie out of the mold when you make the mold. After it’s made the mold will work like any other baking silicone dishes.
you can also use silicone sealant and cornstarch.. dump cornstarch on a smooth surface.. the pump out the silicone sealant, enough for what ever you need to mold. knead the cornstarch into the silicone adding cornstarch as needed and work it until it isn’t sticky. lightly coat whatever your going to mold with petroleum jelly or spray lightly with cooking spray and press into the silicon and leave to dry/cure. it works for lots of small things such as pendents for jewelry etc.
Amazing! Definitely need to try this. Thanks so much for sharing!
That is a great idea. Would you know whether any brand of silicone works or is it only specific ones
Hey Cherie,
Thanks! Just make sure you get one that has the word “silicone” on the tube, but I think that any brand is fine. I usually use the cheapest ;)
I did an ornate oval frame with both recipes. Due to the size of my project I used an overlay rather than a press method. I found the soapy water was not as messy to prepare, it was quicker and much easier on the hands.. With the soapy water method you can pinch off pieces and add them to the mold without causing lines. The cornstarch recipe worked very well but it had to be done in one large application or it formed lines in the mold.
Are u able too paint the items after it dries?
The silicone needs to state on the packaging that it is paintable otherwise the paint won’t stick.
Hey Demetria,
I think it depends on what you make the item from. I’ve used a lot of concrete which is absolutely fine to paint. See my Color Block Concrete Bracelets for a example :)
One quick comment to piggy-back on something that was already said. Do NOT use kitchen or bathroom silicon sealant for anything that will touch food related items. These sealants have chemicals to prevent the growth of mold (like cyanide!! YIKES!) mixed into them.
Thanks for clearing that up Tony. Definitely don’t want those things to be touching food! Also probably wise to wash your hands well after you’ve been making/using the mold as well.
If you use nitrile exam gloves (like the kind that are used in medical clinics now in place of latex), that will protect you from the chemicals you might be exposed to if you handle the sealant for extended periods of time. :-)
Clear 100% Silicone for use with aquariums is food safe!
That makes sense to me since fish are ultra sensitive to chemicals.
I am making candy bars and other types of chocolate candies. The molds in the store dont have the shapes i need so when i saw this i was excited until i saw a post about not for food. So what kind do i use for food again. I think i saw it in a post but could you elaborate on it this please. Thanks
Thanks for this. I have been looking for something to use to make a dolls head mold. I live on a mountain miles from anywhere and find it hard to get supplies but I can buy silicon from the local butchers!!
Will give it a go :)
Fantastic! So glad to hear this is useful. Thanks for commenting! :)
This is exactly what I was wanting to do, but using concrete to make faces for a mosaic. Did this work for you?
There is a silicone that is heat resistant, we had to use it when we installed our pellet stove. This is such a great idea. Thanks for sharing!!!
Hey Kelly! Thanks for that pearl of wisdom. Heat resistant silicone would be perfect for candle making… the options are endless! :)
Hi, this sounds fabulous !! Would the moulds work with polymer clay do you think ?? Also are they flexible when they set so you can get the object out easily ?? Thank you.
Hey Pat,
Yes! I’ve used them myself with polymer clay. They work brilliantly. The reason I wanted to make silicone moulds is for making objects out of concrete. I needed something flexible to keep the concrete intact when I was releasing it. These moulds are perfect for that requirement. I have also popped the mould, with clay set inside, in the freezer for half an hour to make it even easier to get the clay out before heating. Works a treat. Hope that helps!
FREEZER! Brilliant idea to get the poly clay out before baking! Thanks for mentioning that!
I have been wanting to restore an old mirror with plaster framing there are several places where the plaster has been broken off it was always one of those how can i do it projects. now i know i’ll make a mold of a good section . then pour plaster into that and glue the dried product to the mirror then paint and gild it. Won’t my friend mate be surprised when i restore her special floor length oval mirror. She asked me years old to fix it now i can. thanks
I have repaired several old frames and mirrors. I use a rubbery mold marterial I buy at a craft store. But instead of using plaster to make the repo. parts I use Creative Paper Clay. It’s strong and carves and fills in bad spots with a little water.
You need to use cornstarch or talc as a mold release. pat
Thank you for your reply Fran, I must have a try with this !!! Thanks for sharing it with us xx
Hi, does anyone know if this would work for pewter. I want to cast pewter.
thanks
This would be amazing. I have absolutely no idea myself. I’d love to know though.
lost wax casting …. sand casting … molten pewter vs silicone ? hit the library or utube GOOG LUCK LET NOTHING STOP YOU BE SAFE ; )
lost wax casting …. sand casting … molten pewter vs silicone ? hit the library or youtube GOOD LUCK LET NOTHING STOP YOU BE SAFE ; )
Hi, do you or anyone else know if this would work to make soaps as well? Thanks.
I have never made soaps, but I think it would. That’s something I’d really love to do… I’m going to do some research!
Yes these handmade silicone molds will work for soap. Works great to make embeds for your unique soaps!
I do wonder about the chemicals causing skin reactions if you are making soap. Some purple have sensitive skin. I did see something above about aquarium sealant possibly being safer. I would defiantly read the warning lables and take those in to consideration when making food or bath and body products.
That’s what I wanted to know Linda!
Jaclyn – Pewter melts at 340-450 degrees. If your silicone is good to only 400 you might have a problem, but if you find some that is for heat resistant , like Kelly mentioned.
Well, from everything I have read, why not use a silicone mold to make a cement mold, then use the new cement mold for the pewter casting …. just a thought
Thanks Diana! These are all processes you can do easily at home. If anyone tries this out I’d love to see the results!
Diana, the double-mold process works great. I’ve used it many times to make plaster molds for glass casting. The plaster molds are destroyed by heat needed to melt the glass, but the silicone mold they’re made from is good for many, many reuses.
Fran, good tutorial, thanks. Gonna have to check out the rest of the site.
ive gotten all the stuff to try to make a couple molds for some buttons and maybe some pendants. how do you store your molds after youve made them?
karrie, anywhere cool & dry will be fine. As long as the mold is completely cured, it won’t stick to a shelf or whatever you set it on. Any dusty bits that settle on it after a while can be rinsed off with plain water before using.
this just blew my mind…. thannnnnnnnkyoooooooooou
Awesome! Do you think it would work for a mold of an actual finger? Any tips?
I made a soap hand using a disposable kitchen glove. I poured the soap in a bit at a time, waited for each layer to cool & set only enough so I could adjust the pose of the fingers & the hand. Then the next layer, etc. Temperature of the soap had to be warm enough to pour but not hot enough to melt the previous layer’s shaping on contact. A slow process, but I was also able to press in features like nail edges & crease lines at the knuckles, before the soap completely set. It took a few days.
I’d tried to make a mould out of dental mould mix as the amount of latex required would have cost too much. It would have been great to have known about this silicon method… except that keeping a hand in the setting silicon for 2 hours is a big ask. And would the mould have to be cut in 2 pieces to get the living hand out? (& the soap hand too)
cest beau ce que vous faite etr je sai je suis tres interer de faire et de creer des modeles car je sui sure de faire mieu et meme plus mai jai pas les moyen de materiel sasserais tres reconnaissante pour la puit que vous me raporterais, mercie manque ces creation et ideé et model et nous avons bon acheteur,
mon portable :00213698586348
facebook;farrahfati
mercie
Heya,
Just wondering whether anyone has attempted this tutorial for a two part mould and used anything like porcelain slip? I would really love to make ball jointed dolls, which means making two part slip moulds to achieve hollow body parts, but I can not bare the concept of the expense for a liquid silicon mould kit!
The tutorial is fab by the way- I will find some use for it whether it is the above described or not, I have no doubt xD
Hey Emily,
I have not tried anything like that. Hopefully someone might comment who can help maybe?
Thanks for your lovely compliments about the tutorial though. I hope you fins it useful!
x
Hi Emily, and excuse me Fran if I step right in with an answer. I am not sure silicone moulds would work with porcelain slip, as the point in getting hollow parts is making the porcelain powder in the slip adhere to the mould walls while the liquid part of the slip gets soaked up by the mould itself, which therefore should be quite porous to do this. I used to cast tiny miniature cups using gesso moulds and don’t know of any alternatives that work as well.
Fran, great tutorial indeed! I am quite a heavy silicone mould user and will surely give this a try! Just a question: does the silicone dry up even while in the soapy water or does the water keep the silicone workable a bit longer?
Thanks again!
sorry, I meant PLASTER moulds, not gesso :S
I don’t think this would be good for clay as the plaster molds used for ceramics absorbs the liquid allowing the clay to set. silicone would not allow for that and it would take a day (or more) to get enough thickness to pour out the excess. Would be great if it would work huh?
I wonder if this would work to make mold’s of leaves for doing concrete,etc. In the winter I have no leaves to work with,this would be great if it would work. What do you think?
Adorei, venho tentando fazer moldes nunca sai bom o seu e perfeito.
Obrigada, um grande abraço.
I am going to try this for making some molds outta of some buttons and maybe some pendants. what do you store your molds in after your done using them?
Hey Karrie,
I love that idea of using buttons to make moulds. You could make some really interesting things out of those! I just throw my molds into a big box. As long as they don’t come into contact with any sharp objects they should be fine.
fantástico, siempre quise ese molde.
Really nice tutorial! I have been trying to make molds for a while now and I bought some liquid silicone but it turned out to be to expensive and tedious. Do you think I could make a two faced mold for plaster with the example you just did? Im thinking of just covering my whole object and then just cutting out the silicone in half when is done. Or is the silicone to hard? thank you!
Hey Catalina,
This silicone mold is perfect for this use. The silicone is soft and easily sliced with a craft knife. I have not tried it myself but I think you can definitely use this technique to make a two faced mold xx
Does this mold stay flexible so you can make a mold of a solid object can be fully incased with the silicone mold material can be crafter the material sets, with a razor blade directly down middle starting from one side and around to other side leaving bottom of mold untouched.
Yeah, it’s really flexible. If you check the comments I wrote a little bit about this somewhere. But basically it’s perfect for that sort of use :)
I just this moment just made a mold using this method. mine set up in less than 30 minutes. I ended up using the whole caulking silicone and it was not enough for a large bangle. I have been searching for a way to make bangle bracelets and I like this tutorial. Before I seen you site and example I had an idea of doing just this method. I just did not think it would work. I used a very cheap dish liquid from the .99 cents store and in my opinion all dish liquid will work . Mine had a chlorine alternative. I do not know if that had to do anything with the quick curing silicone. Any way that this is great I will me making me another bangle mold this afternoon. i use thick and thin masking tape as my bangle object. Masking tape is great for a medium to large adult size hand.
Good to know the cheap dish soap works. I’ve seen more than one article stating must use Dawn Original which I bought for mine, in the future will try the cheap kind. Why pay more than you need to, right? Thanks!
Thank you so much! This tutorial is priceless.
I have a cascading fountain made of very large concrete elephant ears. Over the years they have begun to crack and I’ve patched them many times. It’s getting to the point that I think I should just make new ones. The existing ones could be used to make the molds. How can I make molds of something large like this? Probably 2 ft wide by 3 ft long. About 1″ thick. Thanks!
Hello,
I have a human skull that I would love to make a mold of. Do you think this would work on a larger object like this? I thinking making two and piecing them together, would I need two tubes of sealant? I do not mind covering the skull in Vaseline for the process if I get a good result, the bone is ancient so it would probably do it some good!
Any advice before proceeding would be fantastic.
Jen
I have just seen a previous comment from Kristie, I will try covering the whole skull and then cutting in half to remove. Any suggestions on how to attach both parts together? I have read may options like wet plaster and PVA, any suggestions?
Hi Jen, I use modeler’s grade two-part silicone for my moulds: I can cut them up and the two parts stick together again with no problem at all, I only need a rubberband to keep them aligned while pouring the casting material in. It’s true I work in miniature and my moulds are quite small, but the properties of silcone should stay the same in any scale. Don’t know if this is true with the sealant kind as well, but it could be worth a try anyway.
Hope this helps!
I have worked with a variety of silicones for moulds. For casting pewter, I suggest you find a company like Silicones, Inc in High Point, NC. They make a silicone for pewter casting that works much better than an ad hoc mold, particularly if you want to make a two or three piece mold. Always, be careful there is no water anywhere in your mold if you cast pewter! Water instantly turns into steam and explodes then metal outwards. In bronze casting, aluminum cast, etc, it is always common practice to preheat any metal or tools that will go into molten metal or heat shock will make the molten metal explode upwards. It is one of the most common ways people are badly injured in foundries. It is not so bad with pewter, but much depends on how much and how hot your pewter is.
Food grade silicone rubber is very expensive because it has to be made in an all stainless steel environment subject to surprise inspections by the FDA (the same is true for companies making restaurant equipment) Making an entire manufacturing line over again in all stainless steel is very expensive.
Silicone calk is a two part catalyst material. Acidic acid (know as vinegar) keeps the hardening agent from interacting with the silicone material. If you apply a thin layer repeatedly to an object it may go faster, or at least with fewer air bubbles. Too much caulk flopped together means the vinegar drys on the outside, allowing the outside to harden but keeping the inside squishy. Thin layers avoid that problem. Afterwards, make a back up mother mould to keep it from flopping around. I use plaster.
Your caulk will go further with this method if you’re trying to stretch your material (pun intended.)
Joel Haas, sculptor
Raleigh, NC
I forgot to add in my info about pewter casting—make sure there are “vents” or “risers” cut into the mold. In other words, as metal goes into a mold the air has to leave the mold. If air is trapped or compressed in a part of the mold from which it cannot escape, the casting will have what’s called a “cold shut.” That is, the casting will be incomplete because the trapped air’s pressure was strong enough to hold the molten metal back. A vent should be cut into one side of the mold (I generally make two or three piece molds) with about a 1 mm groove coming off the edge of some part of the casting. The groove widens just a little bit before opening at the top of the mould.
http://www.silicones-inc.com/
http://www.polytek.com/
As for mould making and making some larger items, I recommend casting aluminum in green sand. (No, green sand is no more green than green cheese–green simply means not aged or uncured). If you have a friend or spouse with some basic woodworking equipment, you’ll be surprised what you can make. I prefer to use aluminum from lawn chairs or awnings–it has up to 7% copper in it, making it much stronger. Drink cans are made of pure aluminum because it is so soft it can be punched into super thin sheets. They’re often full of residual liquid, so dry them out first.
I suggest checking out some amateur sand casting web sites.
Don’t dismiss the idea out of hand, women especially. When I was in welding school right after the last dinosaur died, a third of the class were women. The same was true a few years later in the blacksmithing classes. In fact, several presidents of ABANA (Artist Blacksmith Society of North America) have been women. Almost all metal working is about how smart you are, not how strong you are.
http://www.myfoundrycoach.com/(Australian site, but still excellent for the States)
http://www.myhomefoundry.com/ (Australian site, but still excellent for the States)
http://www.abymc.com/
http://www.castcraft.com/index.htm
http://foundry101.com/
http://incolor.inetnebr.com/bill_r/fun_with_molten_metal.htm
http://www.backyardmetalcasting.com/index.html
http://www.foundry-supplies.com/
http://www.onlinemetals.com/index.cfm?affiliate_id=1014 (small orders)
http://www.freemansupply.com/
An excellent newsletter and series of books on sand casting with aluminum is sent out be the Australian foundry man Collen Croucher.
Well, that’s too much for today!
Joel Haas, sculptor
Raleigh, NC
Joel, Thank you for this in depth info!! I am a dinosaur myself and truly want to learn welding!! I want to make metal art object for yards!! This mold process sounds relatively easy but the one you described sounds like it’s more of a detail oriented process which I’m really good at!! The devil is in the details, my dad always said!! Lol
Use aquarium grade. Its considered safe for food contact when cured, unlike the construction grade that contains chemicals to kill mould and fungus growth. The kitchen and bathroom grade is the most toxic!! to prevent mould growth in the wet conditions of those places.
Thank you, Barry! Excellent suggestion! That should be safe for my natural soaps. I wouldn’t want to expose it to anything that could possibly be harmful.
Thanks for the great tip Barry!
Do you think it could handle heat up to 200 degrees?
I’m sorry if this has been suggested, I couldn’t make it through all eighty comments.
If you had access to a 3d printer, you could create any pattern you wish, within the constraints imposed by the process of mold making. For geometrically complex patterns, you may need a mold release agent.
I would love a 3D printer!!! Dreams for the future ;)
Hi!
This technique looks really great! I can’t wait to try it with some objects. However I’m wondering if you or anyone checking out this forum, has ever attempted to make a mold out of an already existing mold? I already have my negative made out of foam, but I would love to make a new one out of something more durable like silicone (since the foam is not in the best condition anymore after making many plaster copies). If I make a positive with silicone in my already existing foam mold and let it dry, do you think it would be possible to try to make a new mold from this object with the same silicone material? I would totally appreciate any insight, advice, tips, comments?
Hey,
I’m no expert but if you read through the comments I think this has already been discussed! Sorry I can’t be more of a help…
Silicone sticks to silicone. Separate with mold release like petroleum jelly and you will be ok.
do you think I would be able to make a berries mold… Say out of raspberries? or maybe something firmer like strawberries? or is the silicone too stiff?
Yes you can use fresh fruit to make molds this way
I want to make positive molds of 3D items such as shells, starfish, etc. Any suggestions for making a mold that has form and design on both sides?
Gostaria de comprar o silicone vc vende? Obrigada.
white background on photo made it impossible to see what object was molded
Hey
I would like to know if the silicone mould can create objects based out of PC-ABS. I found this link which mentioned processing conditions for the PC-ABS resin – http://www.viewmold.com/Injection%20Mold%20Management/resin%20processing%20condition/PC_ABS%20processing%20condition.html
The object I am longing to create is a pair of headphones.
I have a 3D printed positive made out of ABS. With that I can shape the mould but I like to know your opinions and advice as to have a pro set in hands.
Thanks.
eons ago I used a mold to make candles but here’s the great part…I used finials like from a bed post to make the mold…The candles were amazing!
Dziękuję za podzielenie się pomysłem! Wszędzie szukałam, jak można zrobić własne formy do żywicy. Zamierzam zrobić trochę wlasnej biżuterii.
Na pewno wypróbuję :)
Fantastyczne. dziękuję Lidia x
Trying to make a mould for a lego piece for my sister. Thanks for that, I have tried other methods but they didn’t work. Will try this method soon but exactly how much soap and water. Thanks xx
I love your information on making molds. I have a small toy dinosaur that fits in my hand and would like to make a mold of it. Once I have the mold made what can I use to form my new dinosaurs? Will air dried clay work or what do you suggest? These dinosaurs will just be painted and set on a shelf. Help!
Which bathroom brand did you use? The only bathroom specific one I could didn’t work. I saw later on the tube it read that it it supposed to stay tacky.
Hey, nice tutorial. I’ve been experimenting with this over the weekend and have gotten some pretty great results. :)
I have a question though. Is it safe to bake the molds in an oven? I’m not using this for food, but I do plan on molding stuff out of polymer clay, and to avoid potential warping of the shape, I’m hoping to bake the molds in the oven, with the polymer clay still inside. The silicone I used is resistant to at least 250C in temperature, so that isn’t an issue, but I’m worried the silicone might release harmful contaminants into our oven while it’s baking.
Have you tried baking your molds before?
Wow, amazing wealth of information. Joel Haas you really contributed some great info. Thanks. I’m so looking forward to doing this. I have been wanting to make a dog/cat tic TAC toe board for outside use and this will be perfect to cast concrete pieces. Thank you all so much.
i made this mold yesterday and the mold is still not dry yet(its still sticky), did i do something wrong? If so, do you know of anyways for me to remove the object from the silicone?
I had followed the same instructions using GE 100% silicone II in the color white and had used dawn soap. when i had pressed the object into the mold, the mold did not stick to my hand but it did stick to a different object so, i had placed some soapy water on the object before pressing it into the mold. now as i stated before the silicone still has not dried over the course of 12 hours:(
Hey Daniella!
ARGH! I can feel your frustration. Everything you have done sounds correct and in my experience the silicone would have dried by now. My advice is to leave it a little longer. That type of silicone might just need more time. In the end it will stop being sticky (otherwise what would you use it for!?) and you should be able to remove the object without having the wash off the sticky silicone.
The only thing I can think of for the future is to spend more time kneading the silicone in the soap or a stronger soap/higher concentration in the mixture. I hope it sets for you really soon!
Fran
With the GE caulk, it took weeks for mine to set up to feel firm then it relessed the positive fine.
You need outdoor 100% silicone, as it is being exposed to water.
Привет!!! Можно ли сделать форму для винтажного,декоративного ключа ?Нужно наверное две половинки слеить ,чтобы получить полную форму ключа?Благодарю!
Just some thoughts on silicon. It is a mixture of carbon (from wood) and silicate (from stone). When it cures it generates acetic acid (vinegar). I don’t know that adding vinegar will accelerate setting time.
Silicons adhere best to smooth surfaces by a vacuum. I would put oil on something valuable before coating with silicon. I think the soap in this mix insulates the plug. silicones have a water demand so added water probably helps the setting. They can stretch about 4 times their original length.
I’m curious. What is the purpose of the hand soap? Does it have to be colored? Or does the color help you see the clear silicone?
Hey Roseanne,
The silicone reacts with a chemical in the hand soap which speeds up the setting process. I don’t think it has to be a colourful soap but I’ve not tried it with colourless soap so I’m not 100% sure of that. Thanks for reading!
Fran
Thanks so much for the reply. Well, I tried this yesterday and it was an epic failure. The silicone totally stuck to the gloves (medical type) that I was wearing, and I ended up with more in the mold than in my container. I needed it for several minutes and it just never seem to change texture? Finally I gave up and slapped it in a plastic container and shoved in the item. It did pop out of the container this morning, but there were tons of air bubbles. When massaging the silicone in the water, it looked nothing like your photos! It was real stringy. What brand are you using? I know I bought silicone sealant. Any ideas?
Thanks again!
Roseanne
Ive seen silicone used to make fishing flys, the bloke painted the silicone from time to time using Photography Fixer (whatever that is) which made it set immediately allowing for more work and more additions instantly. (just sayin)
Por favor quisiera saver mas de los moldes de silicona pero no entiendo no hablo ingles gracias
How we’ll would this hold up if I was to make a cosplay head piece with it?
I enjoyed reading your article! Thanks for the tips! Just want to add: use RTV or “Room Temperature Vulcanizing” silicones that are mixed in two parts (a base and a catalyst) to induce curing. Its high tear strength makes it the choice of professional mould makers. When creating your own mould, there will need to be a positive and negative item. A positive item is an item that is duplicated for multiple uses. For instance, the positive item would be a bracelet, pendant or toy. The negative item is the mould of the object you need to replicate. When the silicone mould has finished setting, and the original object has been removed – this would become your negative item. Having a reusable mould saves you time and energy in duplicating your products, which is critical for any business (or crafter) hoping to keep their bottom line down. Read more here: http://dalchem.com.au/how-to/how-to-make-silicone-moulds
Oh, you have inspired me so much! I was cruising the internet looking for ideas on a kitchen reno that I’m doing and want to make something out of paper mache’ and thought I would need a mold to accomplish what I was thinking. THIS IS PERFECT! With this technique I am going to make antique tin ceiling tiles out of paper to finish a very ugly kitchen ceiling. The silicone mold idea is perfect and I can see my vision coming to light! I ordered one tile piece that I will use to make the mold and have already targeted the paper mache’ recipe that I will use. I will post pics of what it turns out to look like!
brillant! I have 24×24 tin ceiling tiles that I could use! Please let me know how it works and the process ! OMG ! The things I could do with this! Thanks for the ideas !
D.
Hi,I want to reproduce river rocks as soap,either cold press or melt and pour and was wondering if that would be possible using silicone. I realise I will have to leave just a small opening in the mold and be able to sort of peel the mold off the rock nearly turning the mold inside out in preference to cutting it open which I would then have to join before pouring soap into mold making it messy and with a join line I don’t want. Any ideas anyone!!!
When the mold has “cured” is it fully cured silicone or is it still fragile and mushy? I’m not in need of making stuff from the mold but the mold itself for a piece of art and I need it to withstand some abuse from people handling it. I’ve tried just using straight silicone without the soap and water but it takes way too long to cure.
Someone did mention Oogoo somewhere. By mixing cornstarch with silicon you get water right into the silicon and it cures quickly. Small batches as it sets fast. Build up in layers. Google Oogloo. Good luck.
Thanks Max! You’ve got me watching videos on Oogloo now ;)
Thanks for this great post. I’m gonna give it a try!!
Hi! I
was searching for a way to make a star wars cake mold for a birthday party , i couldn’t find what i wanted and other related molds and cake pans are unreasonably expensive…. I read the comments but still no sure which material is the safest for cakes.
I will be so glad if you can help me based of your experience… :)
hmmm… not too sure about this one. Try researching Sugru perhaps? Sorry I can’t help more
There are special silicones for gluing fish tanks, non poisonous and food safe.
Thanks for all the knowledge Tempo! I need to find myself some fish silicone ;)
Si fuera una persona racional, debería haber
previsto la posibilidad de una situación como en la que se halla.
I would like to make molds of hands…will this work? Please tell me there is a way
May I ask, I want to make candle holders out of cement can I make a silicone mould and then pour the cement into the mould. … the mould that I want to make will have a few rounding in the shape , to take of the mould from the cement object , do you think I can just rolled it down.
Fab tutorial! Ive seen this before with all usa crafters using ‘blue dawn’ hand soap…. Which I cannot find for cheap in the uk. What hand soap do you recommend? Does it need a specific active ingredient??
Thanks!
Hey Emma!
I used the absolute cheapest handsoap I could find and it worked every time! I don’t think it needs a special ingredient but perhaps buy a couple of different brands to try out? x
It was interesting.
I scrolled through rather quickly looking for comments on making silicone molds for making stepping stones. I plan to use various leaves as patterns. The two inquiries I noticed did not have a reply. One was exactly what I’m wanting to do. Gather leaves during the summer, make my molds and when we build our house this fall, have my casts ready for left over concrete after pouring our foundation. I hope someone can advise.
Hey Sue!
By the sounds of it I think your project would work but it depends on how large you would like the stones to be. The silicone is ideal and cheap for smaller projects but when scaling up it might be more cost effective to go with more traditional casts. Also I’m not sure how much of the leaf detail you would preserve. However as I said, the materials are cheap to buy so you could test it out first before committing to the full scale project.
Thanks,
Fran
Hi can you please tell me can I use this recipe to make silicon mould for cake lace will this work or not? And can you use any silicon u use in bathroom tiles or it’s different thanks
Hey Lubna,
Don’t use the silicone for food use! Lots of chemicals you definitely don’t want in your cake! I think you can buy cheap moulds that are great for making lace on cakes.
Thanks! xx
Do you think this would be possible to use on fabric items such as pillows or stuffed animals? Would I have to coat the item with something before applying the silicone?
Hey Casey!
That’s a tricky question to answer. I’ve only tried it on a small scale with non-porous items so I’m not sure if it works on fabric. Perhaps if you waxed the fabric first? It would be worth doing a few test runs on a smaller pieces to see the results. I’d love to hear more about it! :)
hi. i’m from the u.s.
i’m late to the party but i recently made a silicone mold using this method. i was wondering if the vinegar-y smell ever goes away? or will the mold always smell like that?
I just tried this…several mistakes. I used too tall of a container which made it super difficult to remove. The areas where I embedded my pieces had a lot of bubbles. How do you get it smooth?
Great guide this – esp about the ratio of soap to water.
I am going to try this to make a mould of a tractrix hifi horn. If you imagine a large continually curving / opening vase.
The volume is quite large, around 3 litres (I checked by filling it with water, so I will build up the silicone in layers I think, so each sets.
Question is at what point / thickness to release the mould from the horn? Too thin walled and it will not retain it’s shape, too thick or solid I may never get it out. I will use Vaseline or similar to try to prevent the silicone getting too attached to the object. It will be an inside mould but the end is open about 1.5″ so I can push it out from there and work at it.
I’ll try getting some smaller samples to cure first.
I understand that it’s the glycerine in soap that acts on the silicone to speed up setting.
Once I have my mould I will lay up gel-coat and then 3-4 layers of glass fibre resin, which I am used to working with.
Here goes…
I need a mold of a light bulb. do you think this will work?
Is the smell really awful? because I made it and almost throw up because of the chemical smell.. is there any particular brand that has less smell on it or its normal for it to have a strong chemical smell?
I want to make a mold of brick so I can make my own thin brick. Will it work for that?
Thanks from Ireland for sharing this fran and also to everyone that has added their knowledge and ideas. . I’m so excited, but doubt I’ll get much sleep tonight thinking of what to do as I have a lot of sad furniture that I plan to update with plaster mouldings xxx
Great Post..
I Really enjoy reading it.
Keep sharing it here.
Great Post.
Keep up the good work.
hi, just wana share somethng too, if you dnt want your mold sticking on to your end product try brushing your mold with color guard, its what we dental tech’s uses to keep our cast mold from sticking from dental matirials when we are processing it,, and thanks ms.Fran for the tutorial, i can use it making decorative molds,
by the way dont mind the miss splells okay,,, lol,,
You shared useful information. But now I’m trying to do some more research into silicones that will haves a more forgiving mold life.
Any ideas about changing the color of the mold (silacone). I think it would make it easier to see any imperfections. Thanks for the ideas. Good job!
Hey John,
A great suggestion. You can get so many different colours now that would make it easier to see the imprint! I just like the clear ones because I think they look good! haha!
Just to let you know Fran… I’m jumping into this DIY thing with both feet. You’ve inspired me with the quality of you process. The amount of your followers is impressive and the time you take to follow up is a credit to dedication. I’ll be making molds, soap, and candles and following you example. I see blog in my future!
Yes John!
Thank you so much for your lovely compliments and I wholeheartedly recommend starting a blog. Please let me know when you do. I’d love to read more!
Fran
Oh this is just too awesome for words!!! i came across this yesterday and decided today to read through the comments. Many thanks to you Fran…I was looking for something this easy and economical to try molds. And thanks to everyone for all the additional tips and suggestions. Great help!!! Have you, or anyone else here, tried pouring UTEE into one of these molds? UTEE melts to 350 so I was curious as to how the mold would hold up or react. I would love to hear about your experiences!
Hi, I was wanting to make molds for fondant and was wondering if Latex plus silicone caulk would work?
Hey Trisha!
The silicone has all sorts of harmful chemicals in it so I would avoid for fondant and any other food items. I definitely need to look into food safe mould making though… leave that with me! x
Hi guys. Im trying to make a mould to make a personal chocolate bar for valentines day. Can i use this method for the mould? If not do you have any suggestions.
I live in a small town thats very limited.
Cheers
Hi…Could you please advise? I have a painted art deco face wall plaque and I would love to make a couple more, would this be possible to make a mould from my face plaque or would it harm it? Thanks Sassa
Does the water you put it in have to be a certain temperature
My silicone won’t set…can I do something…maybe put in oven? I have tried to make this several times I have followed the directions this is the closest I have gotten. Clear silicone and concentrate dish soap!!!! HELP
Hey Michelle! Don’t put it in the oven!! It won’t help and the silicone is very toxic. It doesn’t need to be clear – it can be any colour but it needs to have silicone in the ingredients and on the label. Also the soap I used is hand soap rather than dish soap. This might be why it isn’t working for you at the moment. Keep us up to date on your progress!
OK thanks I’ll keep trying!
If the silicone mold has been sitting for a few days and is still sticky, there isn’t much you can do to re-set it. I’ve found that soaking it for 3-4 days in a bucket of very soapy water will sometimes harden the outside so it’s usable. If it’s just certains spots that didn’t set correctly you can also try covering those sections with new caulk (silicone loves to stick to itself).
Things to try with the initial mix
— using a higher soap-to-water ratio
— work the silicone under the water for longer until if feels like slightly stiff clay (like Fimo)
— If you are using GE brand caulk, make sure you are using SIlicone I and not Silicone II. SIlicone II has a different formulation that has had setting issues for me.
Hope that helps! :)
Can anyone see this?
Just stopping by to leave a giant THANKS for this post! It was what kicked off my plunge into mold making back in 2014 and I have had so much fun making things since. :)
Je comprends pas l’anglais.explain in French please
Hi, I was wondering if this would work for bigger projects. I want to make some concrete heart stepping stones from a valentine candy box. Do you think if I made the mold from that box, I could reuse it to make many hearts?
Hey Cheri,
You would need quite a lot of silicone but I don’t see why it wouldn’t work :D
Reusing mold.
Heart mold
As a professional handyman for 12 years before I retired, I had many opportunities to use silicone and caulks of various kinds. I’ve done many bath tubs and sinks with bathroom silicone, and many, many feet of floors behind wood trim, and up and down room corners, and back and forth across ceilings, and in and out of kitchen and bathroom cabinets, prior to painting or to seal rooms and cupboards to keep out bugs. I squeezed an enormous unknown quantity of caulk and silicone. What worries me for you is that my experience with silicones, whether paintable or not, is the possibility of cancer-causing agents or internal organ damage from silicone components. Absorbed through the skin, many chemical substances lodge in the spleen, liver, kidneys, fatty tissues of breasts, and accumulate to later hurt the body. And these days with all the alerts about breast cancer we need to be super alert. I often used bare hands, and equally as often used nitrile gloves during application of silicones and caulks. What information do you have about this issue of potential tissue damage from silicone? Sincerely, Bill
Oh, and I’d like to add that silicone is just as wonderful sticking things together. On my brick wall between the garage doors there are still three white glass bowls my wife and daughter stuck to the wall 25 years ago. Still can’t pry them off. They adhered the bowls to the wall, and painted the interiors of the bowls with the red, yellow, and green or traffic lights.Also, and this is the truth, a few years back before I fixed the basement wall, the brickwork was caving outward, having broken just above the top of the basement wall. I took five or ten tubes of silicone and filled the crevices with silicone, and that stuff held together the brick wall until I took it down for repairs. And when I removed the brick wall, the bricks still clung together with the silicone. I had the scrape it all off to replace the brickwork. I was absolutely impressed with the silcone’s ability to hold together the weight it did for a couple of years. -Bill
As silicon is made from silicate (sand) and carbon (wood) I very much doubt that it can cause cancer. When it sets it generates acetic acid which accounts for the strong vinegar smell.
If you have any doubts phone the manufacturer and speak to a chemist/specialist.
hey there! Do you think this recipe would be okay to use on your face? if not, is there an alternative recipe i could use?
Hey Jessica. I would NOT recommend using this on your face. The silicone has a lot of chemicals in it! You can buy food safe silicones but you should check with the manufacturer about using them on your skin first!
Great post, keep adding. very nice post.
Thank you so much for this :)
Hello I work in the powder coating industry if I was to make a mask out of silicone like you do on this page would it go through a oven at 200 degrees c for 50 minutes to a hour without melting or would I have to use a moe expensive sealer silicone?
Ra
Regards. Steve
Wow, i exceptionally adore it. Be that as it may, I’ve seen some site blend silicone with power. What the ideal way? pls.
This may be an old post but I just wanted to add a bit of info. I have made this using the technique shown. It DOES make a nice rubbery mold! I like the mold to be a bit more sturdy so there is another way you can use the silicone. If you mix it with corn starch it will be a stiffer material, and it will hold heavier weight objects. It works really well!
http://www.madebybarb.com/2017/03/30/cast-your-own-concrete-bunnies/
http://www.madebybarb.com/2016/07/21/cast-your-own-concrete-critter-part-2/
Hi there, I’ve just stumbled across this tutorial and have been desperate to find a way to make moulds of my ceramics for ages, hoe stiff is the mold, would I be able to remove a glazed ceramic object from it easily do you think?
Hey Rebecca,
The great thing about this mould is that it’s really flexible. As long as you make sure you have a coating on the object (like vaseline) to help the mould come off you should be fine. It’s easy and quick to make though so perhaps you can try it with a test piece first and see what the results are?
Thanks,
Fran
It’s an remarkable post in support of all the web visitors;
they will get benefit from it I am sure.
We love this idea for making awesome cake by this recipe and thanks to you for giving this awesome recipe. I will try this recipe recently. Thanks!!!
i agree with you , i love these cake , thank you very much
Does the water need to be cold?
Cool? Room temp? Warm? Or what?
1. Could I use this for a large (24 inch diameter) pot? (With a mother mold to support it, of course.)
2 How much does the mold shrink while curing? If it shrinks more than a minimal amount then it is impossible to support it with a mother mold made from material that does not shrink, or that shrinks to a different degree and/or schedule.
(I made some molds of bricks that were supposed to fit together using the silicon and flour method. It shrank so much that the mold could not be placed in a mother mold, or put together for casting as it had shrunk and distorted. —> useless mold. }
I’m a sculptor. Wondering if I can use it to cast 3 dimensional standing objects, or even something like a doll head. Is this pliable enough for the little noses and ears, etc that stick out, or will it break the clay? I usually have to block off the sections with clay and then pour with plaster. Ideas?
hi fran
would I able to do one for fairies as I am doing a fairies garden and some of them are very costly and would love to do it pamie
hi Fran
I am making a fairie garden and would like to know if I would be able to cover both sides of the fairies as I would need a few of them and I am useing das modelling clay thanks pamie
I have a lot of ceramic molds (plaster of Paris). Some are open-face molds-that you just pour your slip into it and let it dry. Others have 2 or more pieces and are banded together…. I was wondering if I could use these to make silicone molds or for anything other than the traditional slip or porcelain that is poured into them, then fired. I would love to be able to use these.
The silicone I used became solid in seconds..before I could even get the bracelet in.
Does anyone have an idea about why this happened..?
Can you make items that will be worn or used internally with this silicone mould?
I am wondering if this could be used to make a sort of plaster of a print I want to make? I have a very important foot print, of my son’s foot and he has passed away, in our cement on our sunporch and I really want that print to save as we may move from our home in the near future. Any idea if I can do this for that purpose?
Thank you!
Liz
Hey Liz,
I’m so sorry to hear that. Of course this is so important. I think this should work perfectly but please test a little maybe on the concrete nearby just to make sure the silicone peel off when it’s dry. xxx
nice blog about silicone molding, thanks for this information.
nice blog thanks for sharing
It’s a very useful article, thanks to sharing it with everyone who is interested in reading a story that teaches something we do not know of.
ฮวงจุ้ย
Приветствую! I enjoyed your instructions on mold making. Have you tried making a two or three part mold? If you did, what did you used to keep the silicone from sticking to the first part?
I want a make own hand module in silicon what i have to do …love to hear from your regarding this
Hi, I have a question about molding a doll like Monster High or Barbie. I’m trying a new craft with my nieces and I would like to practice with a remake molded doll instead of the real ones…$$$
Would it work for tree bark?
You can use silicone and liquid soap to make a silicone mold. Fill a bowl with room temperature water. Using one part soap to 10 parts water, mix in your soap until it dissolves. Next squeeze some construction silicone into the water and knead it underwater, until it is no longer sticky. Pull the silicone out of the water and form the putty into a thick disk by rolling and flattening it. Now press the desired item into the silicone and let the disk harden over the next several hours. Pull the item out of the mold, and you are done. If you want to learn how to use cornstarch or 2-part silicone for your mold, keep reading!
Squeeze some construction silicone into the water. Purchase a tube of pure silicone from the home improvement store; make sure it is not the quick-set kind. Squeeze enough of the silicone into the bowl to cover your desired item with.
I have used the red high temp silicone to cast lead and solder
Was wondering if I could use my glasses ear plugs to make a mold for resin ear plugs just curious I wanna make my own ear gauges plugs decorated the way I want them. And I can’t find ear plug molds. And I think this may work.
Really very happy to say,your post is very interesting to read. You’re doing a great job
Thanks for the post. It’s helpful.
Thank you for sharing great information silicone molds.
Elexbet kayıt olmak hiç zor değil! Hemen kayıt ol %100 Casino Bonusu kap!
Melbet kayıt işlemlerini sitemizden kolaylıkla yapabilir ve %100 Spor Bonusunu alabilirsiniz!
Bahis siteleri bonus seçeneklerine sitemizden bakabilir ve istediğiniz bonus fırsatlarından siteye giderek yararlanabilirsiniz!
Elexbet giriş adresine sitemizden bakabilirsiniz!
Thank you, because the article is very helpful and also very useful.
Good Post.Thanks for sharing the information for us. We are a pioneer organization engaged in the manufacture of high-quality Rubber moulds since 1989. Rubber Moulds for Floor Tiles, Rubber Moulds for Paving Blocks, Rubber Moulds for Wall Tiles, Rubber Moulds for Thuvanams. if you are looking best quality rubber moulds for paver kindly visit JR Rubber Industries
It was helpful that you said that you should work the silicone until it’s not sticky so you can make a good mold. I’m trying to start working with resin because I think it looks so cool! If you don’t have something to press into the mold, what else can you do?
Nice Blog Good knowlegde
How to make Paver Block and Paver block Moulds
This Is blog Too good i never see like this , providing goof knowledge
SK Tiles Machinery are manufacturing Paver Block hardener
Interlocking Tiles Making Machine Manufacturer
Can you make 2 sided Molds this way.
nice post
how can we get more information
I am not agreed alot
Thanks for the nice information
I can give you one important information about polyurethane mold casting. Cestel is the innovated company in concrete mold casting rubber. Their urethane rubber has more advantage then the most of the its competitors.
Cestel urethane rubber series are famous for their abrasion resistance and high tear strength. Mold Cast30 is the softest of our product and offers the most flexibility and is used for models with deep undercuts. It has superior abrasion resistance and tear strength and are ideal for casting concrete. These rubbers are used for casting of concrete
This type of polyurethane cast rubber should be used and stored at room temperature at 23°C. Liquid polyurethanes are moisture sensitive and will absorb moistures. These products have a limited shelf life and should be used as soon as possible. They should be used in a low humidity environment (below 50% RH). Components should be mixed in a straight sides and a flat bottom. Safety glasses, long sleeves and rubber gloves should be used to minimize contamination risk.
You can get more information about the polyurethane concrete mold from http://www.cestelkimya.com/concrete-mold-casting-rubber/?lang=en
Great post with Informative Content, I really Enjoy Reading this, I think Silicone Rubber industry is really booming.
nice info thanks for the help
Thank you for the good information.
JR Rubber Industries is established in 1993 ,manufacture Moulds for wet cast concrete pavers/tiles. With a clientele in India and 28 countries worldwide we are the pioneers and the most trusted name in the industry. We provide the complete solution for exterior flooring industry with the manufacture and supply of moulds, supply of paver machinery, setting chemicals and color oxides and complete technical assistance for paver production with in plant trainings and onsite assistance for production. We are your destination for all your paver production needs.
Hai, may I ask how may uses can this mold last?
common ways people are badly injured in foundries. It is not so bad with
7/24 Spor canlı destek ile ödemeler, bağlantılar, Fashionbet giriş üyelik ve hediyelar ile ilgili bilgi ve yardım temin edebilirsiniz.
Hem de yeni ve eski üyeler amacıyla yaşanan Fashionbet şikayet hediye kampanyaları ile daha çok oyun, daha çok kazanç fırsatları yakalayabilirsiniz.
2017 seneninse Curaçao oyun lisansı sağlayıcısından alınan Fashionbet para yatırma lisanla heyet Spor, o günden bu yana güncel olarak üyelerine hizmet sağlıyor.
Spor üzerinden spor ve Fashionbet üyelik ajans bağlantıları oynayabileceğiniz gibi, at yarışı, 3D slot oyunları gibi alternatifleri de ziyaret edebilme ihtimaline sahipsiniz.
Bu hediyetan yararlanmanız amacıyla ise en az 100 TL ve Trendbet şikayet üzerinde yatırımınız bulunması lüzum etmektedir.
Kullanıcılar tarafından biçimlendirildiğinde ise Trendbet bonus hediye çevrim koşulunun diğer sitelere miktarla daha vaka ve anlaşılır bulunduğu göze çarpmaktadır.
Çevrimini poker lobisinde tamamlamak isteyen Trendbet üyelik kullanıcılarımız ise 1 TL üzeri masalarda 1500 el oyunlara katılımı yeterli olacaktır.
Spor çevrimiçi oyun sitesi son derece vaka ve tüketimi vaka olan bir gorabet mobil programı ile kullanıcıların mobil üzerinden hesaplarınadır.
Online haber kullanıcılarının vazgeçilmezi olan gorabet giriş canlı haber seksiyonunu araştırdığımızda ise canlı haber seksiyonundadır.
Bilhassa futbol, basketbol ve tenis karşılaşmalarına diğer gorabet bonus sitelere miktarla çok daha çok maçın bulunduğu göze çarpmaktadır.
Yatırımların yükselmesi, meselesiz biçimde kazançların olması amacıyla betluxor giriş spor para çekme prosedürlerinin de yapılması sağlanıyor.
Para çekme betluxor adresi prosedürünü nasıl yapacaksınız? İlk olarak Spor para çekme nasıl olur sorusunun cevabı amacıyla hesaplarınıza giriş yapın.
Bu prosedürler amacıyla teşhis edilen betluxor para yatırma teknikleri kullanabilmeniz mümkün. Yöntemler amacıyla limitlere uyarak, anında yatırımların biçimlenmesini sağlayarak üstünlük elde edebilirsiniz.
Daha sonra para çekiminin sağlanması betluxor bonus amacıyla teşhis edilen tekniklerden birini biçimlendirin. Hem emniyetli hatta süratli, meselesiz bir hizmet sunuluyor olacak.
Haber sitesinde yatırımlarınız bahiscin giriş ile kazandınız. Spor para çekme ile de kazançlarınızı hesaplarınıza aktarın.
istanbul bahis Okey canlı bahis şirketi içerisinde kazandırma seviyesi en yüksek olan bahis seçeneklerinden bir tanesidir.
istanbul bahis bahis oyna servisinde değişik maçlarda yüksek miktarlı bahisler yapma olanağınız vardır.
Betluxor ‘da hemen bahis oynamak dilerseniz, üye olabilir ve bahis yapmaya başlayabilirsiniz.
Betluxor bahis sitesi, üyelerinin memnuniyetini dayanıklıca amacıyla yatırım prosedürlerinde en az limitlere olanak tanıyor.
Betluxor slot oyunları ne kadar nitelikli, çok yönlü ve ilgi çekici olsa da oyunların düşük olması bu keyfi bir anda aşağıya çekebiliyor.
You made some good points there. I looked on the internet for the subject and found most guys will consent with your site.
I’ve been using, buying, making silicone Molds for many years. You have created the neatest and cleanest I have ever seen. Well done!
fantazi gecelik sizi daha çekici ve seksi göstererek partnerinizle birlikte özel dakikalar yaşamanıza yardımcı olur. Zevkinize göre modeller ya da renkler seçerek size en uygun geceliği bulmalısınız.
toptan iç giyim tercih etmenizin sebebi kaliteyi ucuza satın alabilmektir. Ürünler yine orjinaldir ve size sorun yaşatmaz. Yine de bilinen tekstil markalarını tercih etmelisiniz.
tutku iç giyim Türkiye’nin önde gelen iç giyim markalarından birisi olmasının yanı sıra en çok satan markalardan birisidir. Ürünleri hem çok kalitelidir hem de pamuk kullanımı daha fazladır.
nbb sütyen hem kaliteli hem de uygun fiyatlı sütyenler üretmektedir. Sütyene ek olarak sütyen takımı ve jartiyer gibi ürünleri de mevcuttur. Özellikle Avrupa ve Orta Doğu’da çokça tercih edilmektedir.
yeni inci sütyen kaliteyi ucuz olarak sizlere ulaştırmaktadır. Çok çeşitli sütyen varyantları mevcuttur. iç giyime damga vuran markalardan biridir ve genellikle Avrupa’da ismi sıklıkla duyulur.
iç giyim ürünlerine her zaman dikkat etmemiz gerekmektedir. Üretimde kullanılan malzemelerin kullanım oranları, kumaşın esnekliği, çekmezlik testi gibi birçok unsuru aynı anda değerlendirerek seçim yapmalıyız.
iç giyim bayanların erkeklere göre daha dikkatli oldukları bir alandır. Erkeklere göre daha özenli ve daha seçici davranırlar. Biliyorlar ki iç giyimde kullandıkları şeyler kafalarındaki ve ruhlarındaki özellikleri dışa vururlar.
Güncel bilgiler için trendbet blog sitesini ziyaret edin.
Bahis sitesi hakkında en sağlam bilgileri trendbet sitede mevcuttur.
Here have beauty and makeup quotes good articles.
Yeni giriş adresi Atlantisbahis güncel blog sitesinde mevcuttur.
Farklı bahis seçenekleri Atlantisbahis blog sayfasında anlatılıyor.
Thanks for the idea. This is a really simple and quick way. I also tried to do something similar. But you push it further.
Ülkemiz içerisinde aktif olarak etkinlik gösteren ve güvenilirliği ile kendisini defalarca kanıtlamış belirleme Betsoo edilen güvenilir bahis sitedir.
Canlı destek uygulaması ile eş güdümlü canlı bahis Egobet ofisinde aksilikler yaşadığınızda hızlı olarak yanıtlar alabiliyorsunuz.
Ödeme talep formu hesap panelinizde vardır, Buradaki para çekme butonuna Elexusbet tıkladığınızda işlemleri başlatabiliyorsunuz.
Sitenin giriş işlemlerini aksiliksiz bir biçimde gerçekleştirme için Maltbahis internet sitemizin menüsünde yer alabilmekte belirleme edilen bağlantıları tıklayarak ziyaret edebilirsiniz.
Sürekli olarak kazanabileceğiniz bir platform olarak ilgileri üstüne çekmeyi başaran Bahiscin bahis firmasında ara yüz olarak üst seviye bir sistemde işlemlerinizi kesintisiz olarak gerçekleştirebilirsiniz.
Bahis işlemlerinizi gerek bilgisayar gerek tablet gerekse de cep telefonu üzerinden anlık olarak her yerden gerçekleştirme istiyorsanız Gorabet ’i tercih edebilirsiniz.
Eğer Türkiye’deki bahis firmasından memnun değilseniz ve miktarlar ile eş güdümlü olumsuz koşullarda bahis işlemleri gerçekleştirme istemiyorsanız kareasbet ile tanışarak işlemlerinizi her vaktinden daha kazançlı duruma getirebilirsiniz.
Türkiye’de sunmakta bulunduğu avantajla bahis hizmetleri ile ön plana çıkarak nitelikli bir platform yaratmakta belirleme edilen Betticket görülmemiş yararlar ile hizmetlerini sunmaya devam ediyor.
gönül rahatlığı ile bu siteye kayıt olabilir Onwin ve bahis oyunlarınızı bu site üzerinden yürütebilirsiniz.
Hem de binlerce farklı kullanıcı kazanmayı başardı Rokkobet Şirketinin bir ürünü olarak kayıtlarda geçmektedir.
Birçok farklı alan adı üzerinden de bahis Betkur platformları üzerinde yer alarak kullanıcılarını karşılamış belirleme edilen bu sitedir.
Canlı bahis sitesine hesap açmak Betamara isteyen bireylerin yapması gereken işlemler son derece basit.
Mobil bahis ve Casino için kesinlikle donmayan bir altyapıyla hizmet sağlıyor. Atlantisbahis Betconstruct uygulamanın en güzel versiyonu burada karşımıza çıkıyor.
En güncel adresi alıp adres satırına piramitfx yapıştırdığınız otomatik olarak mobil siteyi de erişimi açmış oluyorsunuz.
Böylece canlı bahis sitesinde fazla puanlarla Jupiterbahis eş güdümlü üyelerinin müşteri desteği aldığını görebiliyoruz.
Aksi takdirde aksilikler yaşamanız kaçınılmaz olacaktır Lesabahis Canlı bahis sitesi ile alakalı Güven araştırmalarını ilk etabında sitenin lisansına göz atıyoruz.
Bu biçimde canlı bahis sitesinde hizmet alırken markabet kesinlikle en üst civarda kazanca ulaşmış olacaksınız.
Canlı destek uygulaması ile eş güdümlü canlı bahis Pumabet bürosunda aksilikler yaşadığınızda hızlı olarak yanıtlar alabiliyorsunuz.
Farklı departmanlar oluşturulmuş, Betvakti özellikle finans departmanı ve bonus departmanı yoğun bir ilgi görüyor.
Spor bahisleri servisinde maç öncesi kuponları yapabiliyorsunuz, Musclebet Canlı bahis servisinde devam eden müsabakalar için canlı bahis kuponları doldurabilirsiniz.
Eğer bir üyeliğiniz var ise ya da Betixir yeni üye olacak iseniz bu bilgiler işinize yarayacaktır.
Bahis firması ilerlemiş alt yapısı vasıtası ile Ultrabet bütün bahislerinizi saniyeler içerisinde gerçekleştirmenizi sağlamaktadır.
Bu hamlelerin başında ilk önce 50’den Winxbet fazla branşı belirleme edilen spor bahisleri gelmektedir.
Bu yüzden de siteler, Gorabet gibi fazla branşı belirleme edilen spor bahisleri gelmektedir.
Bu yüzden de siteler, Betkur gibi fazla branşı belirleme edilen spor bahisleri gelmektedir.
Sayısız özelliklere sahip belirleme İstanbulbahis edilen ve her vakit kazanma olanağı sunmakta belirleme edilir.
Uzun yıllardır tamamıyla Bahisgiris müşteri memnuniyeti merkezli güvenilir bahis sitelerinden biridir.
Bu makalemizde sizler için Lizbonbet şirketinin üyelerine sunmuş bulunduğu yatırım ve çekim hizmetleri ile ilgili bilgilendirmede bulunacağız.
Güvenilir bahis siteleri arasında yer alan, Bin239 bütün finansal işlemlerinizi gönül rahatlığı ile yapabileceğiniz bir bahis sitesidir.
Bahis siteleri oyuncularına sundukları Fbcym yararlarla onları siteye çağrı etmektedir.
Elbette güven açısından 7/24 verdiği canlı destek hattı, Bahis Siteleri bölümünde eksper müşteri temsilcileriyle bütün aksiliklere hızlı bir çözüm sağlamaktadır.
Bahis sistemlerinin kullananlara sunmuş bulunduğu Güvenilir Bahis Siteleri güven bölgeleri etkileşim tekniklerinin aktifliği ile oluşmaktadır.
İnternet üzerinde belirli bir sisteme dayalı Güvenilir Bahis Siteleri hizmet veren siteler kullanımları ile alakalı bilgi vermek durumundadırlar.
Canlı destek ekibi internet adresleri üzerinden kullananlara bahis sistemi, Trendbet kazanımlar, bonuslar, soru ve yardımlar konusu ile alakalı destek vermektedir.
Hem de sistemde belirleme edilen bahis sitelerinin İstanbulbahis fazlası da verdiği etkileşim tekniklerine yeterli derecede hizmet sunmamaktadır.
Bonus türleri içerisinde Atlantisbahis mail adresinden gerekli bütün bilgilere ulaşılabilmektedir.
Bahis severler, değişen giriş Betamara adreslerini sitemizin verdiği bilgilendirme mesajlarını vakitli olarak öğrenebilir.
Site, oyunları ve bahisleri için Betixir dünyanın en iyi oyun geliştiricilerinden destek alabilmektedir.
Tam güvenilirlik mükafatı alarak Trendbet bütün kullanıcılarının da güvenini kazanmayı başarmıştır.
Bu promosyon parayla sitedeki oyunları denemeniz, Betixir farklı bahis oyunlarına katılmanız için dağıtılmaktadır.
Canlı bahis sitesinde kazanmış bulunduğunuz paraları Atlantisbahis çekmek dilediğinizde sayılı olarak doğru talep vermeniz gerekiyor.
Sanal bölgede oluşturulan hizmetler içerisinde Gencobahis Giriş geri bildirimlerin oluşumu canlı destek ve etkileşim türleri üzerinden gerçekleşmektedir.
Sanal bölgede oluşturulan hizmetler içerisinde Gencobahis geri bildirimlerin oluşumu canlı destek ve etkileşim türleri üzerinden gerçekleşmektedir.
Site yapısında üye belirleme edilen ya da Tolbet olmayan herkes giriş sayfasından etkileşim tekniklerine ulaşabilmektedir.
Wish good night to your friends and loved ones with these Sweet Good Night Messages at wishafriend.com. GN MSG For Friend
Canlı destek ekibi de aynı biçimde her açıdan Gencobahis Yeni Adresi 7/24 kullananlara ya da bahis severlere hizmet vermek hedefi ile sistemde sahip olunan vardır.
Bet severlerin internete bağlandıklarında Gencobahis en fazla kullandıkları sitelerin başında sanal bahis siteleri gelmektedir.
Şirketlerin canlı bahisler için açmış oldukları bölümlerde Tolbet Twitter bütün servislerle ilgili belirleme edilen canlı bahis tarihleri ve devreleri bulunmaktadır.
Kapsamlı birçok canlı bahis Gencobahis Şikâyet site tarafından kullanıcıların hizmetine sunulur.
Bahis severlerin tespit edilen çekim prosedürlerini Gencobahis Yeni Adresi yapabilmesi hedefiyle ise ilk sırada canlı destek uygulaması üzerinden çekim isteğinde bulunması lüzum etmektedir.
Canlı spor bahis hizmeti, bahis bürosunun Gencobahis Şikâyet en bol ilgi gören hizmetleri arasında yer almaktadır.
Casino oyun alternatifleri bahis severlere site üzerinden iki ayrı alternatif dahilinde sunulmaktadır. Bahis severlerde tespit edilen ara yüz alternatifleri arasından kendilerine en hitap etmekte Gencobahis belirleme edileni ehemmiyete alarak prosedürlerini yapabilmektedir.
Bu türce bahis severlerin Gencobahis Yeni Adresi kısa vakit içerisinde karlı prosedür zevkini tadabilmesi mümkün bir alternatiftir.
Bahis sitesi bölgende bahis oynarken fazlası Gencobahis Giriş avantaj ile karşılaşabilirsiniz. Site bahis oynamanın hazzını arttırabilmek adına kullanıcılarına site bölgende ayrıntılı promosyonlar uygulamadır.
Tespit edilen formda ise üye kaydı gerçekleştirme Gencobahis Şikâyet isteyenlerin bireysel verileri ve hesap verilerini doldurmaları gerekiyordur.
O an oynanan ayrıntılı spor dallarını, ülkeleri ve ligleri Hilabet filtreleme yak daha basit bir şekilde görüntülemek de mümkün.
Hem canlı destek imkânı var hem de e-posta Egobet gibi daha classic teknikler ile müşteri hizmetlerine ulaşmak mümkün.
Seçenekler de şansımızı denemek dilediğinizde Sahabet birbirinden farklı alternatifler üretilmektedir.
En fazla maç oralarını bulabildiğiniz Tulipbet sitelerden birinde hizmet alabiliyorsunuz.
Dolayısıyla sizin gene sitede kalmanız sağlanmış olacaktır. Betkanyon Ancak kendiniz hesaplarınızı kapamak istiyorsanız iki gün içerisinde işlemler tamamlanmaktadır.
Böylece canlı bahis bürosunda belirleme edilen Ganobet sahip olunan hesaplarınıza dilediğiniz vakit de kapatabileceksiniz.
Yüksek miktarlar ve avantajlı vasıtası ile bahislerinizden escort siteleri ek kazançlar elde edebilirsiniz.
Sitenin sağ alt evresinde belirleme edilen lisans verilerine escort siteleri tıklayarak sitenin güvenilirliğini bizzat kendiniz onaylayabilirsiniz.
Adres değişiklikleri niçini ile sitenin kapandığını düşünen escort siteleri üyeler, sitemizde sahip olunan yazıları okuyarak bilgi alabilirsiniz.
Sunulan bu özellikleri değerlendirmek isteyenler; Betluxor ilk önce ana sayfanın en üst evresinde yer alan üye ol butonuna tıklamalı.
Kullanıcıların site ile alakalı gerçekleştirdikleri yorumlara da bakarak güvenilirliğinden emin olmanız mümkün. Maltbahis Site ile alakalı rastgele kötü bir yorum yok.
Yatırımlarla alakalı bütün detayları site canlı yardımından alabilir ve Gorabet ’e komisyon ödemeden işleminizi sonlandırabilirsiniz.
Eğer bu iki bilgiden bir tanesini unuttuysanız, Onwin müşteri hizmetleri ile etkileşime geçerek onlardan destek almanız gerekiyor.
Böylece canlı bahis bürosuna gerçek oyun Betamara deneyin fırsatlarını kurup ela ile eş güdümlü yaşayabileceksiniz.
Dolayısıyla hesaplarınızı silmeden önce talep ederseniz Trendbet manada kazançlı bir şekilde hesabımızı dönem dışı bırakabilirsiniz.
Burada özellikle şikâyet konuları söz konusu olmuşsa bu noktada Betgarden müşteri hizmetleri servisi öne çıkan girecek ve şikâyet konularını gidermeye çalışacaktır.
Çünkü site müşteri hizmetleri servisi ile üyelerle çok yakın bir Betcool irtibat kuruyor olumsuz yorum konuları büyümeden çözülüyor.
Bahis sitesi sizlere varlıklı içeriği bahis ayrıntılılığın sunuyor olması vasıtası ile Vbet müşterilerine bunun dışındalıklar ile dolu bir dünya sunmaktadır.
Sitede elde edilen fazla kazançlar güvenilir teknikler ile günün her Vakit’inde Lesabahis yalnızca birkaç dakika içerisinde çekilebilmektedir.
Oyuncularına %100 müşteri memnuniyeti sağlamak için elinden gelen yapan Restbet site, 7/24 canlı destek hizmeti ile oyuncularının soru ve aksiliklerine an çözümler üretmektedir.
Bir başka teknik olarak ise canlı destek Betlasman linkimizi tarayıcınızın kısa yollarına ekleyebilirsiniz.
Müşteri memnuniyetini ön planda tutan bu bahis sitesi, Ntvsporbet istenilen her yerden bahis oynama keyfine varılabilmesi için mobil dizaynı da geliştirmiştir.
Sunulan bu özellikleri değerlendirmek isteyenler; Onwin ilk önce ana sayfanın en üst evresinde yer alan üye ol butonuna tıklamalı.
Canlı oyunlar, gerçek kurpiyerler ile eş güdümlü oynanır. Betkur Bu sayede bahis severler kendilerini gerçek bir oyun içerisinde hissederek kazanma ihtimaline sahip olur.
Benzerlerine nazaran dağıttığı tutarları ve geniş oyun yelpazesi sebebi ile son derece fazla birey açısından ilgi gören Betamara giriş, birisi olarak da karşımıza çıkmaktadır.
Yıllardır kullananlara bahis oynatması ve belki de milyonlarca lirayı Atlantisbahis hesaplara aksiliksizce işlemiş olması, belirleme adlandırıcı mı sorusunu akıldan silmeye yetiyor.
Bahis sitesi her gün müşterilerine yüzlerce maç için canlı bahis ve Betgarden spor bahislerini fazla miktarlar ile sunmaktadır.
Bunun yanı sıra yatırım ve çekim işlemlerinde de Betcool müşterilerine rastgele bir aksilik yaratmaması, bu işlemlerin kısa vakitte uygulanabilmesi güvenilirliği destekleyen özellikler arasında yer alıyor.
Bu çevrim gerekçesi vakit içerisinde değişim geçirebildiği için her vakit en güncel koşul Betper ve kurallara bakmalı, bunları gözden geçirmeden kullanmamalısınız.
Bahislerinizi hazırlarken tekli, sistem ve toplu kuponlarda Betnis geniş kategorileriniz var.
Canlı oyunlar alana da benzer şekilde çalışırken, sanal sporlarda Parisbahis sanal futbol, sanal basketbol gibi sanal sporların bahis kategorilerine ulaşmak mümkün.
Böylece canlı bahis bürosundaki maksimum nitelikte hizmetlerin tamamından Bahistürk akıllı telefonla istifade edebildiğiniz gibi yeni şifre oluşturma işlemlerini de yerine getirebilirsiniz.
Başaran canlı bahis sitesinde fazla maç Betprocasino miktarları fazla limitli her vakit bulabiliyorsunuz.
Siteye ait mobil uygulamalamayı kullanmayı tercih ediyorsanız da Ultrabet sitemizde belirleme edilen butonlar ile mobil uygulama aksilik yaşamadan an girebilir ve kazanmaya devam edebilirsiniz.
Bahis sitesi müşteri memnuniyetine önem vermekte Kareasbet özellikle finansal konularda müşterilerine aksilik yaşatmamaktadır.
Butonlara bastığınızda sitenin ana sayfasına yönlendirilir ve Gameofbet buradan da siteye kayıt işlemlerini an yapılabilirsiniz. Siteye 7/24 yatırım yapılabilir ve elde edeceğiniz kazançları da gene günün her saati çekebilirsiniz.
Bundan dâhiyi da güven bölgeni vakitli olarak sağlayacak belirleme edilen Favorisen güvenilir çizgisinden ödün vermeden kullanılmaya devam eden bir platform biçiminde de isminden söz ettirmektedir.
Siteye abone olurken reklam mesajlarını alma izniniz varsa, Milabet yanınızdan adres değişikliği hususu ile alakalı bilgilendirilebilir.
Bu kampanyaların her biri farklı koşullar gerektirdiği için Atlantisbahis katılmadan önce gerekçesi iyi değerlendirmenizde yarar var.
Üstelik tamamı da Türkçe oyun alternatifleri de ön plana çıkartılmıştır. Bütün bu alternatifler için Lesabahis Şikâyet kayıt yaptırmak yalnızca 10 dakika vakit çektir.
Hem de yalnızca bilgisayar sürümünde bu Pusulabet işlemleri gerçekleştirme mecburiyetinde değilsiniz.
Bahis sitesi lisanslı ve güvenilir olmasının sayılı var bulunduğunu düşünüyor Betbey ve sizin siteye basitlikle girerek üye olabilmeniz için burada butonlar bulunduruyoruz.
Sitede elde edilen fazla kazançlar güvenilir teknikler Lirabet ile günün her Vakit’inde yalnızca birkaç dakika içerisinde çekilebilmektedir.
Bütün bu belirleme edilen akları dayanıklısının yanı sıra güvenilir Jüpiterbahis bulunduğundan dâhiyi de bahis severlerin ilgilerini çeken bir Curaçao lisanslı bir platform var bulunduğunu da göstermiştir.
Mobil siteyi açmak istiyorsanız sayfalarımızdaki Betticket güncel giriş adresi bilgilerini almanız gerekmektedir.
Sisteme girme ile alakalı meseleleri engellemek hedefiyle Betpapel sitemizden bahis gerçekleştirme üzere siteye girmek hedefiyle en son adresi onaylayabilirsiniz.
Biz önemli olarak yükleme gerektirmeyen çözümden bahsedeceğiz.Bu bilgiler her hafta Sahabet değiştiğinden kaynaklı en güncel bilgileri sayfalarımızda bulabilirsiniz.
Üstelik slot oyunlarının üstüne geldiğinizde oyunu ücretsiz Atlantisbahis oynama alternatifleri içerisinde değerlendirebiliyorsunuz.
Belki de şans oyunlarının içerisinde en basit saptama edilen, Betvakti çok ilgi ve takip gerektirmeyen slot oyunlarıdır.
Oyunlarda tekrar donma sıkıntısı ile karşılaşmıyorsunuz. Pumabet Hem de güvenceli bakımından da mobil siteye tam not sağlıyoruz.
Bunu yapmadansa öğrenmenin çok basit bir tekniği vardır İstanbulbahis düzmece siteler sizin kullanıcı adınızı ve şifrenizi ele geçirmek için ayrıntılı teknikler gerçekleştirmektedir.
Müşteri memnuniyetini ön planda tutan bu bahis sitesi, Betonbet istenilen her yerden bahis oynama keyfine varılabilmesi için mobil dizaynı da geliştirmiştir.
Bu niçinden kaynaklı müşteri ayrıntılılığın de Atlantisbahis geniş tutmayı başarabilen site idaresi, çevrimiçi bahis ve şans oyunlarını güvenilir bir düzeyde iletmeye özen göstermektedir.
Ülkemizde yasal olmamasından kaynaklı para çekmek ve Markabet yatırmak konusu ile alakalı tedirgin tespit edilen kullanıcılar var bulunduğu bilinmektedir.
Bunun niçini kullanıcılarına kolaylıklar ve Lizbonbet hızlı erişim olanağı sağlamasını niçiniyledir.
Mobil program vasıtası ile bahis, canlı bahis ve bahis oyunlarına Atlantisbahis aksiliksiz ve hızlı bir biçimde erişerek eğlenerek kazanabilirsiniz.
ülkemiz bahis kullanıcıları yönünden Afroditbet sık sık tercih edilen adreslerden birisi olmaktadır.
Bünyesine e – sports bahislerini de eklemiştir. Cuma, cumartesi, pazar günleri Forex Yatırım Yap 2000’ in üstünde bahisi bünyesinde barındırarak canlı bahis açmaktadır.
Belki vakit içerisinde bir masaüstü uygulama geliştirilebilir Jupwin ve internet sitesinden duyuru yapılır.
Rulet oyununda strateji ya da taktik belirlemeniz çok fazla şey ifade etmez Atlantisbahis lakin gene de oyun sırasında size yön verebilir.
Bir ileri duyuruya kadar, şu an arama motorlarında linklerini Jüpiterbahis gördüğünüz uygulamaların bir geçerliliği yoktur ve itibar etmeyiniz.
Rulet oyna linkine tıklayarak, Foreks Yatırım Yap sitesinde Rulet oynayabilirsiniz.
Zaten kullanım kolaylığı bakımından gereksiniminiz belirleme Atlantisbahis edilen her şeyi internet sitesinde bulabilmektesiniz.
Bu prosese kadar sitenin internet ve mobil sürümlerini kullanmanızı öneriyoruz. Milosbet Bir ilerleme bulunduğu vakit, sizinle uygulama haberlerini paylaşacağız.
Avrupa ruleti oynadığınız vakit, rulet çarkında Atlantisbahis dönen top 37 rakamın herhangi bir tanesinde durur.
Bu oyun tamamıyla şansa dayalı bir oyun bulunduğu için, çok katı ve Betsdot ilgi çekici kuralları pek bulunmamaktadır gerçekte.
Artık yasal firmalar ile bağlantısını kesin olarak kesmek isteyen bireyler için birinci sırada yer alan Helixbet için fırsatların kısa bir vakit sonra sona ereceğini belirtmek istiyoruz.
Bu alternatifler ilk başta insanların kafalarını karıştırabilir. Kupon seçiminde karamsarlığa düşen bireyler, Atlantisbahis ilk üyelik bonuslarını almalarının ardındanda gönül rahatlığı ile kuponlarını oluşturarak kazanç elde etmeye başlayabilirler.
Güvenilir bir bahi sitesi arayışı içerisinde iseniz Asyabahis bahis sitesini tercih edebilirsiniz.
The groovy bot allows the discord users to add the songs on the music channel of the discord server. The groovy bot offers functionality such as adding songs in a queue, adding playlists from platforms such as youtube or Spotify, etc. and all this can be done with simple commands. The groovy bot offers many features similar to music players and even more such as pause, resume, play, queue, next, back, clear, jump, shuffle, etc and all this can be done on your discord server.
How do I get my discord bot to work?
Sometimes the Groovy Bot might have issues, such as it may not respond and it may be offline. This can be due to a complete discord server outage, if you face the issue check on the discord status page.
Also, make sure that you have provided sufficient permissions to the groovy bot, it can be done in the setting tab.
If the groovy bot does not respond after applying the above steps, then make sure you did not change the groovy bot default prefix.
Her alanda güvenilir bahis hizmetine bahsegel bahis sitesi ile erişim sağlayabiliyorsunuz.
En iyi bir bahi sitesi arayışı içerisinde iseniz bahsegel
bahis sitesini tercih edebilirsiniz.
Bahistek giriş adresi belli aralıklarla yenilendiği gibi kullanıcıların ve üyelerin platformun sunmuş olduğu tüm avantaj ve imkanlardan en efektif biçimde yararlanabilmeleri adına anında ve hızla güncellenerek kullanılma sunulur. Bahistek güncel giriş adresi ve tüm güncel bonus seçeneklerine ulaşabilmek adına platformun sosyal medya hesaplarının takip edilmesi tavsiye edilmektedir.
En iyi bahis sitesi arayışınızı Bahsegel ile sonlandırabilirsiniz.
güncel iddaa sonuçları
They’re produced by the very best degree developers who will be distinguished for your polo dress creating. You’ll find polo Ron Lauren inside exclusive array which include particular classes for men
This article was written by a real thinking writer. I agree many of the with the solid points made by the writer. I’ll be back soon . Thanks for posting this info. I just want to let you know that I just check out your site and I find it very interesting and informative. I can’t wait to read lots of your posts. Very awesome!!! When I seek for this I found this blog at the top of all blogs in search engine. For the very first time, I read your blog and really loved it. Your way of delivering content is really amazing and appreciable. Hope you will continue this and provide new, unique and strong content from your side. For me, it’s a five stars article . 메이저놀이터
I’m intrigued, I should say. Really once in a while do I experience a blog that is both educative and engaging, and point of fact, you have hit the nail to the head. Your idea is remarkable; the issue is something that too little individuals are talking cleverly about. My business is enchanted that I ran over this in my search out something identifying with this. This is truly animating, You’re a genuinely fit blogger. I’ve joined with your feed moreover expect perusing your incredible reviews. Besides, We’ve imparted your page to our long range informal communication destinations. I’m extremely delighted in for this blog. It’s an instructive theme. It help me particularly to take care of certain issues. Its chance are so phenomenal and working style so rapid. I figure it very well might be help every one of you. Much appreciated. 카이소
It’s really a fantastic website, thanks for sharing. There’s no doubt i would fully rate it after i read what the idea about this article is. You did a nice . Nice information, valuable and excellent design, as share good stuff with good ideas and concepts, lots of great information and inspiration, both of which I need, thanks to offer such a helpful information here. This is a great article and great read for me. It’s my first visit to your blog, and I have found it so useful and informative especially this 오래된토토사이트
This website contains a lot of information. Very good webpage and user friendly! Have a great day! Took me time to understand all of the comments, but I seriously enjoyed the write-up. It proved being really helpful to me and Im positive to all of the commenters right here! Its constantly nice when you can not only be informed, but also entertained! I am certain you had enjoyable writing this write-up . Only wanna remark that you have a very nice internet site, I the design and style it actually stands out. 카지노마트
online bahis ve casino
sekabet
meritroyal bet
prizmabet
betkanyon
I need to know more information about this
Is this mold strong as rtv silicone?
how about release power of this mold?
I like this article alot. Thank you.
how can I get more information about moulding?
RTV2 silicone mould is not difficult to make. Just apply the rules.
moulding need also more experiences.
How to make molds for candle?
thanks for this nice article.
Good Morning Messages & Blessings For Daughter
Very good written article. It will be supportive to anyone who utilizes it, including me. Keep doing what you are doing – can’r wait to read more posts. canaan avalon 1246 90th
It was a very good post indeed. I thoroughly enjoyed reading it in my lunch time. Will surely come and visit this blog more often. Thanks for sharing. digital marketing
I gotta favorite this website it seems very helpful . 먹튀폴리스
I really like your take on the issue. I now have a clear idea on what this matter is all about.. 에볼루션카지노
I like this website so much, saved to favorites . digital marketing
The post is really superb. It’s varied accessory information that consists during a basic and necessary method. Thanks for sharing this text. The substance is genuinely composed. This web do my paper for me log is frequently sharing useful actualities. Keep sharing a lot of posts. 카지노사이트
You’ve picked up the perfect dog-friendly grooming kit from the local pet store
Women Love Egg
Meals grade silicone, non-toxic and tasteless, protected for human physique
Superbly designed feminine ergonomic construction
Delicate to the contact, easy and waterproof, straightforward to wash
Wi-fi distant management + 10 vibration modes
We support customizing all kinds of silicone products, I like that I can see more professional articles about silicone.
Newtop is a custom silicone manufacturer and silicone rubber supplier from China. We have first-class silicon product design and production capabilities in the industry. Over the years, we have provided high quality custom silicone mold making services and silicone injection molding services to hundreds of companies.i like this custom silicone molding
As a liquid silicone rubber manufacturer, Newtop is committed to liquid silicone rubber injection molding, silicone overmolding, silicone compression molding, silicone prototyping,silicone multi-shot injection molding,clean room injection molding and so on.Newtop silicone products factory’s products include medical silicone, automotive silicone, silicone houseware, silicone kitchenware, silicone mother & baby products, custom silicone parts, etc.Get in touch with us now to get a personalized lsr molding solution. We are your most trusted OEM silicone/ ODM silicone partner.
Good Morning Wishes For Brother
This is an excellent post! I’m looking forward to reading your future post.
Drum chippers are specific types of wood chippers used to reduce wood (usually large tree limbs, branches, or trunks) into smaller wood chips. These are often portable,
with the ability to mount them on wheels and frames that can then be towed behind tractors, vans, or trucks.
Drum chippers are specific types of wood chippers used to reduce wood (usually large tree limbs, branches, or trunks) into smaller wood chips. These are often portable,
with the ability to mount them on wheels and frames that can then be towed behind tractors, vans, or trucks.
Romantic good morning wishes for husband– Looking for romantic good morning messages and wishes for a husband? Check out our amazing collection of Adorable HD Pics, Photos, Greetings & Messages to start your day.
Drum chippers are specific types of wood chippers used to reduce wood (usually large tree limbs, branches, or trunks) into smaller wood chips. These are often portable,
with the ability to mount them on wheels and frames that can then be towed behind tractors, vans, or trucks.
Good Morning Wishes For Girlfriend– Good Morning Kiss Images, Images, Status, Messages, and Quotes to show your love to your girlfriend, wife, husband, and boyfriend.
Birthday Wishes In Punjabi– We have shared Happy Birthday Wishes in Punjabi, Punjabi Birthday Messages and Punjabi Birthday Quotes, Punjabi Birthday Quotes Happy Birthday Images
Good Morning Wishes For Brother – Good Morning Wishes offers Good Morning Life And Time Are Our Best Brother pictures, photos & images, to be used on Facebook, Tumblr, Pinterest, Twitter, and other websites.
I’m impressed, I must say. Actually rarely can i encounter a blog that’s both educative and entertaining, and without a doubt, you could have hit the nail about the head. Your idea is outstanding; the thing is something that too few individuals are speaking intelligently about. We are delighted that we came across this around my try to find some thing with this.메이저사이트
Drum chippers are specific types of wood chippers used to reduce wood (usually large tree limbs, branches, or trunks) into smaller wood chips. These are often portable,
with the ability to mount them on wheels and frames that can then be towed behind tractors, vans, or trucks.
Markabet her zaman en yüksek oranları sunan güvenilir bir bahis firmasidir. Güvenle 7/24 bakiye akışı sağlayabilirsiniz.
Your ideas inspired me very much. 메이저토토사이트모음 It’s amazing. I want to learn your writing skills. In fact, I also have a website. If you are okay, please visit once and leave your opinion. Thank you.
Arzbahis en yüksek oranlar ve geniş bahis seçenekleri sunan bir firmadir. Güvenilir bahis siteleri arasında yer almaktadır
I was impressed by your writing. Your writing is impressive.. Keep sharing a quality article.
I finally found great post here. Thanks for the information.
https://www.casinosite777.info
Great blog article. Really looking forward to read more.
https://www.baccaratsite.biz
Thanks for sharing a great article. You are providing wonderful information, it is very useful to us. Keep posting like this informative articles. Thank you.
Here are some links to web pages that we link to simply because we feel they’re really worth visiting.
Birbirinden eğlenceli casino oyunlarının bulunduğu ve yüksek bahis oranlarına sahip sekabet sitesinin giriş adresi yenilendi.
I really like all of the points you have made. Your article is extremely attractive and interesting..
sekabet sitesinin yeni giriş adresi
Birbirinden eğlenceli casino oyunları ve yüksek oranlı bahisler için güvenli adres olan sekabet sitesinin giriş adresi yenilendi. Siz de siteye giriş yapmak için bizi takip edin.
There’s noticeably a bundle to learn about this. I assume you made certain nice points in features also
Arzbahis mobil ödeme ile yatırım yapılan siteler arasındadır. Minimum 5 TL tutarında işlem yapabilir ve güvenle bahis oynayabilirsiniz. Sizlerde şansınızı denemek için güncel adrese sayfamızdan ulaşın!
you own lifted an crucial offspring.. Blesss for the usage of.. I’d need to study higher ultra-modern transactions from this blog.. Preserve posting. I am unable to study articles on line very often, however i’m satisfied i did today. That is very well written and your points are properly-expressed. Please, don’t ever stop writing. That is the splendid attitude, nonetheless is just no longer assist to make every sence by any means preaching approximately that mather . Surely i admire the effort you made to share the expertise. The topic right here i discovered was honestly effective to the subject which i used to be learning for a long term . I assume this is one of the maximum sizable information for me. 먹튀폴리스
I felt extraordinarily upbeat while perusing this web page. This become honestly highly educational website online for me. I definitely favored it. This became actually a welcoming submit. An awful lot preferred! Thanks again for all the information you distribute,right publish. I was very inquisitive about the thing, it’s pretty inspiring i ought to admit. I love touring you web site since i always come upon exciting articles like this one. Amazing task, i greatly appreciate that. Do maintain sharing! Regards . Positive website, wherein did u come up with the information in this posting? I’ve read the various articles to your internet site now, and that i definitely like your fashion. Thank you one million and please maintain up the effective paintings. A very first rate web page. 토토사이트추천
Excellent info!! It could be one of the most useful blogs we have ever come across on the subject.
Thank you very much for your analysis. Our company is also engaged in related industries and your article is very helpful to us. Our company’s website is https://zetarindustry.com
We are looking forward to the publication of your article soon and it will inspire us more.
All incoming college freshmen are invited to apply to the CHED Scholarship Program 2022. CHED Scholarship 2022- StuFAPs aims to provide financial assistance to students who are enrolled in authorized public or private Higher Education Institutions (HEIs). This helps to ensure that education shall be accessible to all especially to underprivileged and deserving students.
Silicone molded products can be used for numerous purposes in commercial, military, and industrial applications.
Automotive industry uses silicone rubber o rings, glass and window gaskets, exhaust hose, windshield water subsystem, radiator subsystems.
Food and Dairy industry uses molded silicone components for sealing, baking trays, fluid transfer, utensil parts to just name a few.
Construction industry uses for door and windows gaskets, garage door seals, electrical housing seals.
Silicone is a thermal material which can be used in many products and industries.
https://www.newtopcustomsilicone.com
An obligation of appreciation is all together for the better than average blog. It was amazingly useful for me. I m playful I found this blog.
An obligation of appreciation is all together for the better than average blog. It was amazingly useful for me. I m playful I found this blog.
It is amazingly decent to see the best subtle elements introduced in a simple and understanding way.
The information related to biology assignment help is available here.
I really like your blog, the information you’ve provided on the website
I like it when people get together and share views. Great website
https://www.casinositenet.com
We like to honor numerous other world wide web websites around the web, even though they aren’t linked to us, by linking to them. Beneath are some web pages really worth checking out.
https://www.casinositeking.com
Fairly certain he will have a good read. Thank you for sharing!
https://www.slotmachinesite.com
Thanks so much for sharing this awesome info! I am looking forward to see more postsby you
Thanks for share amazing content. Very interesting keep posting. https://www.bacarasite.com
Thanks for sharing this marvelous post. I m very pleased to read this article.
Thankѕ for sharing your thoughts. I truly appreciate you efforts
I’m very curious about how you write such a good article. Are you an expert on this subject? I think so. Thank you again for allowing me to read these posts, and have a nice day today. Thank you. 호치민 가라오케
As a leader in custom silicone molding and silicone manufacturing and we always work hard to provide every customer with outstanding service. We can custom silicone molds as your requirements. We will adopt the most cost-effective injection molding and material as your options.
As a leader in custom silicone molding and silicone manufacturing and we always work hard to provide every customer with outstanding service. We offer custom silicone molds as your requirements. We will adopt the most cost-effective injection molding and material as your options.
Great Blog! What a Lovely Blog is this. I Love Cake, Even I order delicious bomb cake from Kekmart
I’m really glad I have found this information. Today bloggers publish only about gossips and internet and this is actually frustrating. A good web site with exciting content, this is what I need. Thanks for keeping this web site, I’ll be visiting it.
https://www.sportstotomen.com
Thanks for having this post pop-off and getting other’s engaged in DIY projects, the more the merrier
test
This is a truly good site post. Not too many people would actually, the way you just did. I am really impressed that there is so much information about this subject that have been uncovered and you’ve done your best, with so much class. If wanted to know more about green smoke reviews, than by all means come in and check our stuff. 課程管理系統
Read you be conscious of the trend at this point
trend below… 토토사이트
Because of this , it truly is superior you can applicable research prior to providing. It will be possible to share larger document that way. 메이저사이트
Good Post.Thanks for sharing the information for us. We are a organization engaged in the manufacture of high-quality PVC Rubber moulds . Rubber Moulds for Floor Tiles, Rubber Moulds for Paving Blocks, Rubber Moulds for Wall Tiles. if you are looking best quality rubber moulds for paver kindly visit Reackon Concretes Pvt. Ltd.
What an impressive new idea! It touched me a lot. I want to hear your opinion on my site. Please come to my website and leave a comment. Thank you. 메이저토토사이트
It’s a great presentation based on a thorough investigation. I appreciate your honesty. Hi, I’m surprised by your writing. I found it very useful. 토토사이트
Well we extremely get a kick out of the chance to visit this site, numerous valuable data we can arrive. 토토피스트
Preparing for a business trip can easily become overwhelming with constant stress and worry leading to travel anxiety. A few strategies can help you overcome stress anxiety. 토토사이트추천,
“Im still learning from you, but Im making my way to the top as well. I definitely love reading everything that is posted on your site.
“
If I had found this before, my life could be much better than now. Thank you, and I would really like to let you know 메이저놀이터 so that you will feel good.
The most frequently asked questions are how can you win the horse race well? It is a word.안전한경마사이트
Thank you for the information. I really like your clear expression of complex topics. It helps me understand it much better.. I’m happy to join the Internet community. https://totoforce.com/ Check out this
This is an interesting way of explaining that most bloggers don’t understand that even when writing a blog, they need to consider this fact. And after reading your post, I feel like you’re doing that on your blog. Would you like to visit my blog later? https://majornoriter.com/ Check out this
A superbly written article, if only all bloggers offered the same content as you, the internet would be a far better place 바카라사이트
Merci beaucoup pour l’article de blog. Merci encore. A lire la suite…
https://www.bacarasite.com/
You always come up with helpful and timely information. I will take this information and add your site to my list. Cheers!
https://holyname.one
Interesting and amazing how your post is!The content makes the post more interesting really appreciated.
thanks for sharing this beautiful blog
truly appreciate this post. I’ve been looking everywhere for this!
It’s very nice. Congratulations.
it was really great for me – I was looking for such a thing
Of course, your article is good enough, baccaratcommunity but I thought it would be much better to see professional photos and videos together. There are articles and photos on these topics on my homepage, so please visit and share your opinions.
bb
This website offers high-quality articles and reviews, which are the major reason why readers should pay a fast visit.
My day is coming to a close, but before it does, I’m reading this substantial piece of writing to advance my knowledge.
Oh my goodness, that’s what I was looking for, what a thing! existing here at this website, many thanks to the website’s administrator.
There, you made some respectable points. I looked on the internet for more information about the problem and discovered most people will agree with what you have to say.
It’s a very good professional blog post. Thank you for the information that will be of great help to my project.
It’s a very helpful blog for me. I was able to see a new issue in your article.
I am happy to find the best bibliography. Thanks for sharing a useful article.
I totally agree with the text. I can get correct and updated information.
Your story impressed me a lot. I’m looking forward to further updates.
I am glad to see the best textbook. Thanks for sharing useful articles.
This is a very professional blog post. Thank you for the information that will help my project a lot.
I’m glad to find the best bibliography. Thank you for sharing a useful article.
I completely agree with the text. I learned very accurate current information.
This blog is very useful to me. I can see new problems in your article.
Your story touched me a lot. Looking forward to more updates.
I was very impressed by your story. I look forward to more updates.
I completely agree with the text. I was able to learn very accurate up-to-date information.
[IZ상위노출] You are such a motivated person, you show great attention to detail!—→해운대호빠
I read this paragraph fully about the comparison of latest and previous technologies,..it’s awesome article..Quality posts is the important to be a focus for the users to pay a quick visit the site, that’s what this web page is providing. 먹튀패스 먹튀검증업체
Thanks for every other great article.
Very good info.
This is to helpful, I have read here all post.
Thanks for the informative and helpful post, obviously in your blog everything is good..
I’ve been reading all the articles related to 플레이포커머니상 for the past hour, but I don’t know why I saw this post now. It seems like very useful information.
Thanks for publishing this kind of blog.. you provide a nice info.
I love seeing more and more people visiting your blog. I, who have been together for a long time, created a forum with the same topic as yours this time. The subject is going to be captured by 플레이포커머니상.
I think this is an informative post. Absolutely well-researched
I absolutely feel this web site. I’ll be back again to see more
You’re one of the highest quality sites online. You’re great. Magnificent it is
It was definitely informative post. Extremely helpful. I love your works
Good site here. I appreciate individuals like you! I love the article, Take care!!
Really Very Helpful For me Thanks…
The whole process is so fantastic! maybe we can try newxt time
cool theory. I will try it.
hello friend.
I’m doing a water leisure business in Korea.
I read well what you wrote.
I hope you had a good time today too.
Wonderful illustrated information. I thank you about that. No doubt it will be very useful for my future projects. Would like to see some other posts on the same subject!
en güvenli yatırım aracı ve sevilen slot oyunları bu adreste oynanır ve işleme alınır.
Thank you for your informative blog. This blog is quite helpful and simple to understand. This website is also quite nice in my opinion; there are many more blogs like this one, such as ProiDeators Digital Marketing Course.
I’ve been reading all the articles related to 플레이포커머니상 for the past hour, but I don’t know why I saw this post now. It seems like very useful information.
I love seeing more and more people visiting your blog. I, who have been together for a long time, created a forum with the same topic as yours this time. The subject is going to be captured by 플레이포커머니상.
XYD Display Furniture Co.,ltd. provides Shop Jewelry Showcases, Shop Furniture, Display Furniture for jewelry, watches, cosmetics, clothing, telephones, digital products, glasses, shoes, bags, etc. for shops.
Thank you for such valuable information
BTS Jin, who went to the army, saved a Brazilian fan?… Photo of robber startled슬롯사이트
Reports emerged that a woman in Brazil escaped robbery by putting a photo of group BTS member Jin (real name Kim Seok-jin) in her cell phone case.
Twitter’s advertising revenue cut in half after Elon Musk acquisition카지노솔루션Elon Musk said that since acquiring Twitter for $44 billion in October, advertising revenue has nearly halved.
Ukraine War: What’s Inside the Regions Recaptured from Russia?As Ukrainian forces recaptured some territories in a counter-offensive, the BBC was one of the first media outlets to gain access to the recaptured territory and sought it out on its own.by카지노사이트
Everyone is well aware of the importance of safety when
it comes to online sports betting. My website has a lot of
useful sports news information, check it out now.
https://www.mt-blood.com/토토먹튀블러드
Vous êtes au bon endroit pour votre permis de conduire enregistré, votre vrai passeport, vos cartes d’identité, votre permis de bateau et tout (( https://realdocumentproviders.com/fr/))
ok, it is good diea, it can help me
Amazing! Anyone can find a best professional articles online. After reading your content it is totally cleared how to choose it. I learn about the importance of many topics also. Thanks for such a grateful help.
The BA 2nd Year students have started searching for the B.A Part II Result because they want to know the B.A Part II Year Result 2023 very soon.
Thanks for this DIY tutorial! :) I read many positive words that start with S about silicone molds and I can’t wait to try it myself!