• Home
  • Blog
  • About
  • Collaborate
    • Media Kit
  • We Make
    • Bloglovin
    • Facebook
    • Instagram
    • Pinterest
    • Twitter
    • YouTube

Fall For DIY

  • DIY
  • Interiors
    • Planters
    • Paper
    • embroidery
    • Drinks
  • Blogging
    • Photography
    • Instagram
  • fashion
    • Jewellery
    • Accessories
  • Inspiration
    • Round Up
    • 50 DIYs
  • Office
    • Free Printables
    • Organize
  • Party
    • Christmas
    • Halloween

Our favourite things in your inbox every month!

DIY Woven Wall Hanging

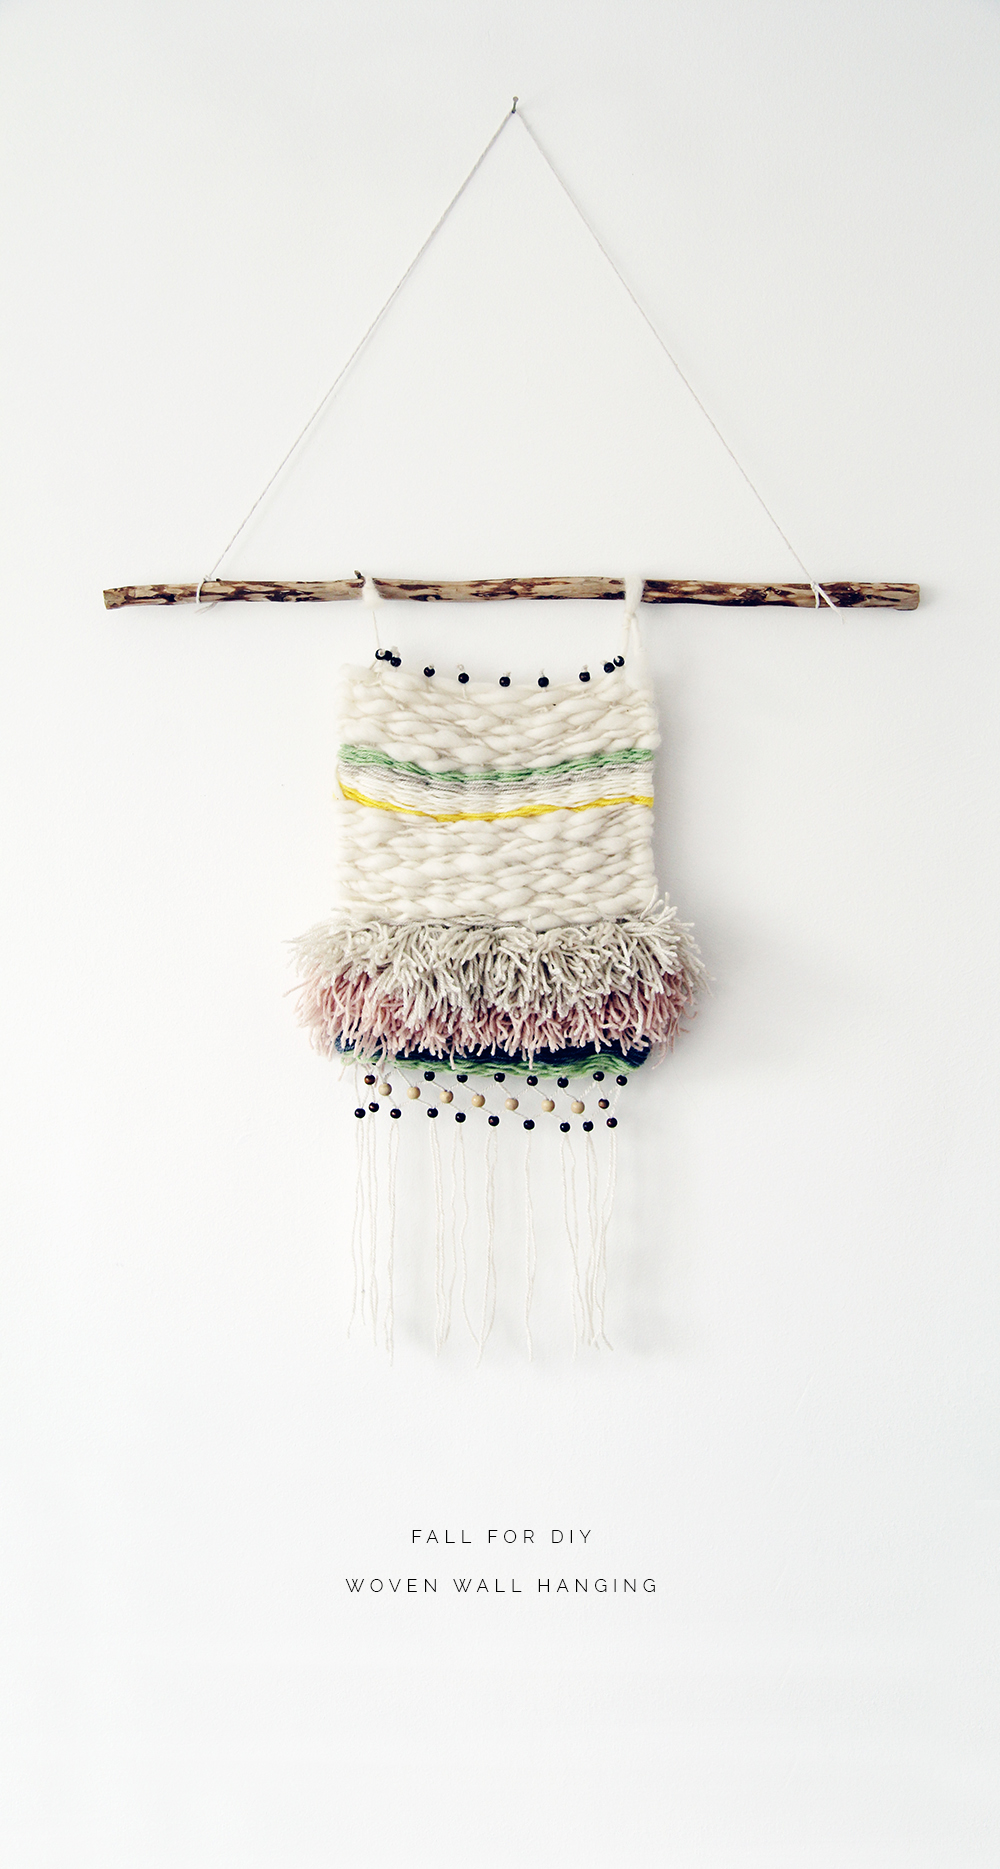
If you’ve ever delved into the world of knitting or crochet I’m betting you have enough yarn stashed away to clothe a small army (ok, a very small army… of children). My studio is full of bundles of left over scraps and balls bought with the best intentions so I decided to gather up a few and give them a purpose in life using my new (DIY) peg loom. I’d seen a lot of woven wall hangings floating around the Pinosphere (like that?) and wanted to give it a go!

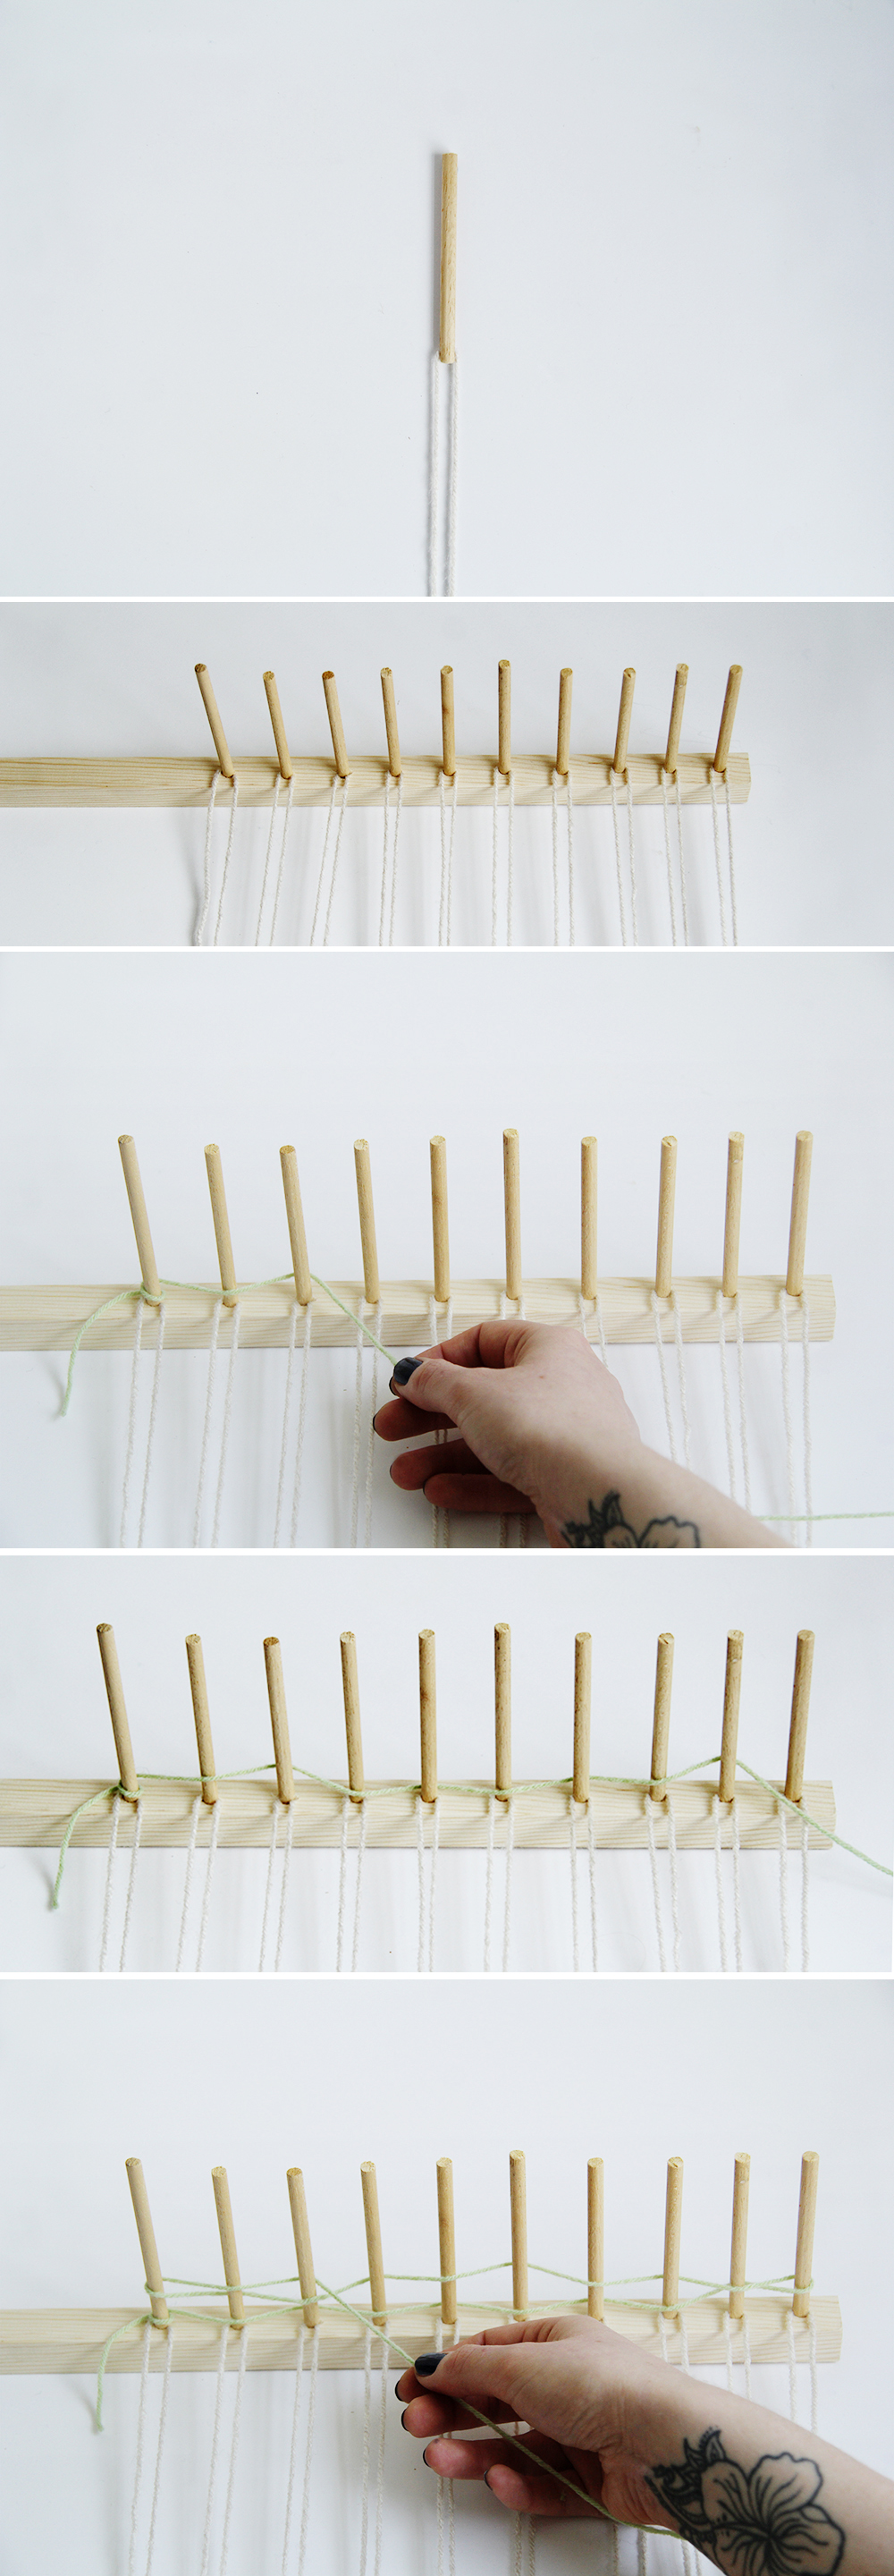
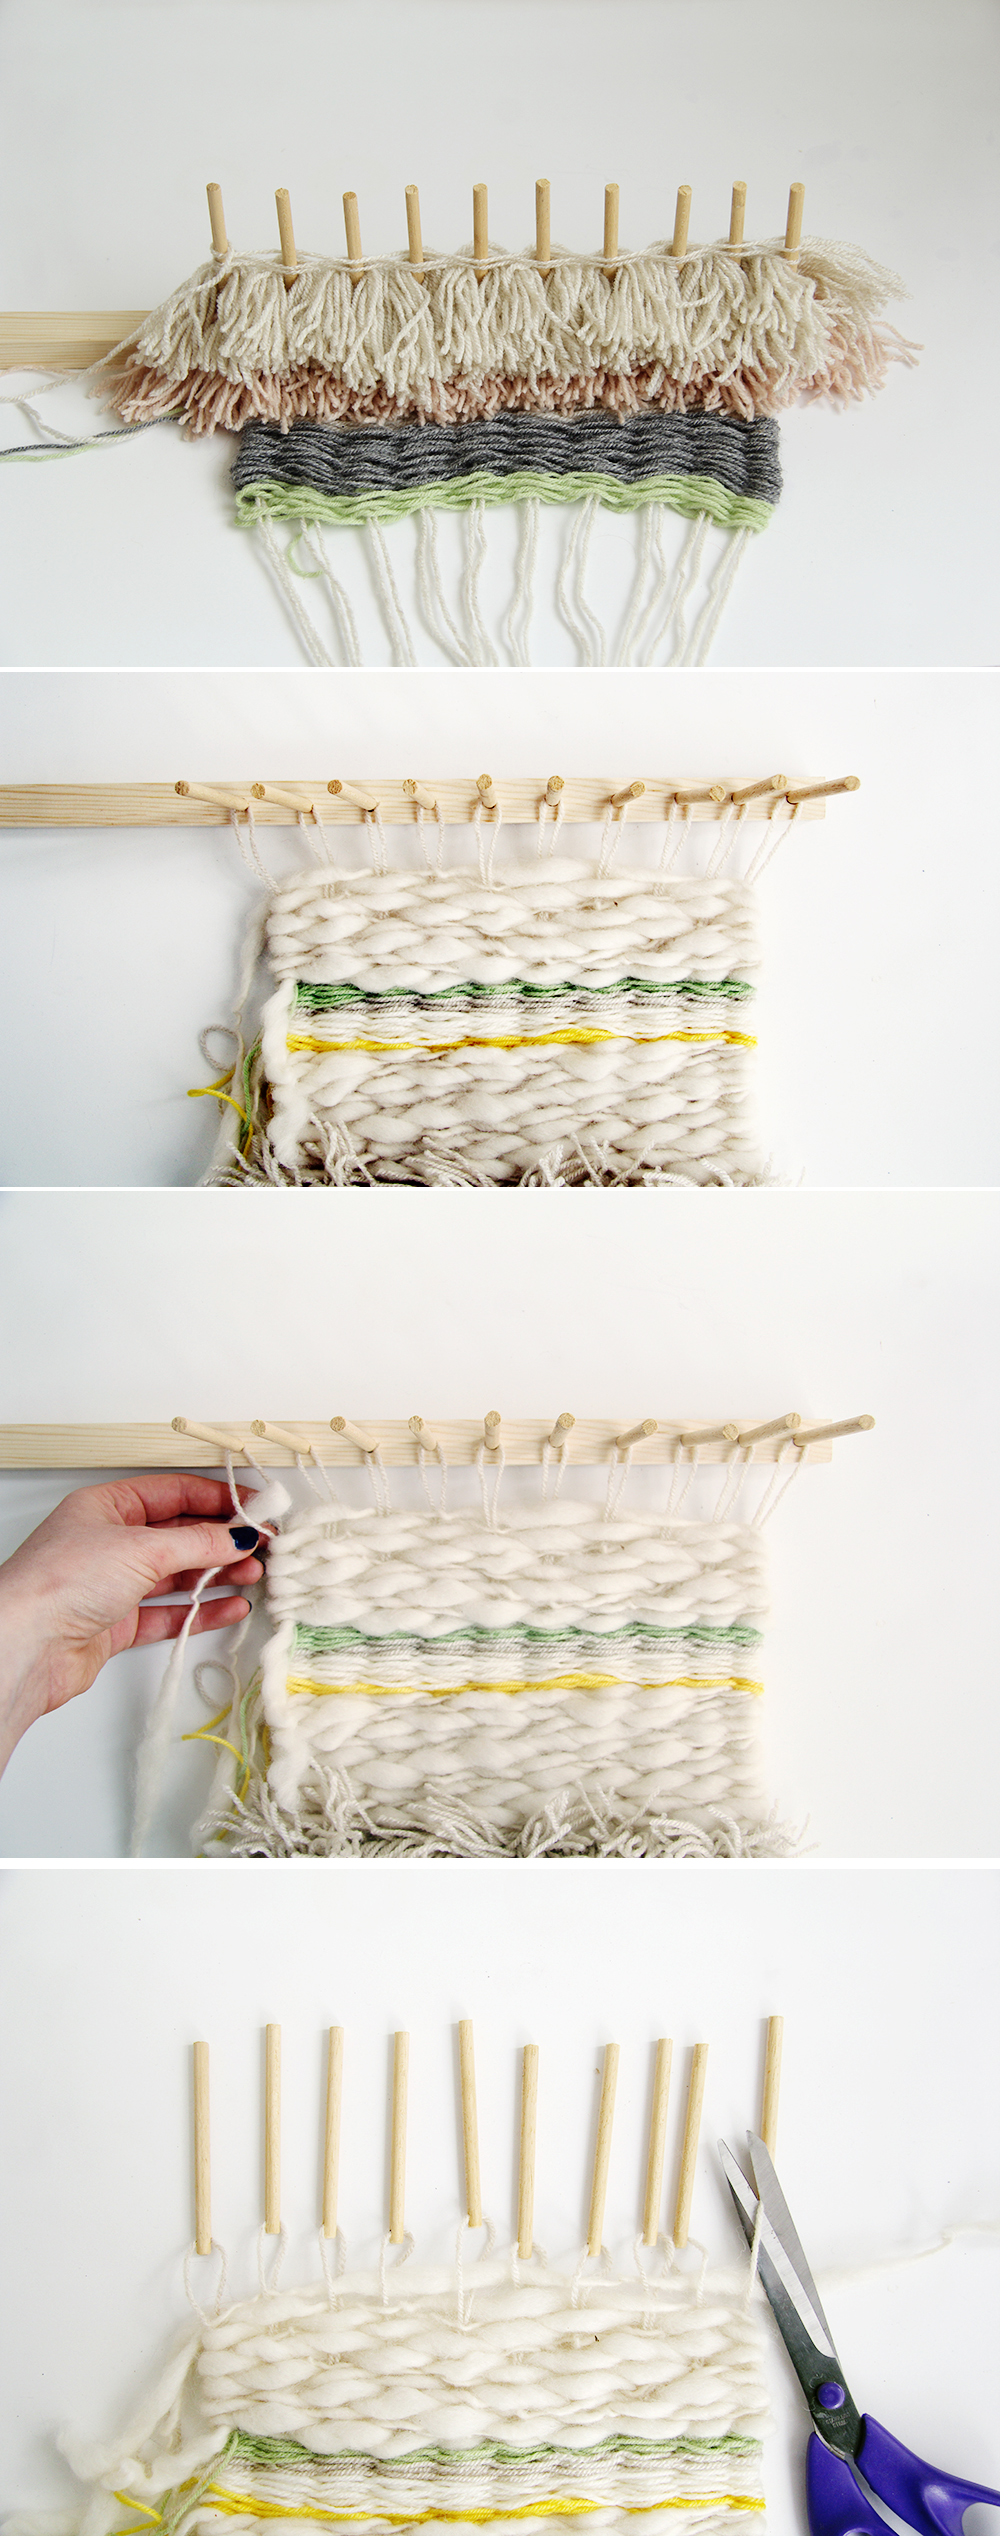
1. Cut and thread metre lengths of a neutral coloured yarn into each of your pegs.

2. Stick the pegs, hole side first into the loom holes. Make sure the threads are facing the same way.

3. Take your first yarn, wrap it around the first peg, then weave in and out of the remaining pegs. When you reach the end turn back on yourself and weave in the opposite direction.

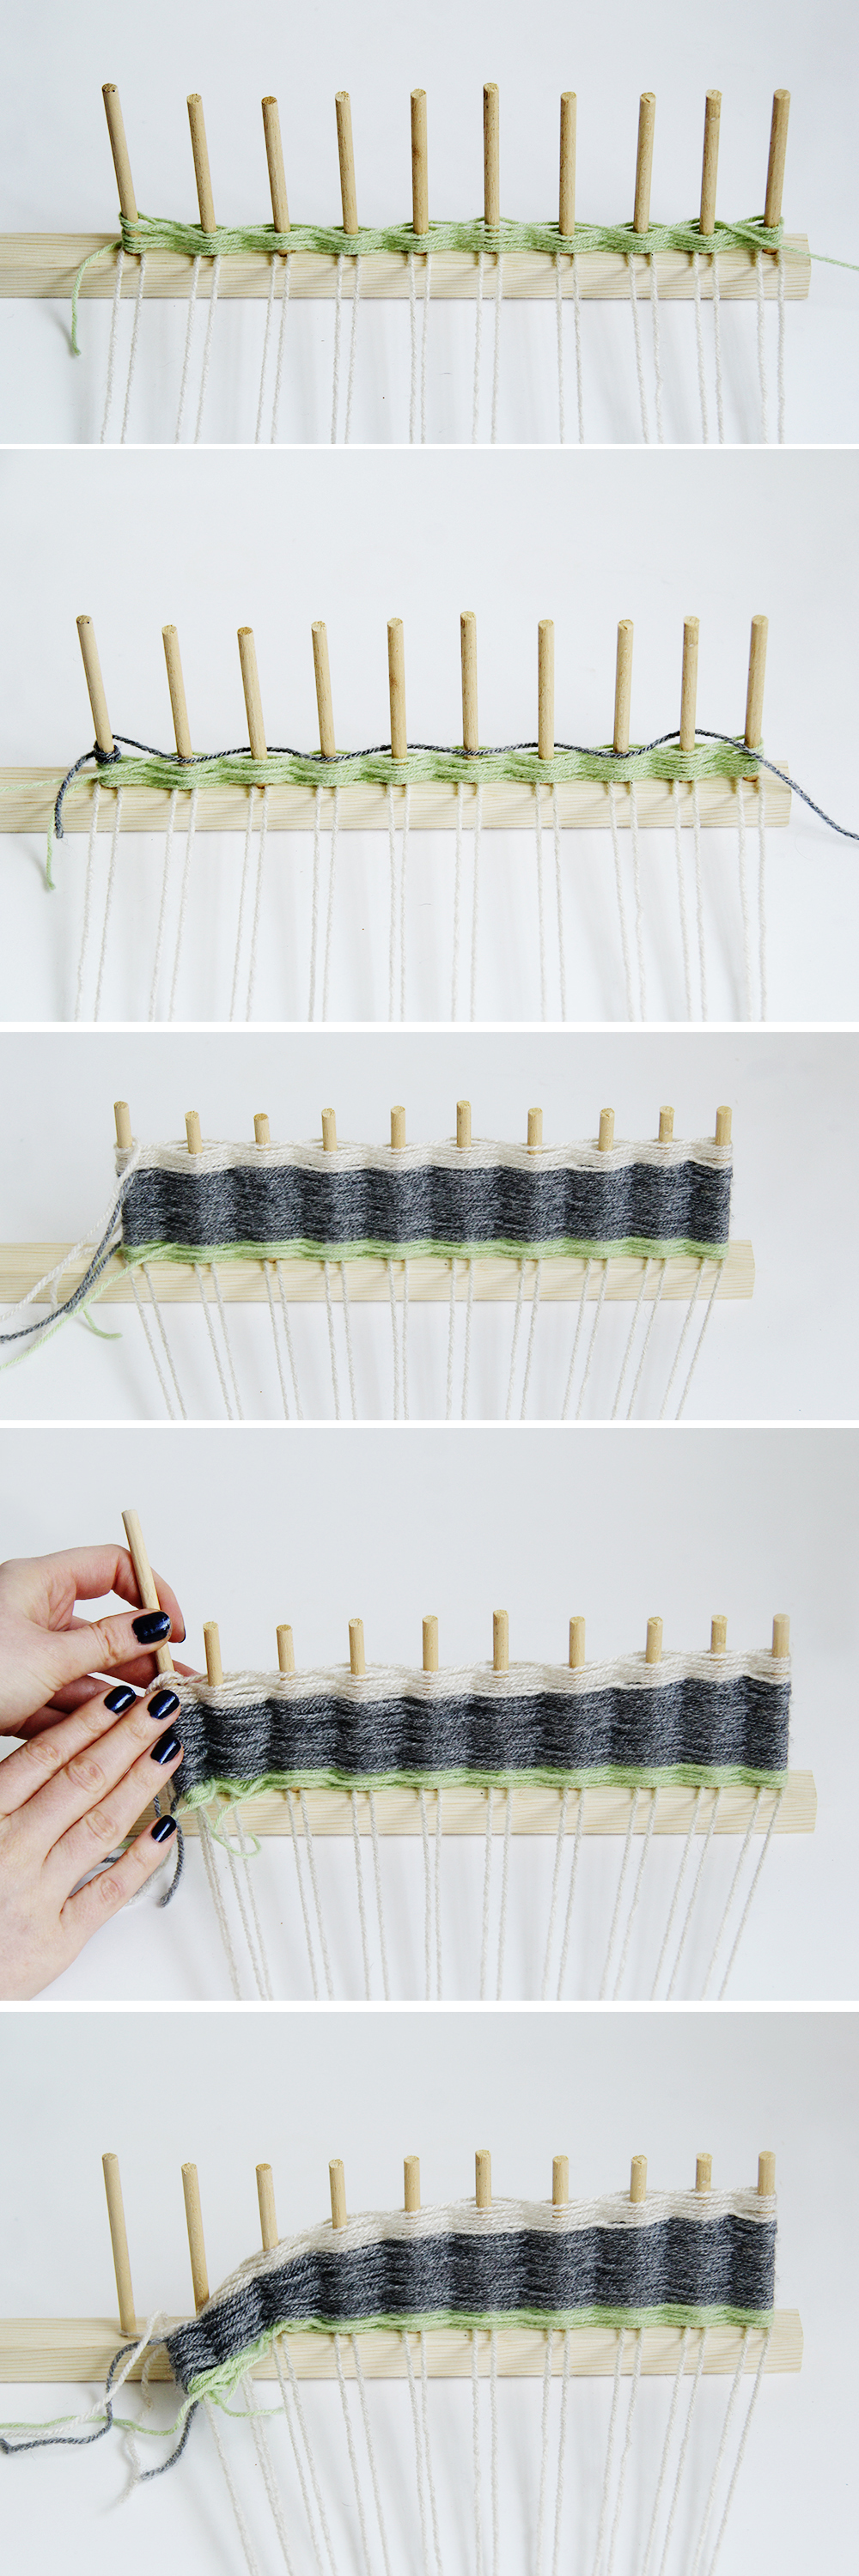
4. Once you’re happy with the width of the first band of colour do the same with a different yarn.

5. Keep doing this until you reach the top of the pegs. Then carefully lift the first peg out of the hole and slide the woven yarns down off the bottom of the peg.

6. Start weaving more yarn on to the pegs.

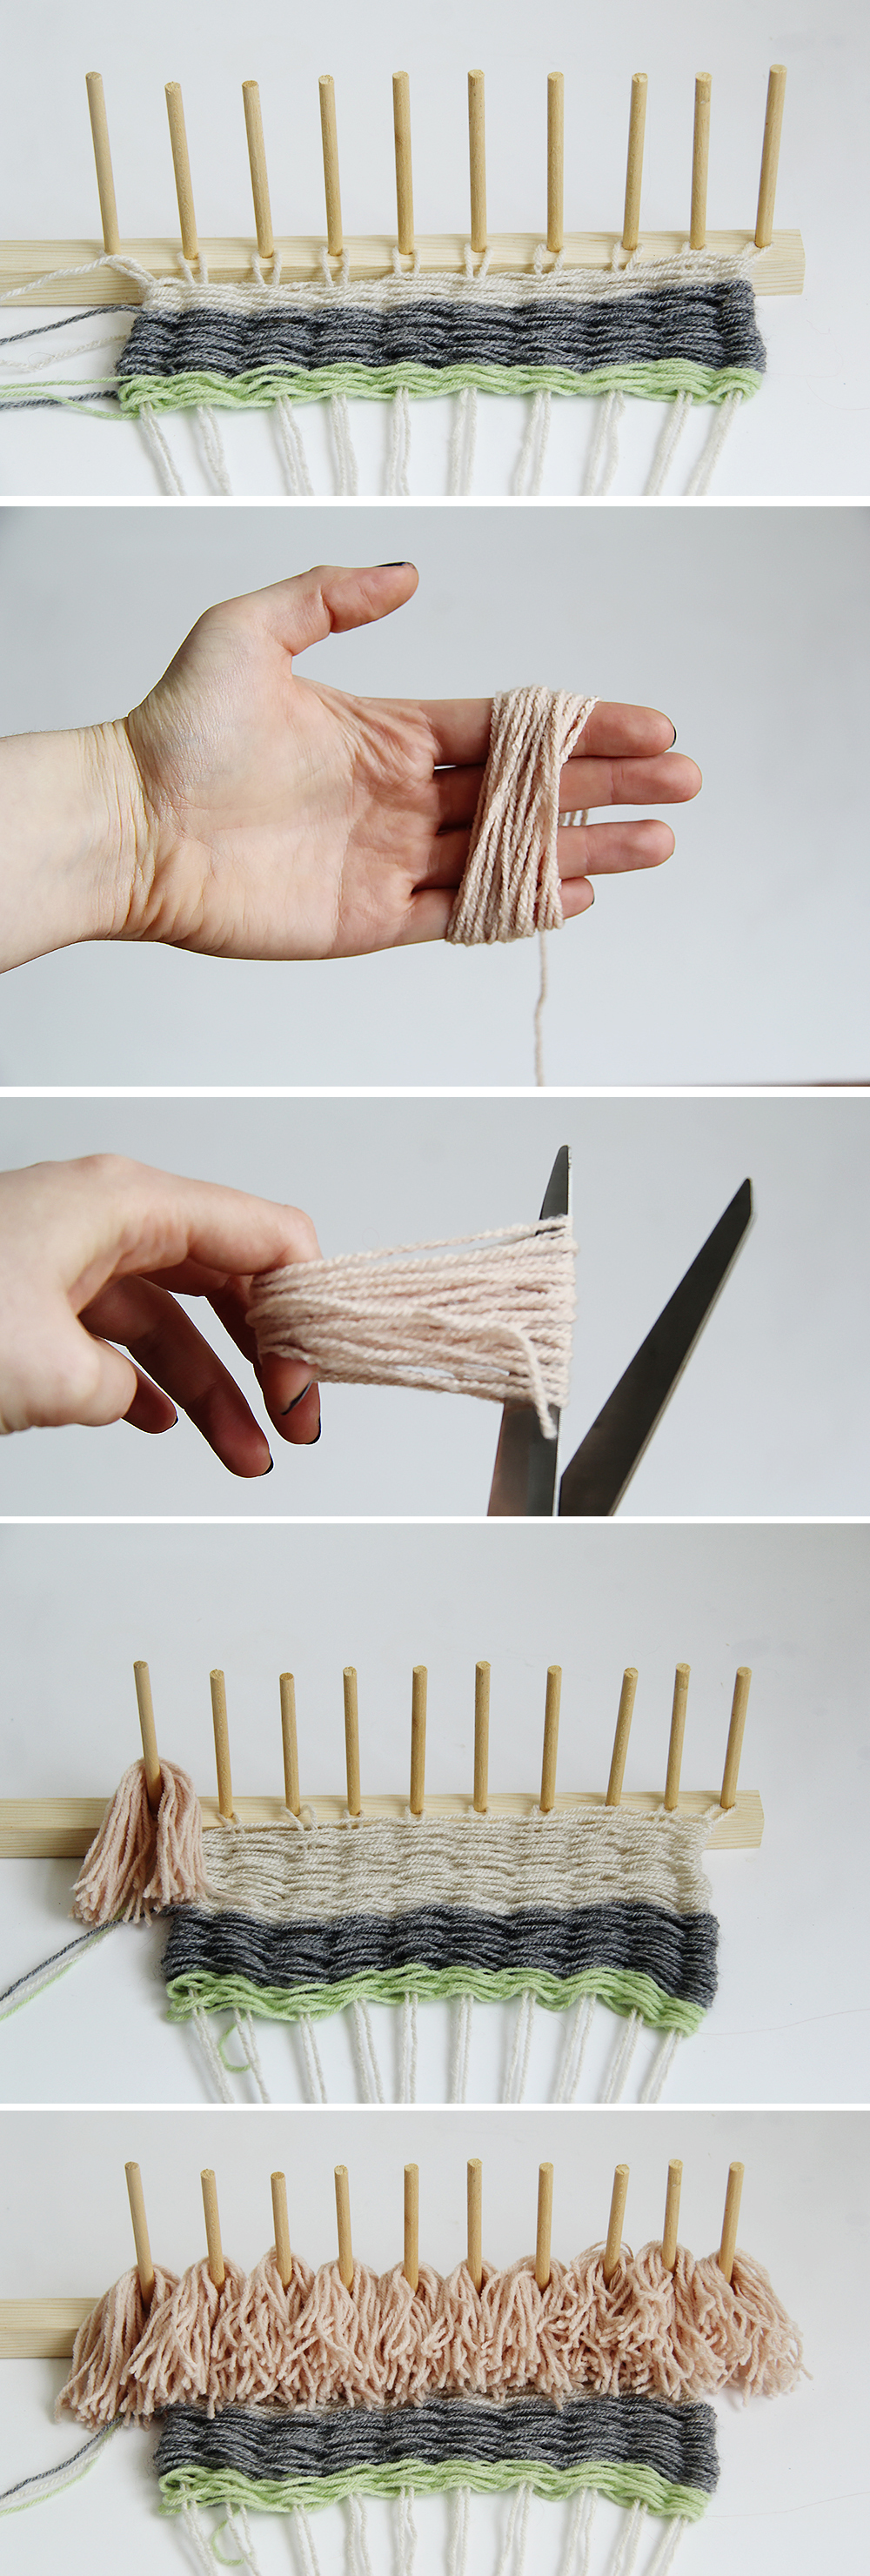
7. To break things up a bit I made some tassels (of course) by wrapping yarn around my fingers and cutting all the yarn along one end of the loop.

8. Place your tassels carefully over the pegs trying not to pull too many threads out of place.

9. Once you’re happy with you tassel layers continue to weave the yarn in between the pegs.

10. Repeat these steps using random weights of yarn until you are happy with the design.

11. To finish your piece pull the woven section down from the pegs a little and thread a length of yarn in between each of the loops going through the pegs.

12. Cut the yarn off the pegs and thread a bead on to both threads.

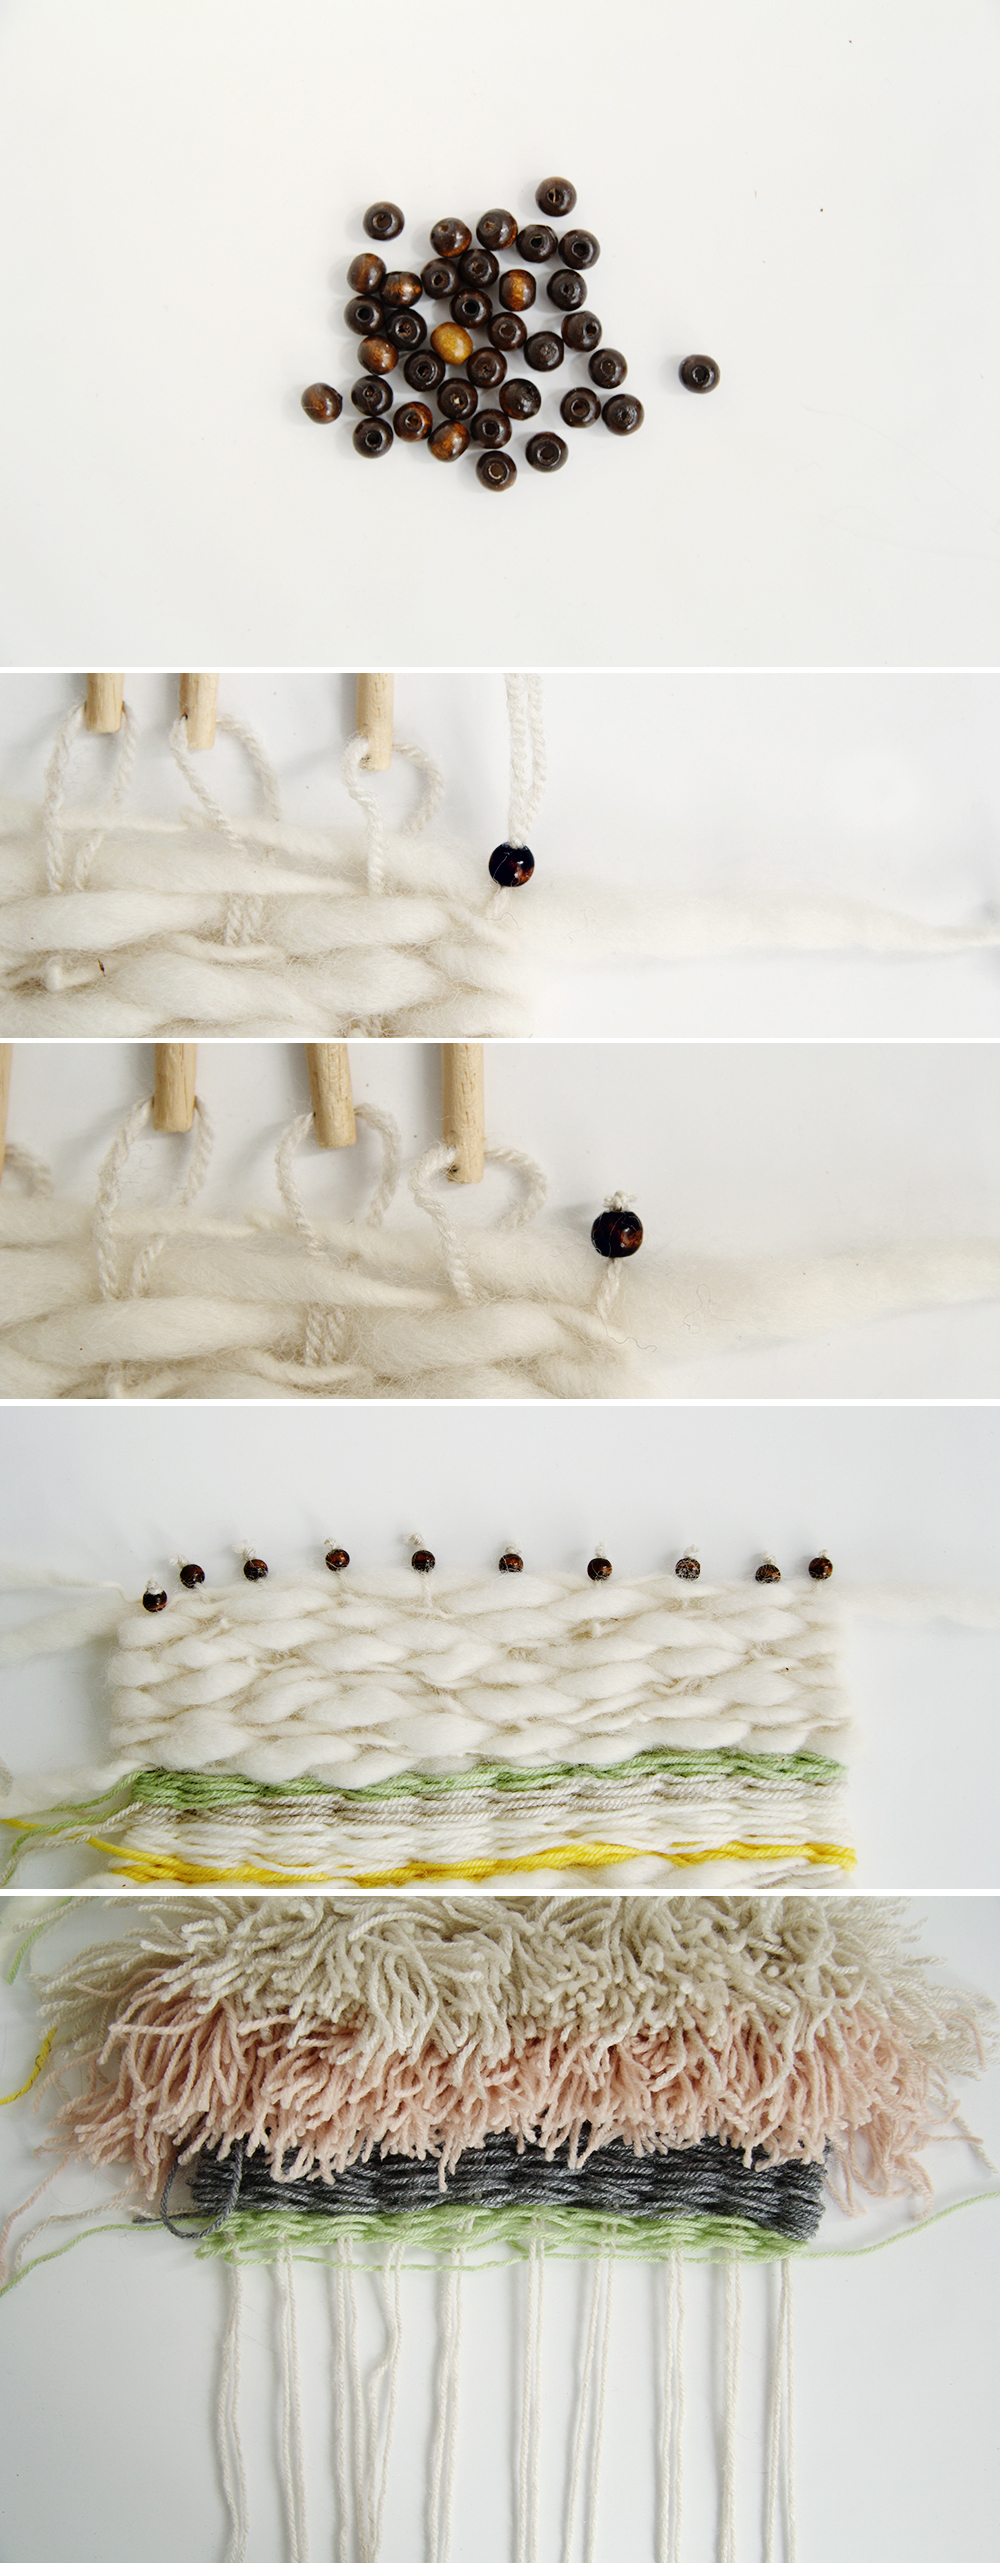
13. Knot the yarn just above the bead and continue along the whole of the piece doing the same to each peg.

14. At the bottom of the piece thread a bead onto each (double) end of yarn.

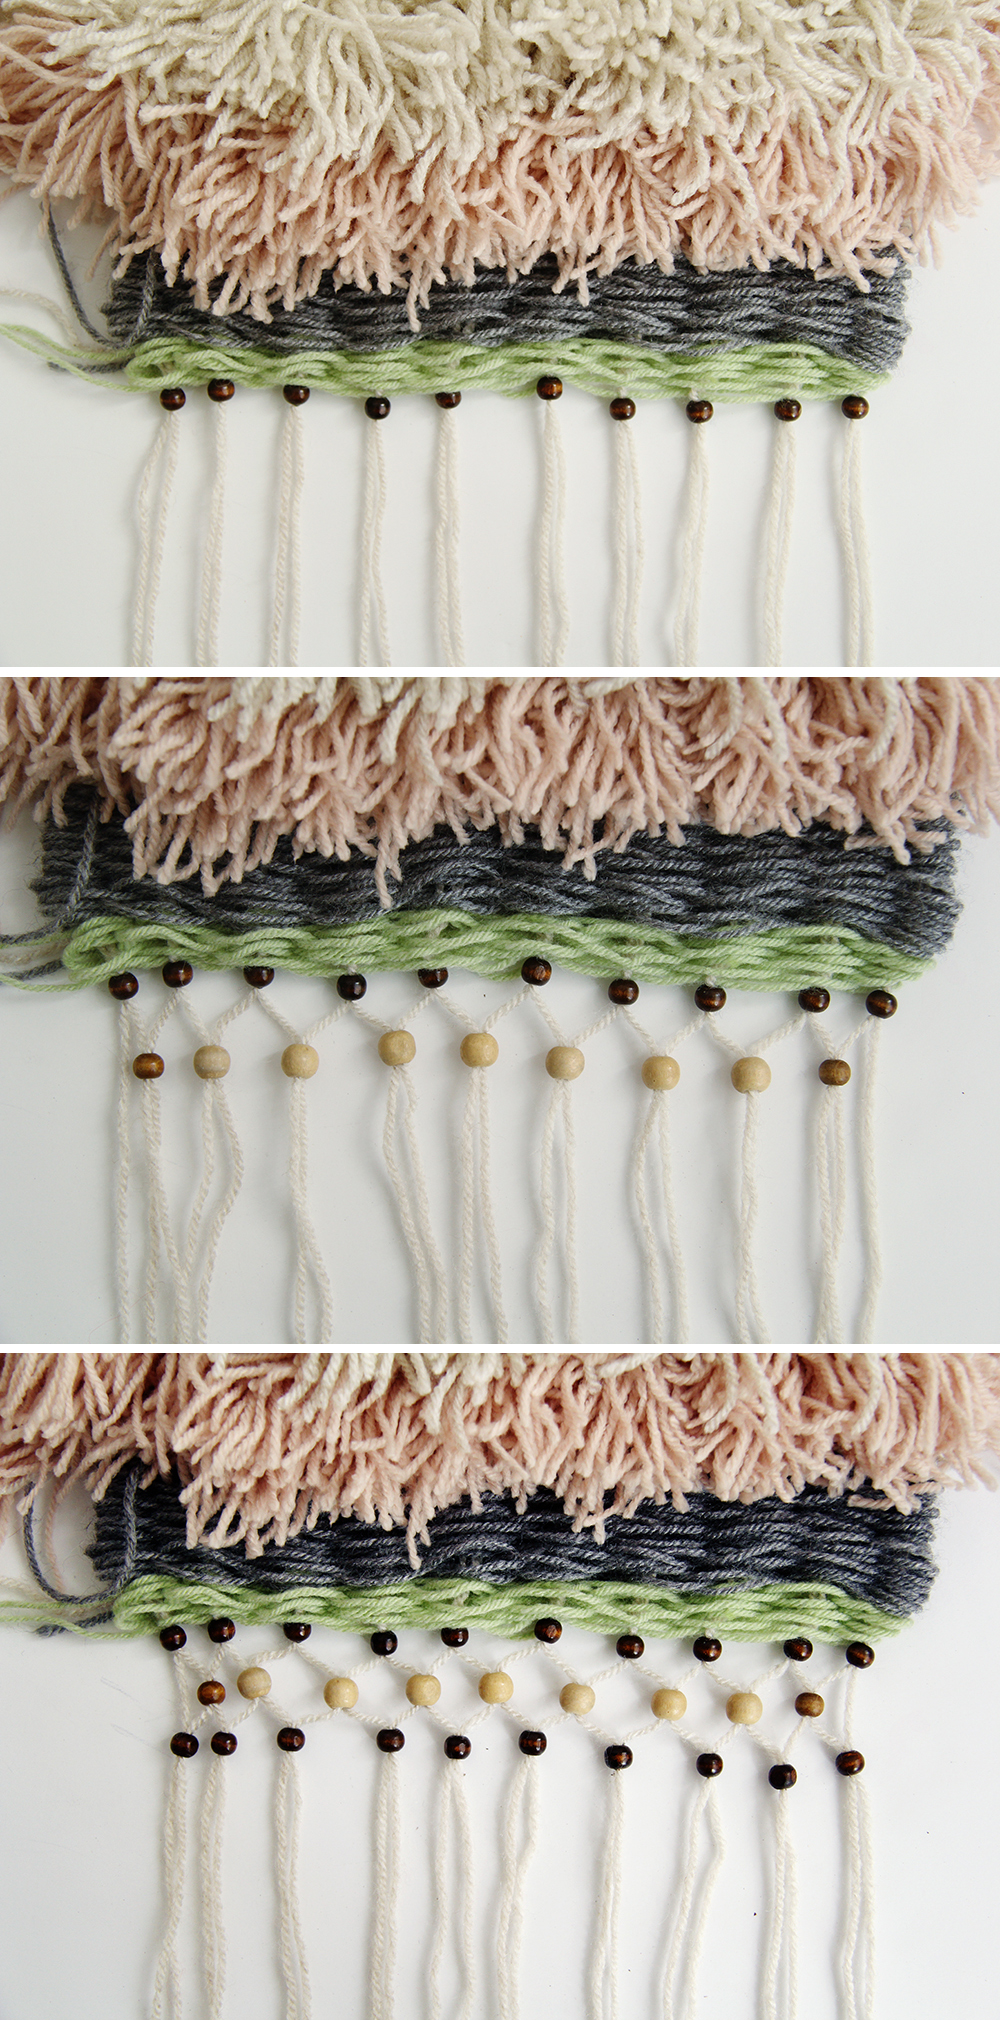
15. Missing out the first thread from each end slide a bead onto two threads that are next to each other but from separate beads.

16. For the last row thread beads onto the original two threads to create the pattern shown above.

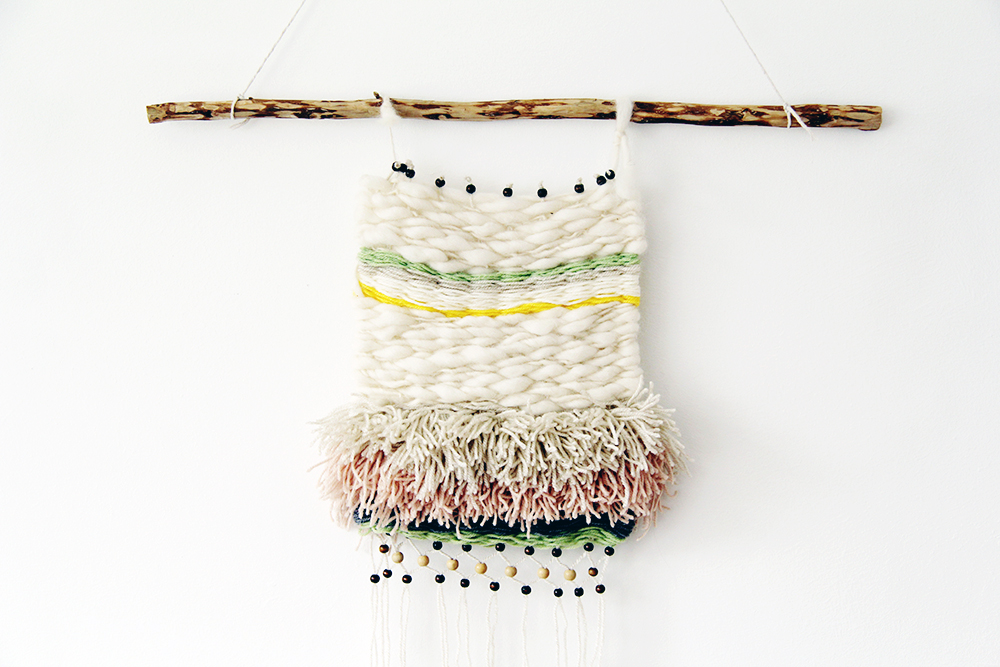
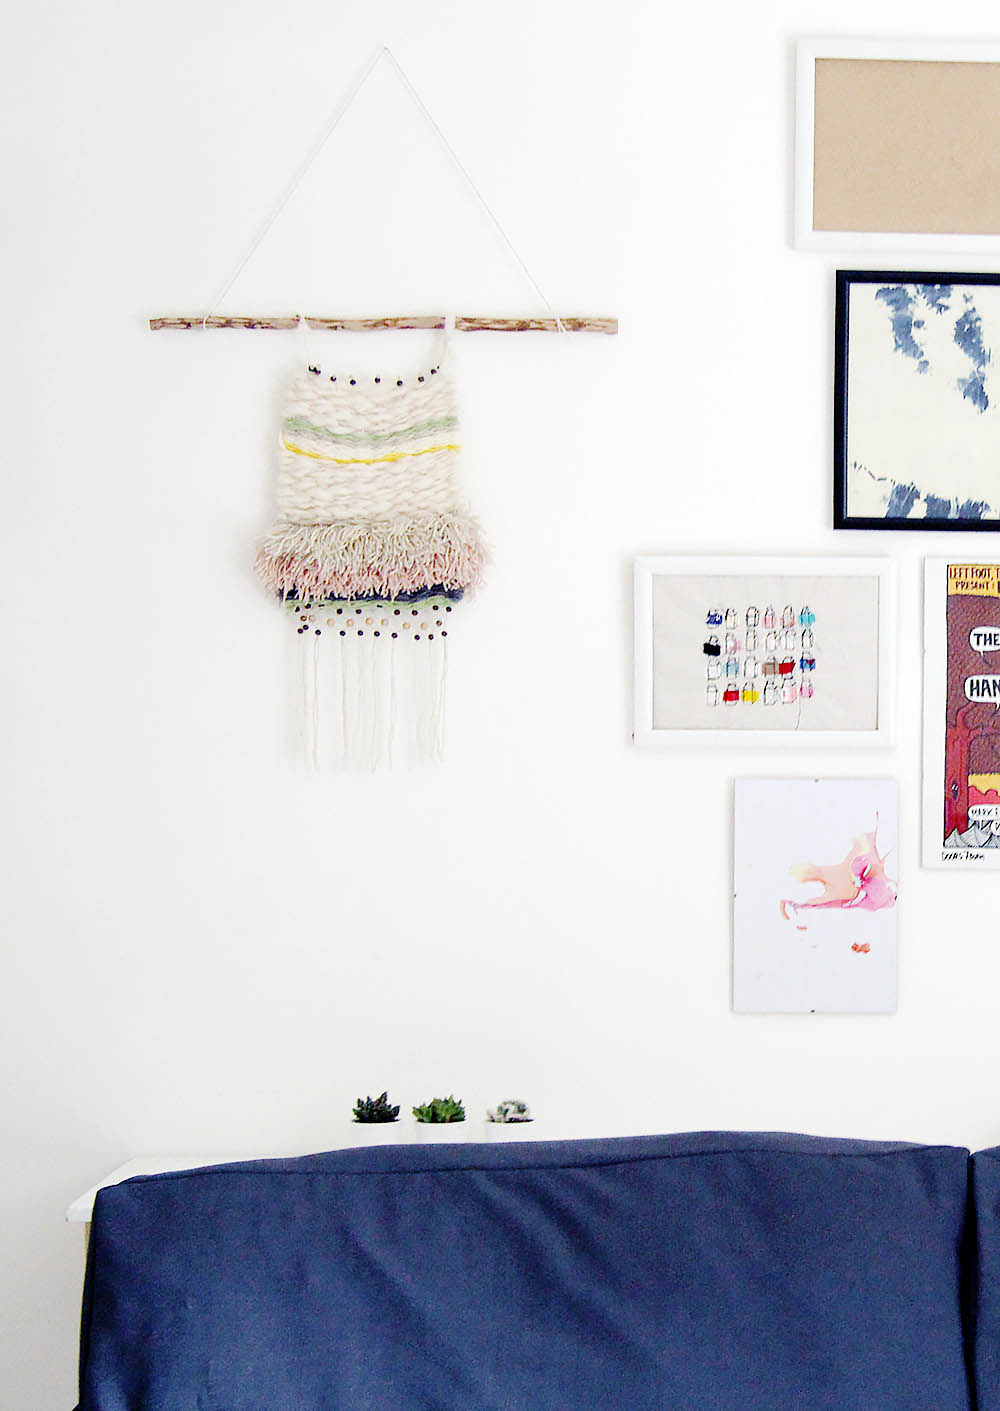
17. Find a branch to tie it to and hang next to a picture wall of over your bed.

I can’t wait to see what you guys make out of this one. Remember to tag me @fallfordiy on Instagram to show me your versions and if you have a questions or suggestions just pop them down there in the comments.


Related

DIY// Interiors46 Comments

« How to Make a Peg Loom
DIY Concrete Bracelets »

Comments

  1. Ice Pandora says

    May 6, 2014 at 7:48 pm

    Ohmygooodness! This looks really cool DIY c:
    But I doubt I will pull it off cuz it looks pretty
    hard :c
    love the woven wall decoration ^___^ Xx

    Reply
    • fran says

      May 7, 2014 at 2:48 pm

      No way! Really, it’s so easy (I wouldn’t have the patience for it if it was too difficult!) I bet you could do it. :)

      Reply
  2. Beth says

    May 6, 2014 at 8:17 pm

    I love your weaving! Your loom is different than mine. Mine has two sets of pegs that stay in place and you have to weave the yarn under and over in rows. Your looks like it might be faster (which I always love).

    Reply
  3. Amy @ Homey Oh My! says

    May 6, 2014 at 10:10 pm

    WOW. You are so creative Francesca… I’m blown away and will never look at looming the same again (in a good way of course!)

    Reply
    • fran says

      May 7, 2014 at 2:45 pm

      Amy You’re too kind. And this coming from you seriously means something as well. I’m gushing over here.

      Reply
  4. Erin @ Thanks, I Made It says

    May 6, 2014 at 11:23 pm

    very cool! I just want to pet it : )

    Reply
    • fran says

      May 7, 2014 at 2:43 pm

      Haha! It’s on my wall at a good height for me to just snuggle into… when I’m stressed out… and there’s no one around to see me do it.

      Reply
  5. Jeanine says

    May 7, 2014 at 2:41 am

    You amaze me everytime. I have to say your blog is extremely inspiring and full of many useful practical affordable DIY projects ( that I aspire to try) ;D Thanks for sharing! I think this is one wall hanging I just might be able to recreate on my own.

    Reply
    • fran says

      May 7, 2014 at 2:42 pm

      Jeanine! Thank you so much. Trust me, it’s so quick and easy. You can do it!

      Reply
  6. Amy W says

    May 7, 2014 at 3:40 pm

    This is unbelievable. I am in love with this woven wall hanging!! I’d be honored if you would come share at our link party going on now. http://www.delineateyourdwelling.com/2014/05/link-it-or-lump-it-party-36.html

    Reply
  7. Megan says

    May 8, 2014 at 11:14 am

    This wall hanging is so awesome. I will be making this . I’ll send you a photo when I’m done.

    Reply
    • fran says

      May 12, 2014 at 10:19 am

      Amazing! I’d definitely love to see your take on this tutorial. Can’t wait!

      Reply
  8. Ali says

    May 18, 2014 at 5:50 am

    I have the Martha loom, would this creation work on it. It’s completely adorable.

    Reply
    • fran says

      May 18, 2014 at 7:27 am

      I’ve just had a look at the Martha Loom and it looks amazing! You lucky thing! This will definitely work, it’s perfect for the job. Also in response to your other question I did not tie the tassels. When you start adding cord above them it will hold them in place. There’s nothing stopping you tying them on to create a different effect though. Go crazy!

      Reply
  9. Ali says

    May 18, 2014 at 5:54 am

    Also do you tie the tassels down any type if way?

    Reply
  10. Katie @ 24 Carrot Life says

    May 27, 2014 at 4:46 pm

    I am SO going to try this. Have you seen Maryanne Moodie’s wall hangings? http://instagram.com/maryannemoodie I love them but wouldn’t be able to afford them or her classes so I think your DIY is the perfect place to start. Thank you!

    Reply
    • fran says

      May 30, 2014 at 10:45 am

      Hey Katie,

      I love her wall hangings. I’ve seen them on Pinterest and massively inspired me to make this tutorial. Of course mine is not as beautiful as these, but I’m going to keep practicing!

      Reply
  11. Shelley Makes says

    June 9, 2014 at 9:58 pm

    I absolutely love this! It’s so pretty and girly. I never would have thought it was possible to make something like this myself. I’ve featured your DIY on my blog in a round-up of four of my favourite DIY wall hangings:

    http://shelleymakes.wordpress.com/2014/06/08/inspiration-diy-wall-hanging/

    Thanks for sharing!
    Shelley

    Reply
  12. Suzie says

    June 13, 2014 at 12:50 am

    Awesome! Where did you get the wooden loom?

    Reply
    • fran says

      June 17, 2014 at 4:07 pm

      Hey Suzie, I made it!! You can make it too with this tutorial :)

      Reply
  13. Paola says

    November 24, 2014 at 11:46 pm

    Wow, this is so great!!!
    Found your amazing tutorials yesterday and started building my own peg loom right away and also did my first wall hanging. Thank you so so much for this inspiration and the awesome tutorial :-)
    Just wondering one thing: what did you do with all the yarn ends on the side?
    Thank you again :)

    Reply
  14. angie says

    January 14, 2015 at 4:00 pm

    i made one just like yours!! I love it! thanks for the tutorial!!

    Reply
    • fran says

      January 16, 2015 at 3:21 pm

      YAY!!! LOVE IT! Please tag me on Instagram if you have it. I want to see what you made!

      Reply
  15. Betty says

    March 26, 2015 at 3:22 pm

    molto bello e pratico da fare!!

    Reply
  16. Madelynne says

    November 21, 2015 at 11:23 pm

    I love this post! Thank you so much for sharing! So I have one question, how do you finish off your strings after you have switched colors?

    Reply
    • fran says

      November 22, 2015 at 10:51 am

      Hey Madelynne,

      Thank you so much! To finish off the colours leave a tail about 4-5″ long at each change. Then once the work is finished take a tapestry needle (or one with a large eye) and sew the threads into the back of the work.

      I hope that helps!

      Fran x

      Reply
  17. Lorraine Viljoen says

    August 19, 2016 at 9:44 am

    Awesome cannot wait to do it myself thank you so much

    Reply
  18. Lorraine Viljoen says

    August 19, 2016 at 9:48 am

    Awesome c annot wait to start with my wall hanning

    Reply
  19. michele says

    July 23, 2018 at 2:39 pm

    Hello! Here is a good offer for you. http://bit.ly/2JMTAE1

    Reply
  20. Artykuły Szkolne says

    October 6, 2018 at 7:10 am

    These speakers fulfill the two major considerations: volume
    and sound quality. I am resigned to the fact that buying
    anything via the Internet, without seeing
    it, has risk associated with it. However, the major highlight with this Samsung TV
    is its integrated eco sensor which won’t only let you adjust along with scheme of one’s TV but also save the electricity.

    Reply

Trackbacks

  1. Woven wall hangings | Chantelle Grady says:
    May 21, 2014 at 3:00 pm

    […] This one below by Fall for DIY has beautiful texture and colour. She also has a tutorial on making a peg loom […]

    Reply
  2. Weekend marvels: 19/2014 | Kittenhood says:
    June 20, 2014 at 6:00 pm

    […] Make: How do you feel about the woven wall hanging trend? I’m thinking of giving it a try. Tutorial from Fall for DIY. […]

    Reply
  3. DIY Trends - 14 Fiber Wall Hangings - DIY Craft Kits, Craft Supplies, Online Craft Supplies, Monthly Craft Subscription Box, Craft Projects - Whimseybox says:
    July 10, 2014 at 5:30 pm

    […] 11. DIY Woven Wall Hanging […]

    Reply
  4. Trend alert: modern weaving | Baby Montgomery says:
    August 20, 2014 at 7:42 am

    […] DIY Woven Wall Hanging via Fall for DIYDIY Front Door Weaving via Ann-Marie LovesWeaving Class via A Beautiful MessDIY Hand Knotted Wall Hanging Tutorial via The Gathered HomeWeaving 101 via Playful LearningHow to Make a Custom Loom via Make Scout DIYMake a Mini Loom via M. A. P.A Woven Wall Hanging via Little Things BloggedWoven Wall Hanging via All Put TogetherDIY Woven Wall Hanging via Gathering Beauty […]

    Reply
  5. Woven Wall Hanging | Thimble & Tack says:
    September 1, 2014 at 3:48 pm

    […] Fall for DIY DIY Woven Wall Hanging […]

    Reply
  6. Haakwerkje voor aan de muur | Natascha van Noord says:
    September 19, 2014 at 12:24 pm

    […] van links naar rechts: 1. DesignLoveFest.com 2. FallforDIY.com 3. […]

    Reply
  7. + Woven Wall Hangings + | Jessica Rebelo Design says:
    October 30, 2014 at 10:02 am

    […] (DIY woven wall hanging via fallfordiy.com) […]

    Reply
  8. we love Inspiration: Weben - we love handmade says:
    November 2, 2014 at 6:12 pm

    […] DIY Wandteppich von Fall for DIY 2. Wandteppich von Maryanne Moodie 3. DIY gewebte Kette von Say Yes 4. Webstück von Jesussauvage […]

    Reply
  9. Ideas para explotar tu telar al máximo says:
    November 19, 2014 at 7:31 am

    […] Con las lanas que tenías por casa (Tutorial aquí) […]

    Reply
  10. Faire son macrame soi – même says:
    December 19, 2014 at 9:41 am

    […] 4. Fall For D.I.Y […]

    Reply
  11. Woven wall hanging | withyourone says:
    March 20, 2015 at 9:38 pm

    […] Fall for DIY DIY Woven Wall Hanging […]

    Reply
  12. El telar DIY says:
    April 8, 2015 at 8:58 am

    […] Imágenes vistas en 1 // 2 // 3 // 4 // 5 // 6 // 7 // 8 // 9 […]

    Reply
  13. Summer To-do List | alovelyperception says:
    June 9, 2015 at 9:35 pm

    […] explaining how to do it and I ended up using the DIY guides from Emma at Gathering Beauty and Francesca at Fall for DIY the most. Weaving is actually really fun and super easy! Can’t wait to show you all my […]

    Reply
  14. Hygge og nærvær til væggen - BoligcousBoligcous says:
    December 30, 2015 at 12:01 pm

    […] NEM     ENKEL     LET    ENDNU EN ENKEL ÈN    SVÆRERE MEN SER PROF UD    PROF-AGTIG […]

    Reply
  15. Hygge og nærvær til væggen - BoligciousBoligcious says:
    June 2, 2016 at 8:08 am

    […] NEM     ENKEL     LET    ENDNU EN ENKEL ÈN    SVÆRERE MEN SER PROF UD    PROF-AGTIG […]

    Reply
  16. OAD #41 - 10 DIY tentures murales à réaliser absolument ! - Once a DIY says:
    March 7, 2017 at 10:34 am

    […] DIY #6 / Tenture tissée en laine Si pour vous le métier à tisser n’a aucun secret pour vous, ce DIY pourrait vous inspirer ! Il s’agit d’un beau mix de laines, d’épaisseurs et de couleurs pour une tenture originale à l’esprit gypsy. Source […]

    Reply

Leave a Reply Cancel reply

Your email address will not be published. Required fields are marked *

Search

About

Preorder My Book Now!

Follow

Featured

shop earrings

Partners

Terms & Conditions
Private Policy Statement

DIY

A Green Garden Refresh with Durapost Vento Fences

A Green Garden Refresh with Durapost Vento Fences

3 Ways to Use a Printer that will Make Your Life Better

3 Ways to Use a Printer that will Make Your Life Better

DIY Tower Cleansing Bars

DIY Tower Cleansing Bars

DIY Wavy Shelf with Cricut

DIY Wavy Shelf with Cricut

How to make your Mother’s Day gift more than perfect this year with DIY fabric wrap

How to make your Mother’s Day gift more than perfect this year with DIY fabric wrap

DIY Valentine’s Clay Name Necklaces

DIY Valentine’s Clay Name Necklaces

DIY Seamless Floor to Wall Wood Panelling (with Laminate)

DIY Seamless Floor to Wall Wood Panelling (with Laminate)

How to Recycle your Advent Calendar this Christmas

How to Recycle your Advent Calendar this Christmas

DIY Faux Stoneware Candle Holder

DIY Faux Stoneware Candle Holder

DIY Speckled Clay Arch Picture/Card Holder

DIY Speckled Clay Arch Picture/Card Holder

More Posts from this Category

Copyright © 2023 ·Savory · Genesis Framework by StudioPress · WordPress · Log in