This post is sponsored by Wayfair. Thank you for supporting the brands that support Fall For DIY.
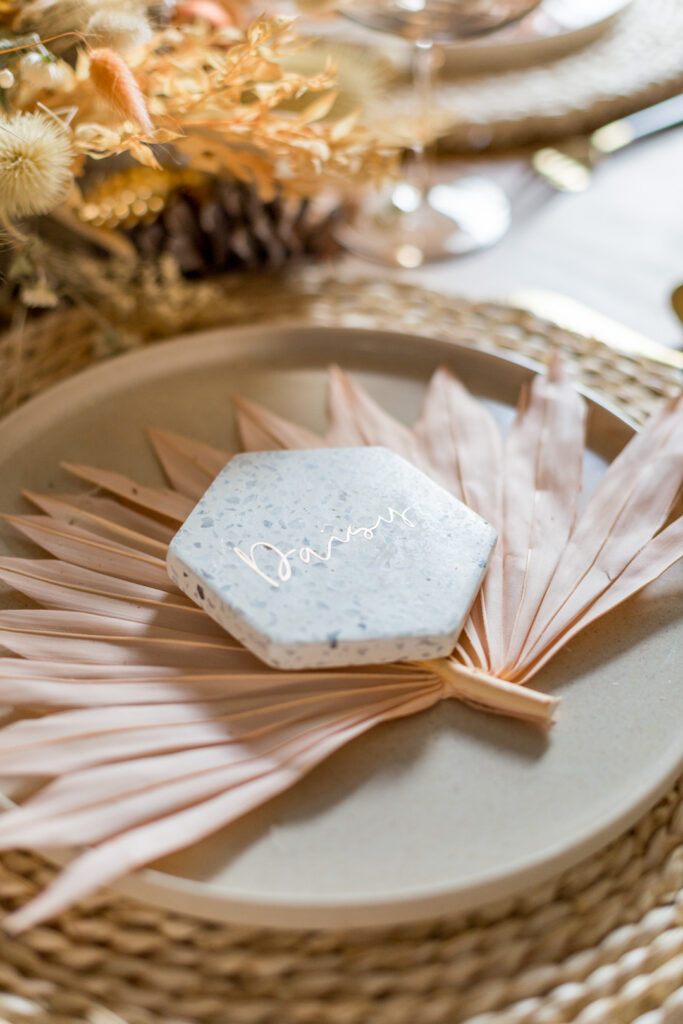
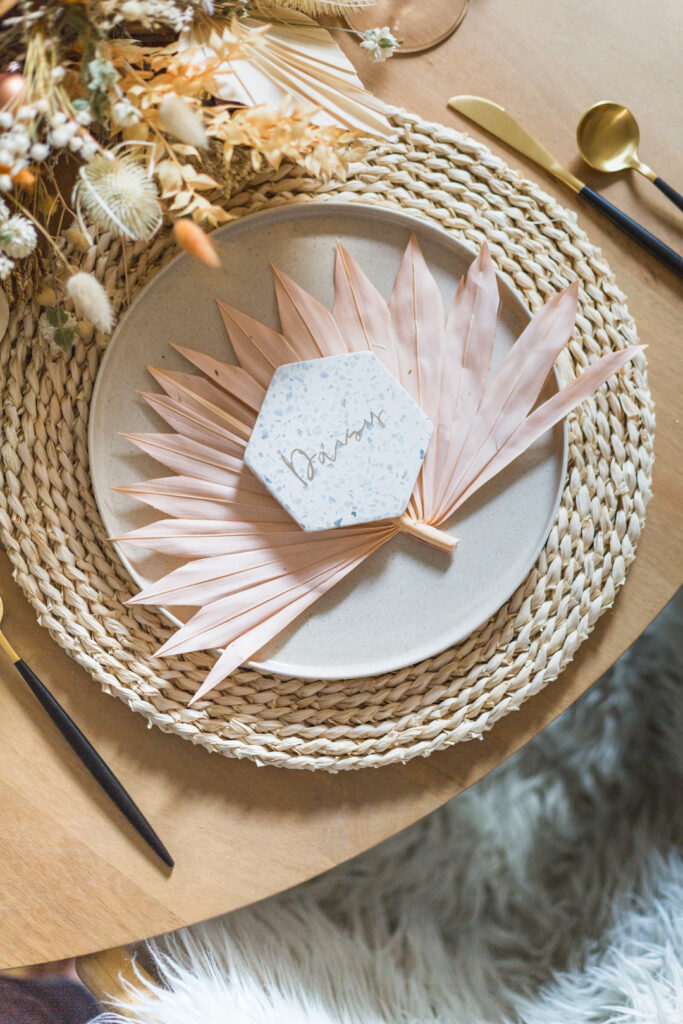
This really is the year to go all out and make your family feel extra special. These DIY personalised coaster place settings are a cute gift and if you’re lucky enough to have them around the table this year, the perfect way to create excitement and cheer as you sit down to eat.

But this is also a way to extend your table to those who cannot physically be with you. If you’re planning a Zoom dinner or getting together the 2020 way (digitally), these coasters can help create the idea you’re all at the same table. Post them in advance or add them to your gifts so they are ready for your Christmas meal. In a small way bringing everyone together around an extended table.
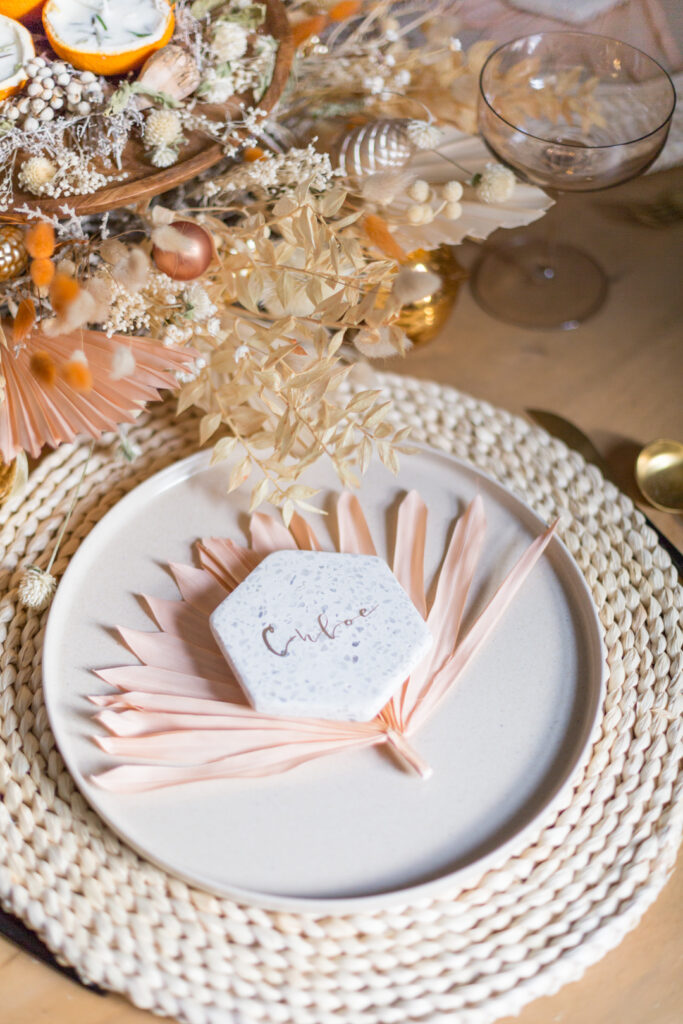
I’ve used my Cricut Joy to cut out the names for these coasters but you can order ready made names or buy lettering to create your own. I’ve used the most gorgeous terrazzo coasters from Wayfair which look incredible as a place setting. Adding a subtle detail but not distracting from the rest of the table.

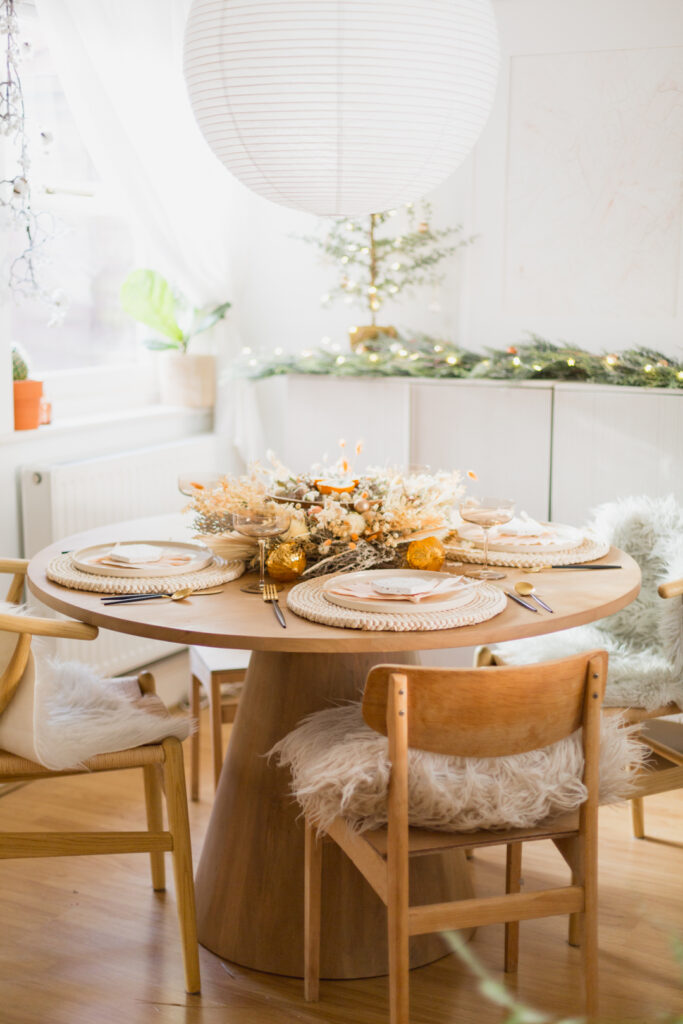
I’ve styled the rest of the table in a warm, wintery way to create a slightly different seasonal feel with a festive twist. These plates are fantastic to use as a charger or to eat straight off. And speaking of eating, this cutlery is not only gorgeous but incredibly affordable.

To create the floral centrepiece i’ve added dried flowers to a garland base, adding in various decorations and baubles. Keep the look simple with stars, some twinkly lights and natural elements from the Wayfair Christmas range.
DIY Personalised Place Setting Tutorial
Materials
- Terrazzo coasters
- Vinyl name – cut out or order online
- Transfer tape
- Scraper
Tutorial

- Clean the surface of the coaster with warm soapy water and dry with a cloth. Leave for a few minutes until it feels completely dry to the touch.
- Cut off a small piece of transfer tape which will cover the entire name you have chosen for the place setting. Layer this over the vinyl name and press down.
- Rub over the tape and vinyl using the scraper. You want to create a strong bond between the tape and the vinyl. Carefully peel back the tape to remove the vinyl from the backing in one piece.
- Place the backing tape sticky side down onto the coaster ensuring it is positioned in the centre. Use the scraper to rub over the surface of the tape again. This time you want the vinyl to adhere to the coaster.
- Peel back the transfer tape from one corner. Do this slowly and carefully checking all the vinyl is stuck down onto the coaster as you go. If the vinyl sticks to the tape use the scraper to rub this area again and try peeling a second time.
- Once the tape is off your place setting is ready. I’ve styled it with some natural dried palm fronds for a boho festive look!


Thanks for sharing this information. I really like your blog post very much. You have really shared an informative and interesting blog post with people.
I really like reading through a post that can make people think. Also, many thanks for permitting me to comment!
Thank you for this nice DIY Idea.
When you compare foreign women vs. American women, you should find that local girls are happier. They are the brides that treat their mail order wives partner as a gift. Asian or Latin brides love to care for their husbands and make their wishes come true. International mail order brides are super keen on meeting American men, it is a dream of theirs, and they are willing to do anything to make this come true. A Western man is a treasure for some of these brides, so you can imagine how happy you can make them by being their partner.
I was glad to reveal this bewildering site. I need to thank you for your time thinking about this sublime read!! I indisputably respected every single piece of it and I have you bookmarked to see new data on your blog.
Hello, my cousin’s sister birthday is coming near and I want to decorate her home for her birthday. I was busy a few days ago but now I am free because I have found the uk essay writing service reviews and after reading them, I have taken help from their writers. Now I was searching for the home decoration ideas and thanks to you for sharing decorating with us.
Once your essay is finished and transferred to you, you have 2 weeks to ask for a free revision. We’ll improve anything that does not correspond to your initial instructions.
Best buy hacks experts share the best products that you should buy. We’re a team of savings professionals delivering the best deals, tips and tricks to help you save at your favorite brands, stores and restaurants.
Very inspiring. I sometimes forget what it feels like to write out of pure enjoyment. Thanks for sharing this post!
So very true, you are thinking in the same manner as I do, I feel like I have found soulmate.
Everything is unguarded with a cautious explanation of the difficulties. It was truly educational. Your site is important. Appreciative for sharing!
We use coasters to protect our furniture against moisture and stains. However, there’s no reason why we can’t make the coasters look good as well. In fact, they can be beautiful accessories on a table if you’re willing to spend some time making them look beautiful.
Air-dry clay is very versatile and can be used to make all sorts of beautiful decorations and accessories, including some cool-looking coasters. These ones have laser-cut inspired designs which were made using clay cutters. Check out the details on diys and come up with your own unique design by combining different patterns and colors.
I check your blog everyday and try to learn something from your blog. Thank you and waiting for your new post.
You deserve all the very appreciation because you, yourself being so very intelligent as well as knowledgeable are yet so very humble as well as generous that you just keep helping others with all the knowledge you have. Thanksgivings for all your sharing of knowledge.
I check your blog every day and try to learn something from your blog. Thank you and waiting for your new post.
Your blogs are very good to increase your knowledge. Please keep giving the blogs like that. I always come here to read your posts. Thank you.
Aside from loosened up muscles, your temper will likewise improve, hence furnishing you with an unwavering discernment. A decent outlook will hoist your temperament, assisting you with managing viably during upsetting circumstances. Visit b 2 b massage
good blog Visit body to body spa in Bangalore
I was glad to reveal this bewildering site. I need to thank you for yours. Very inspiring. Thanks for sharing this post!
This article is written so well and much useful and informative. Thanks for giving such wonderful informative information. I hope you will publish again such type of post. Thank you for sharing this.
Regards
Hello, the equipment is of different types and in my opinion I do not even know how you have, but when I’m on vacation, how to go out with family, cook a fantastic dinner on the grill and open a cold beer with alpicool portable refrigerator, enjoying the cleanliness air. Damn, just thinking about it now makes me want to quit my job and go to the mountains! Of course, for the above scenario to work, you need to have a good refrigerator so that the beer is cold of course, the food too!
Leather vests have such a distinctive look. Conventional coats and jackets are, of course, more popular. Users would see more people that wear them when they become more common. Not everybody wants to go with the flow. Some people really enjoy standing out of the throng of people besides wanting to dress inside an unorthodox manner. Having to wear a leather vest can help you reach a unique look in your each and every day outfits.
Relax in isha b2b spa Bangalore’s best Spa Centre. It has been providing services since many years in india, to help people lead a comfortable and relaxing lifestyle.Visit massage parlour near me
Good one. Keep giving the posts like that. Thank you.
Instead of being treated as a luxury spa treatment, the We people view their traditional Thai massage as an essential therapy to promote wellness. It is a practical way to relax the whole body that is in line with the main pillars and principles of Thai medicine.Visit erotic massage
Great keep up with great work.
I Was Eagerly Looking For Content Like This, Right To The Point And Detailed As Well Accordingly Depending Upon The Matter/Topic. You Have Managed This Greatly For Sure. Bape Hoodie
This is a really decent site post. Not very numerous individuals would really, the way you simply did. I am truly inspired that there is such a great amount of data about this subject have been revealed and you’ve put worth a valiant effort with so much class. Squid Game Outfits
Fashion is the thing that you make it – The primary thing you need to comprehend about fashion is that it is just what you make it, that’s it. Dungeons & Dragons Chris Pine Jacket
Great tips, thanks for sharing
This is a great article. Thanks for bothering to describe all this out for all of us. Inspired jackets It really is a great guide.
Personalized coaster placesetting is a fun and easy way to add personality and personality to any room. With just a few simple steps, you can create a unique and personalized coaster place setting. Spinal Specialist Near Me
This DIY Personalized COaster Place Setting is perfect for your next party! It is made from durable plastic and features your own personalization. The coaster will add a nice touch of customization to any party, and is sure to impress your guests.
Home Renovations Ivanhoe
This DIY personalised coaster holder is the perfect way to show your friends and family what a great gift you have! The coaster holder is easy to make and can be personalized with your name and date.
Lane Cove Orthodontics
This personalised coaster set is perfect for your next party or function! You can add your own text or images to make it extra special.
Modern Home Builders Brisbane
This is a fantastic post that is undoubtedly fascinating because you covered Pascal’s Triangle’s background and basic idea. Super Jackets
Insightful post. I was amazed as I browsed this blog. This knowledge is extremely valuable. I appreciate you so much, and please keep up the great work. Mardams Leather
Great job for publishing such a beneficial web site villa contractors in dubai
Excellent article, You have summerised important points, keep it up. Thank you Buy chocolate truffles Jeddah
Outstanding material. I think I’ll use it for developing my business continuity plan Offshore Company Formation for Filipinos
This article has so much of information Industry Leading Degassing Solutiong
I will visit your blog regularly for some latest post. branded contact lenses pakistan
First of all, thank you for your post. woon clothing
Thank you so much for such an interesting article .i have been searching for best articles and found this article for best split ac. highly recommended.
https://www.hvacsouq.com/blogs/news/best-affordable-split-ac-units
thank you for sharing this wonderful information with us i really liked it a lot and i hope you will more posts in future . printing press ajman
With the assistance of our editorial and content teams, we supply you with the best web information on any topic imaginable.Jnanabhumi AP is a startup founded by webmasters and bloggers who are dedicated about providing engaging https://jnanabhumiap.in/jnanabhumiap.in material that is accurate, fascinating, and worth reading. We are a web community where you can get various information’s, resources, discussions on daily happenings, or news.
you have written a very wonderful article i hope you will write more articles in future. Kitchen Renovation Dubai
well this is the best personalized coaster. keep up Sony tv repair dubai
this diy is very amazing keep sharing. G tv repair dubai
Travelling With MSC Cruises Discount Codes just got smarter! With Couponado, you’ll always have access to unbeatable deals and discounts on your favorite items.
Such a beauty ful post.. Thanks For Sharing this article.. I also got some the best OnBuy Discount Codes you can try it.
When I applied for internet banking, I supplied my phone number. However, nothing has changed in my account. My e-banking account was temporarily frozen, and I needed to change my password.Overseas Indian Bank My mobile edutec.in number is being updated, and online banking is enabled on my account. When I applied for internet banking, I supplied my phone number. However, nothing has changed in my account. My e-banking account was temporarily frozen, and I needed to change my password. Overseas Indian Bank My mobile number is being updated, and online banking is enabled on my account.
Our reporting team intends to publish the Education & Recruitment Update for all age groups and present the true picture of the recent events with the inside coverage. Our objective would be to cater the requirements sample-paper.com of people of all age groups as we intend to publish news classified into General, Political, Crime, Sports, Entertainment, Education and World News.
Customer reviews and testimonials speak volumes about the exceptional service provided by XYZ Car Transport. Countless satisfied customers praise the company for its professionalism, timely delivery, and hassle-free experiencehttps://www.youtube.com/watch?v=tLor2Onq1fY
Thanks for sharing this great informative content, very easy to understand. Definitely learn something new here. Froshvoice
“Wow, what a fantastic idea for a personalized coaster place setting! I absolutely love how this project adds a special touch to any dining table. The step-by-step instructions provided in the blog are clear and easy to follow, making it accessible for crafters of all skill levels.
I appreciate the creativity in using various materials and techniques to achieve a unique and customized look. The possibilities are truly endless when it comes to personalizing these coasters to match any theme or occasion. From monograms to favorite quotes or even miniature artwork, these coasters can truly reflect one’s personality and style.
Moreover, the practicality of these coasters as both a decorative and functional element is a great bonus. Guests will surely appreciate the thoughtfulness and attention to detail put into their place settings. Plus, it’s a fun conversation starter during meals!
Thank you for sharing this wonderful DIY project. I can’t wait to try it out and impress my guests at the next dinner party!”
What an incredible concept for a personalized coaster place setting! I’m truly amazed by how this project effortlessly elevates any dining table with its special touch. The detailed instructions outlined in the blog are exceptionally clear and user-friendly, ensuring that crafters of all skill levels can embark on this delightful endeavor.
The sheer ingenuity displayed in incorporating a variety of materials and techniques to achieve a distinctive and bespoke aesthetic is truly remarkable. The customization possibilities are limitless, allowing you to harmonize these coasters with any theme or occasion effortlessly. Whether it’s adorning them with monograms, cherished quotes, or even intricate artwork, these coasters have the ability to encapsulate and showcase your individuality and unique style flawlessly.
thank you for sharing this wonderful information with us i really liked it a lot, keep up this. Washing Machine Repair in Dubai
well i’m agreed with your opinion keep doing this. TV Repair Dubai
your DIY are really impressive i’m so impressed with this, i know you will share more in future. Handyman services Dubai
Thanks for the information. I’ve definitely pick up something new from right here.
these diys are so nice that i really want to try one of them by myself, can’t wait more try one of these. satellite dish tv installation Dubai
AC Maintenance in Dubai is very important to make sure the quality and efficiency of the air conditioning unit are maintained, you should have it serviced by professionals under a scheduled maintenance routine, at least 2 times per year. At least one or two AC services a year can increase the efficiency of AC and make your running costs as low as possible.
Thanks for the information. I’ve definitely pick up something new from right here.
Hello, tech enthusiasts! I’m interested in a 1 Ton AC that offers convenient features like remote control or smart compatibility. Any recommendations for models that allow me to adjust settings from my phone?
Almirah Summer Clearance Sale brings a fusion of traditional and contemporary fashion to its customers.
The SEO optimization your agency integrated into our Custom webdesign agency has led to a noticeable increase in organic traffic. We’re delighted with the results!