I have three levels of how I wear jewellery. It’s either 1, nothing at all. 2, one small, understated piece or 3, big statement earrings. My new favourite is the latter. After giving birth to Ollen (yeah, I some how make every blog post about this at the moment) I lost a lot of my hair. I’ve never had great hair and it’s quite difficult to style at the best of times, but this last year I’ve struggled with it daily. What I’ve learnt is that a great pair of earrings can really help you look a bit more together even when your hair is not playing along.
I wear my hair tied up much more often these days and a great pair of earrings can make this look more intentional (than time saving). So as well as designing my own earring range with Working Clasp, I like to add to my collection with some DIY’s now and then.
I promised this tutorial a while ago after posting my DIY Terracotta Hanging Planters (thank you for all the love on this post by the way!!) I quickly whipped these up with the left over clay and I finally finished them this weekend. Now I just need somewhere to wear these. We’re just about to head out to the garden centre… I’m doing it!
Materials (affiliate links)
- Terracotta air dry clay
- Roller
- Cookie cutters
- Craft knife
- Sand paper
- Earring blanks
- Eye Pins
- Four in one jewellery pliers
- E6000 adhesive
Instructions
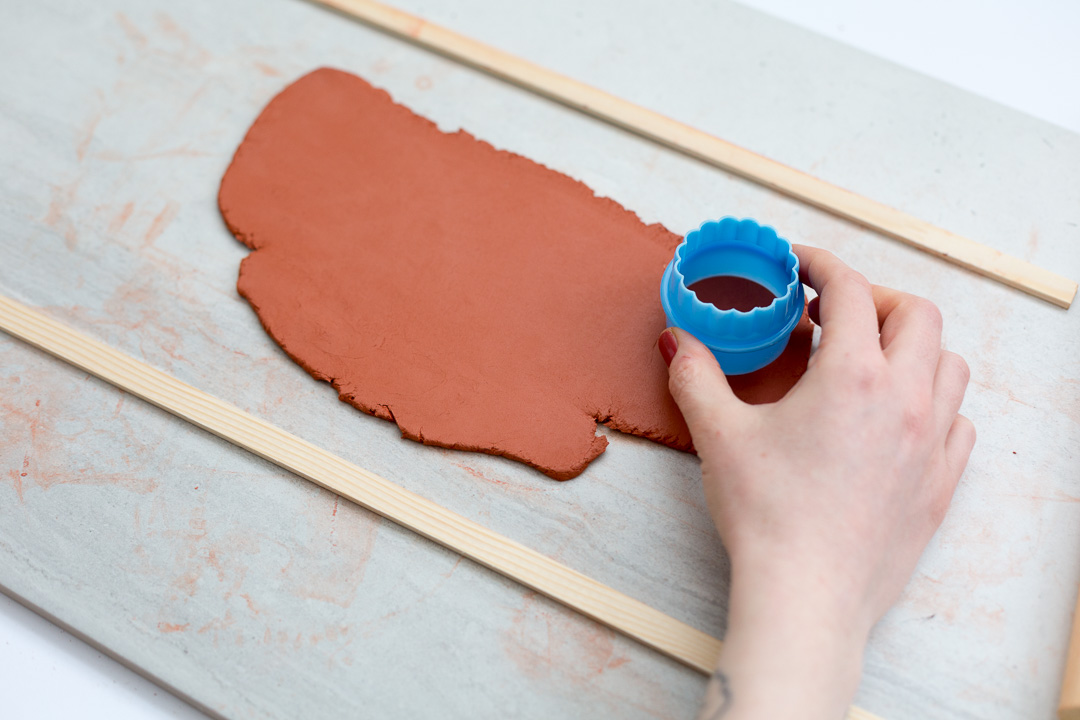
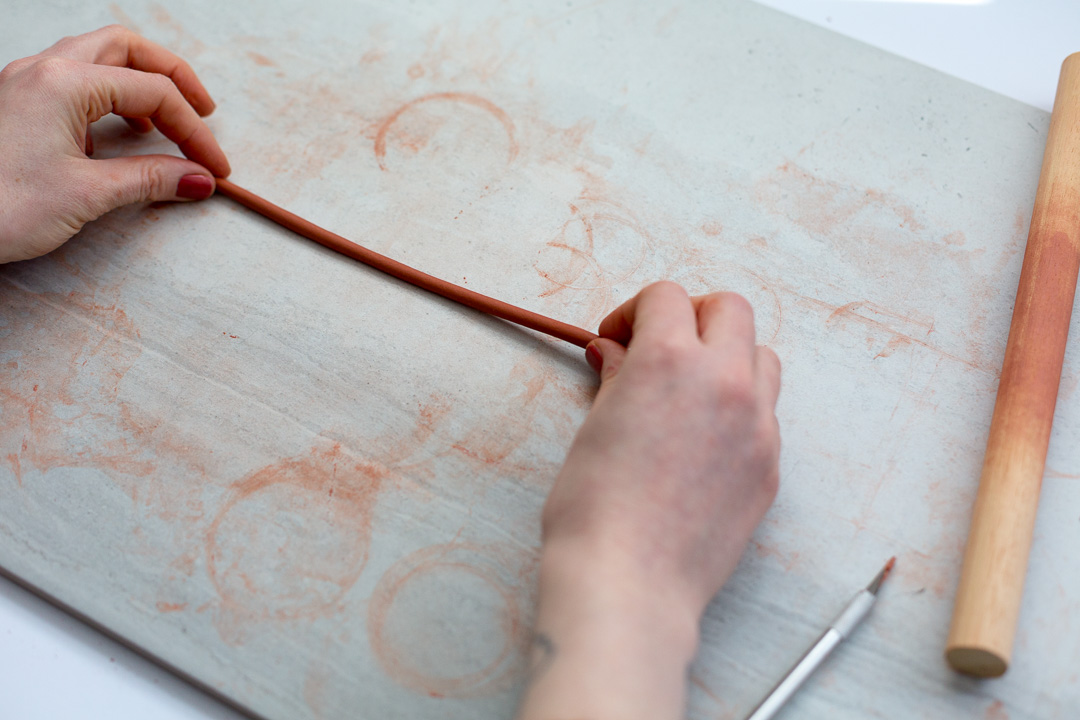
Roll out your clay using a fondant roller or two pieces of thin strip wood to keep it an even thickness.
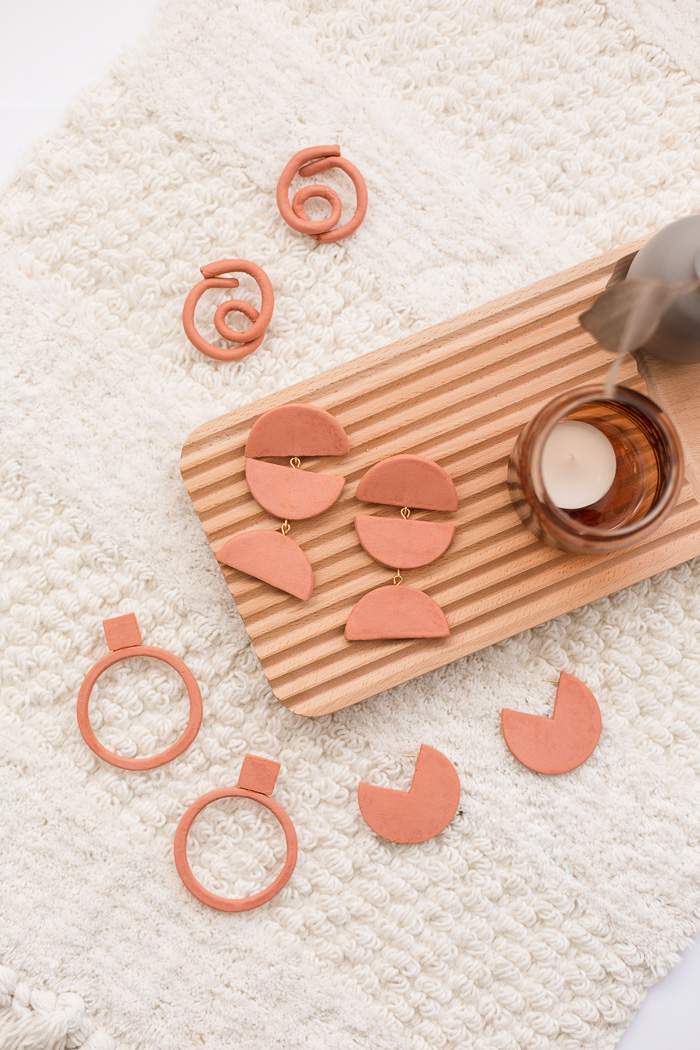
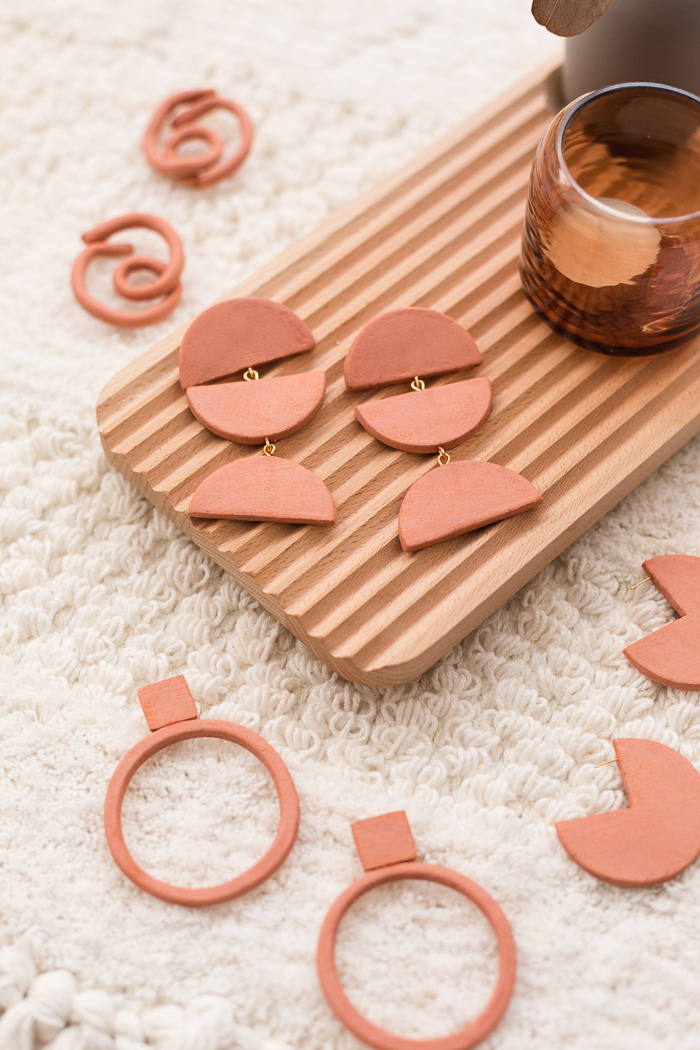
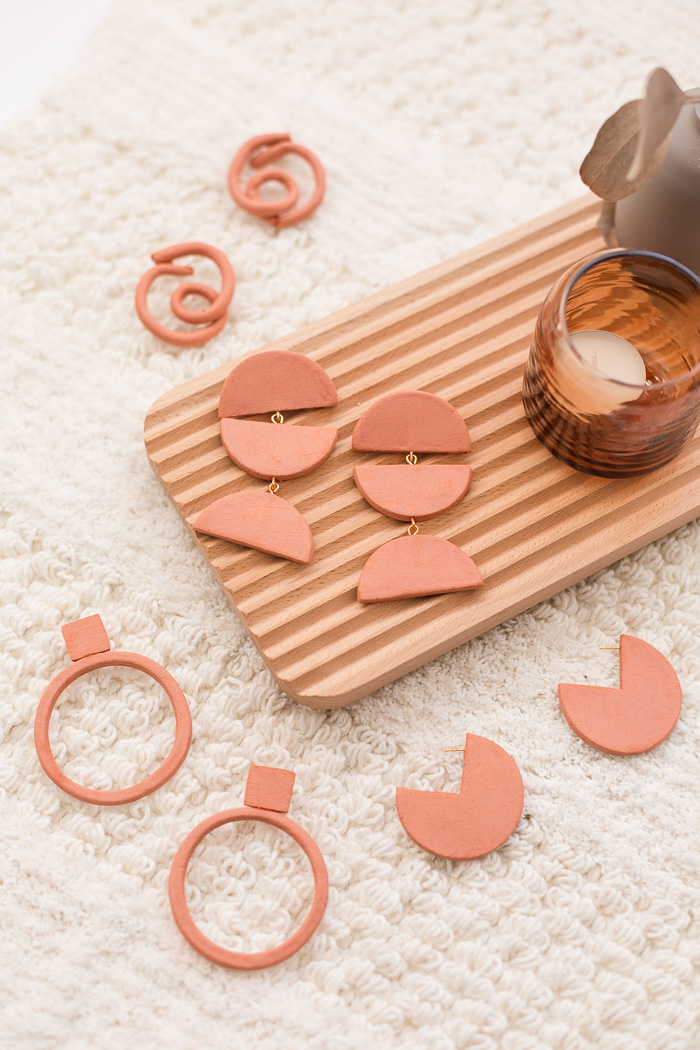
Three Quarter Earrings
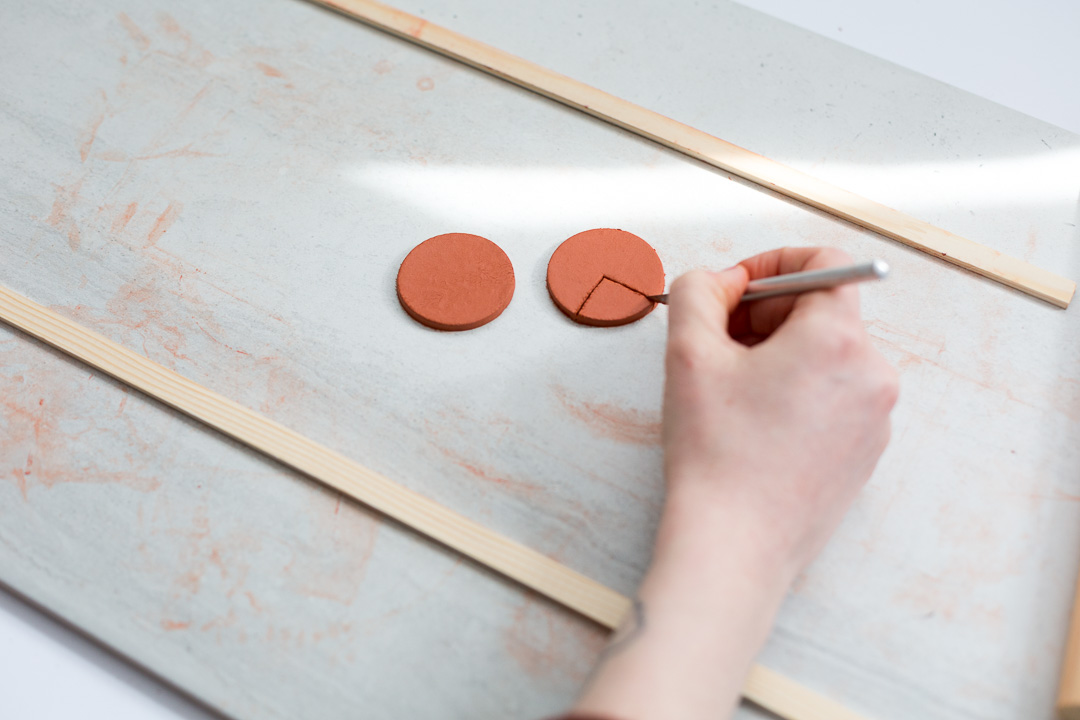
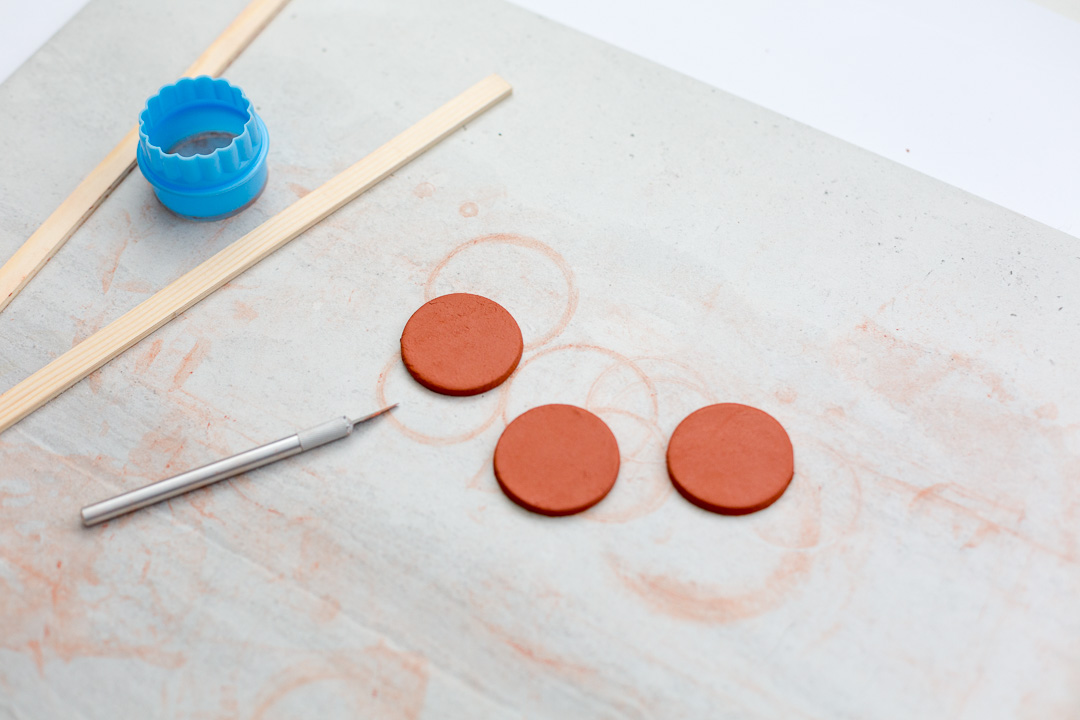
1. Cut out a circle around 2″ in diameter using a cookie cutter. With your craft knife, cut out one quarter of the circle.
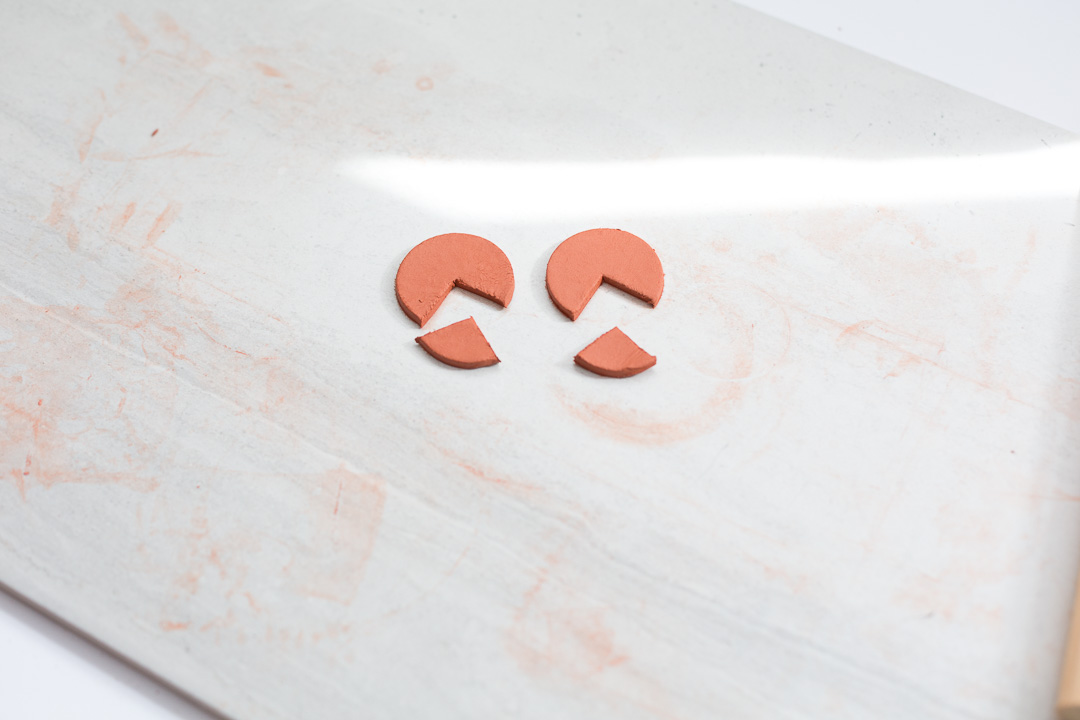
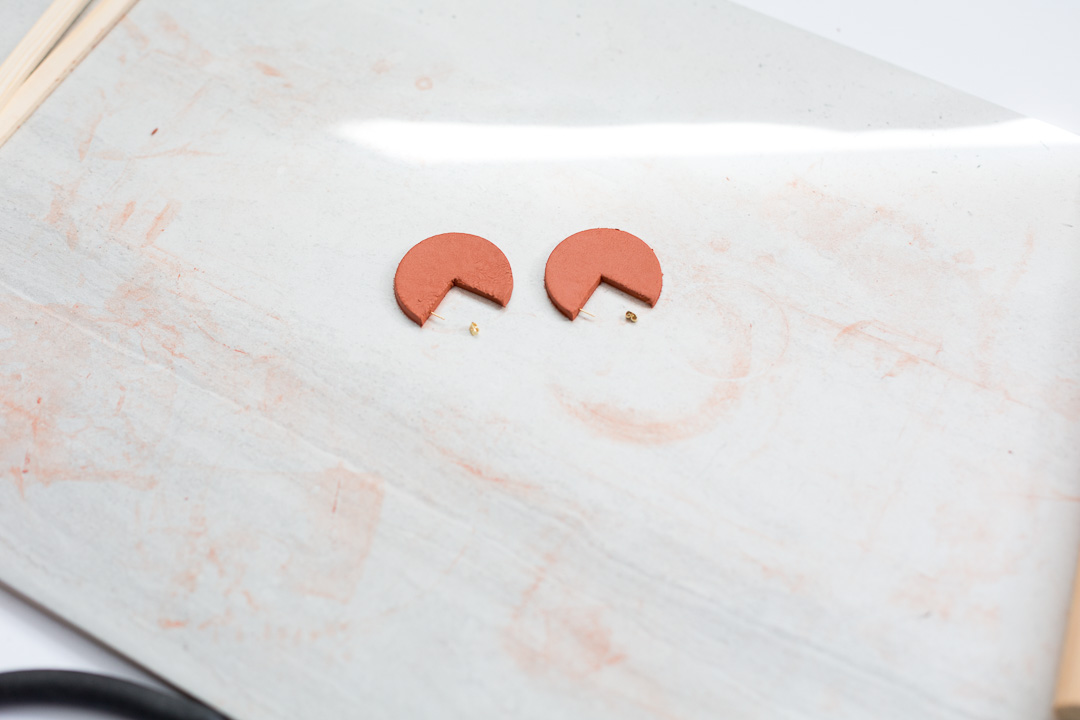
2. Cut off the end of the earring blank using plier cutters and push the post into the clay. Once this has dried take the post out and add some E6000 glue to the end of the post. Push it back into the hole and leave it overnight to set.
3. Sand the clay with fine sand paper until it’s smooth all over.
Hoop Earrings
1. Cut out two circles and using a smaller cookie cutter cut out another two circles inside them.


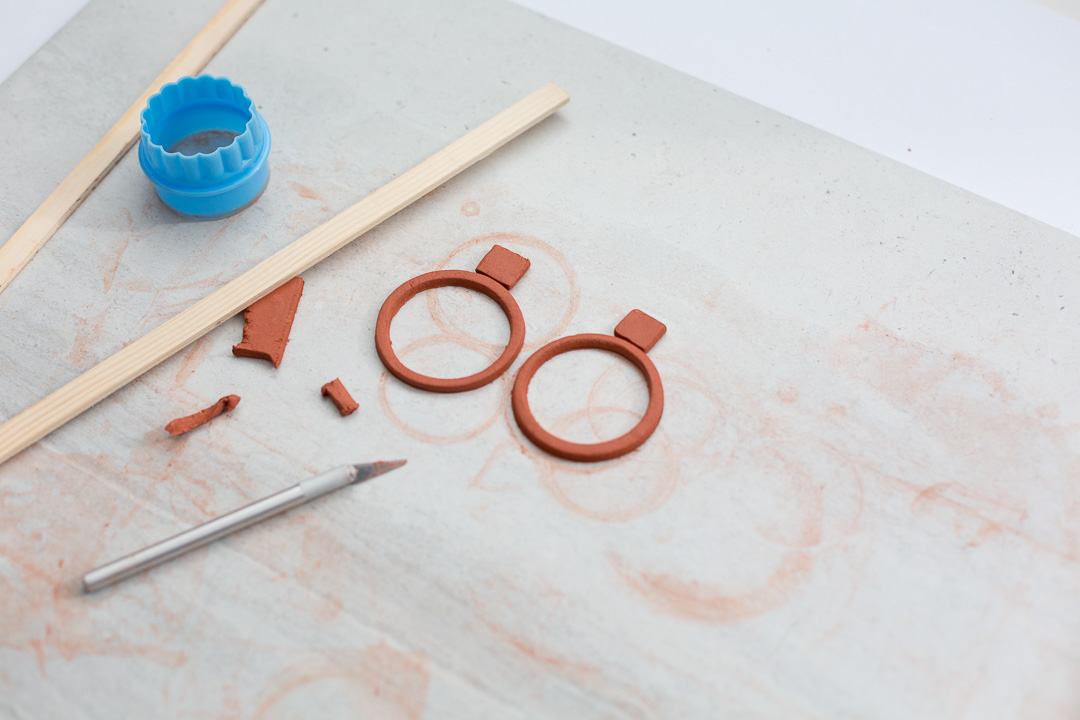
2. Using a craft knife cut out two squares. Leave the clay to dry, sand smooth and glue the square to the top of the circle.
3. Use the E6000 adhesive to glue the earring blank to the back of the square and leave to set.
Knot Earrings
1. With your hands roll out a long sausage of clay. Wrap this into a knot or twist and leave to set. Make sure you overlap the ends to create a place for the earring blank to be added. Repeat with another piece of clay mirroring the first knot.


2. Once they are dry, sand and add the earring blanks to the overlap.
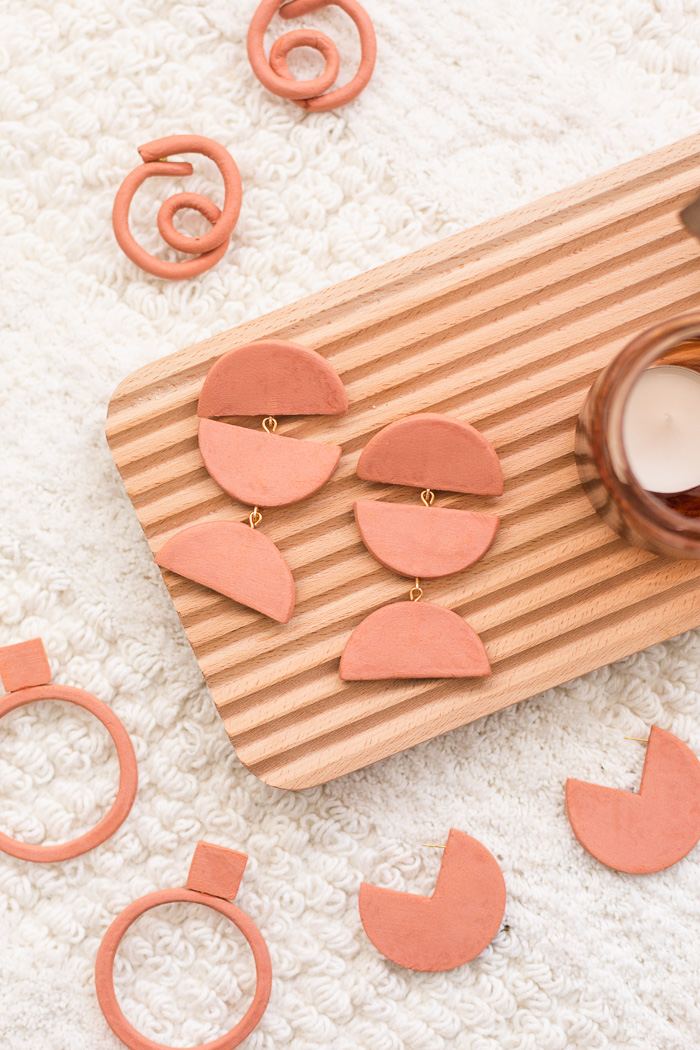
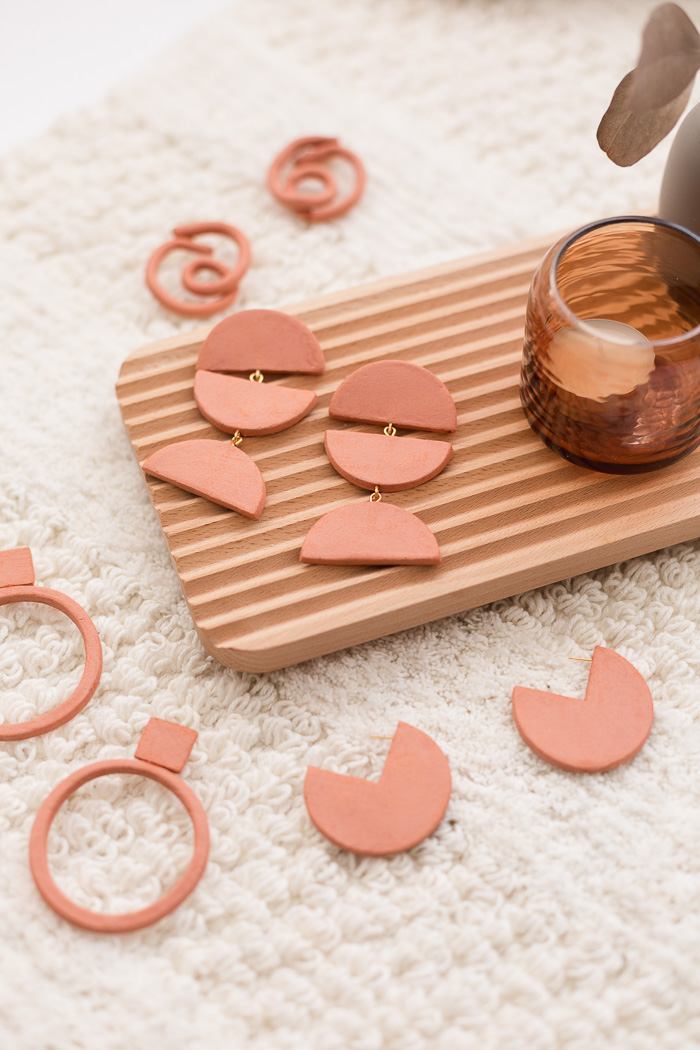
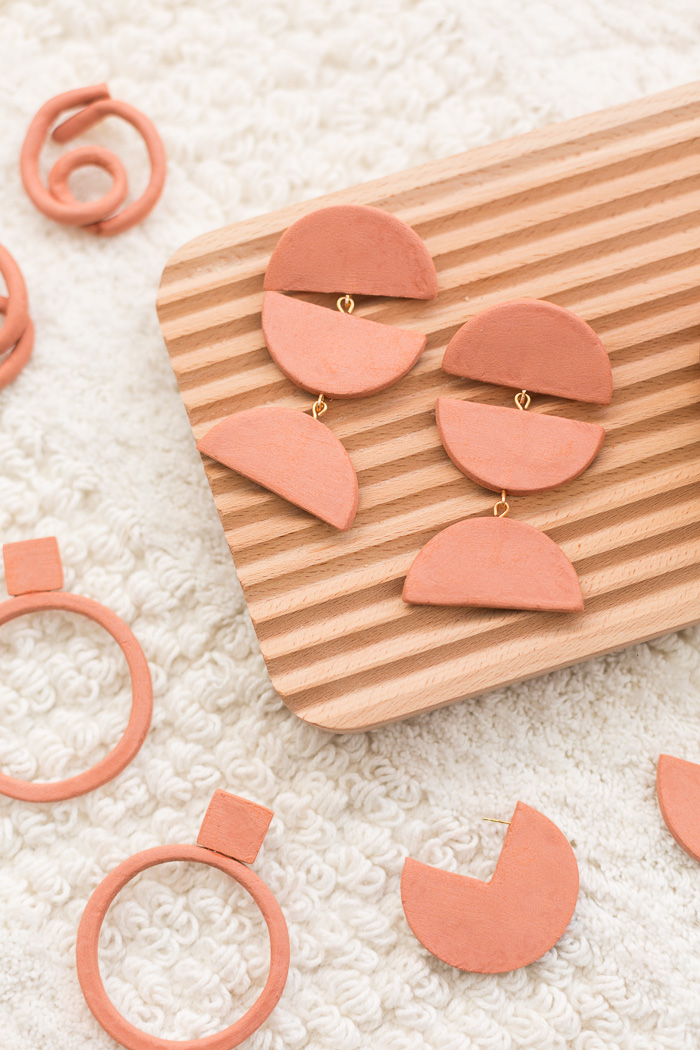
Half Circle Earrings
1. Cut out three circles about 2″ in diameter. Using a craft knife cut these in half. Lay them out in the design show below.
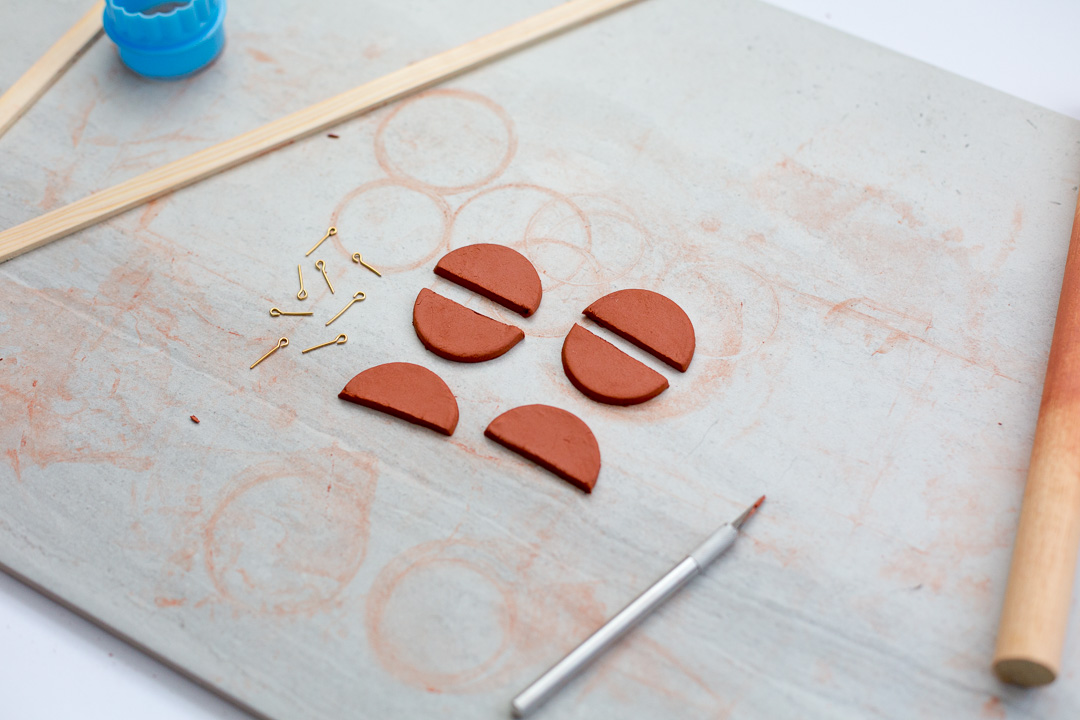
2. Push your eye pins into the clay where it joins with the next piece. Make sure the eye pins are twisted 90 degrees where they meet so that each pin can be joined with the one next to it.
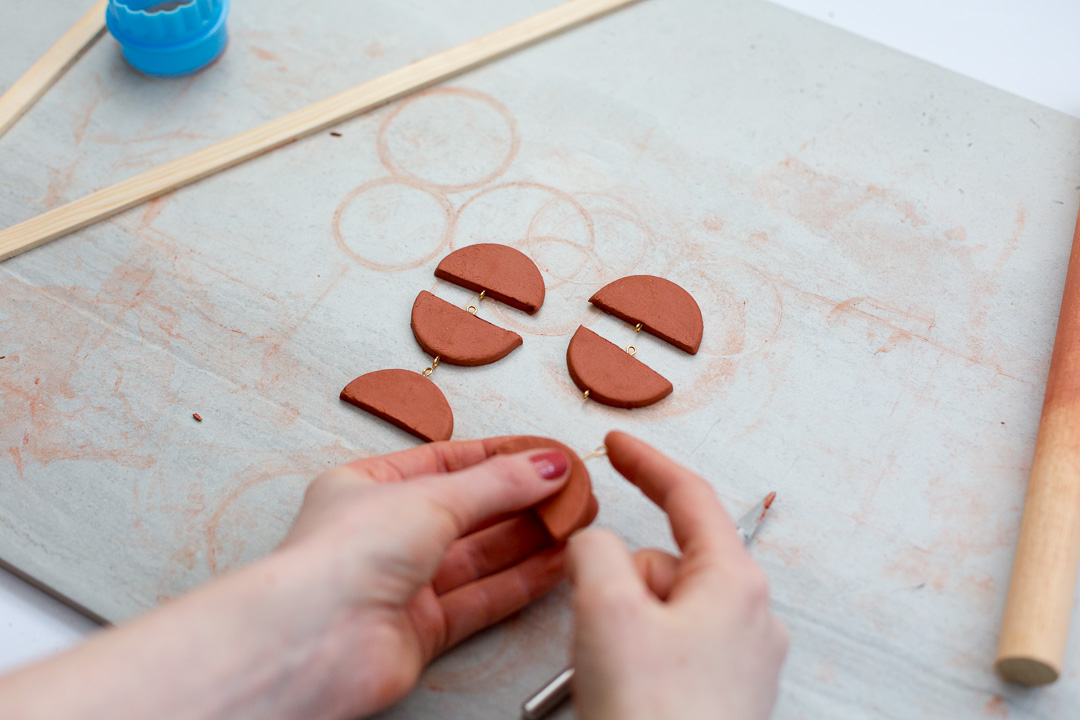
3. Leave the clay to dry then sand smooth. Using the round tip of the pliers gently open the eye pin (see this post for video tutorial) and attach it to the next one in the design. Add the earring blank to the top of the first half circle and leave to dry.
I hope you love these earrings as much as I do! While we’re talking about jewellery, I’m thinking of doing a technical jewellery making series. For example I made my eye pins for this post. It’s so easy once you know how and it means you can always whip something up without having to buy materials in advance. I’d love to know if you’d actually be interested in reading something like that! Please let me know in the comments xx


Those earrings are absolutely gorgeous! I always have the problem that my hair hides my earrings, so I normally wear a tiny pair. However when I feel fancy I pin up my hair and wear statement earrings!
https://www.makeandmess.com/
Some days before I l also faced this problem but using natural hair care oils it is fine now.
Fran, these earrings are just to die for! I want to try air-dry clay, polymer clay in this color gets ruined by sanding, but I have trouble getting it very smooth before baking. And I’d love to see your technical jewelry series!
Are they waxy and plastic like polymer clay? Or smooth and heavier like pottery?
Are they made up of clay?
Got new ideas by your post. These tips will be more helpful to me.
Hi,
Are they waxy and plastic like polymer clay?
It’s really good tip for making accessories from clay.
Hey, do you sand then bake the clay earrings if so how long do you bake them?
The earrings look gorgeous! And you can combine different colors, it’s really good tricks. Thank you!
Just finished some psychological online test, it was interesting because the result was very close actually.
You cannot find yourself by going into the past. You can find yourself by coming into the present.
These look great! I tried using a plastic fondant roller and the clay kept sticking to it! Any ideas on how to prevent this? I’m using non-terra-cotta air dry clay. Thanks!
Nice to read, Good information here. Thanks for representing the blog.
I agree with you
You can not find yourself by entering into the past. You can find yourself by entering the present.
It is an informative post. Thank you for sharing.
I was looking for this exact info. thank you for letting me have i. thanks https://2048cupcakess.com
Simply Gorgeous…
amazing
The idea with step by step guide is good to see, everyone expects the same.
Great idea, Will try it.
Blueberries are at the top of almost every superfood list, but just about any edible berry is worthy of superfood status. While all https://healthnnatural.com/ differing in nutritional value, blackberries, cranberries (the fresh, not dried, variety), strawberries, and raspberries, to name a few, are low-calorie, high in fiber, and packed full of antioxidants that help fight against cancer-causing free radicals
It is an informative post. Thank you for sharing.
It is an informative post. Thank you for sharing.
Application of Computer in Education
] This post is by Francesca of Fall for DIY. Check out the original post here
IZSPA, is the heaven in form of spa we are best body massage service provider in Bangalore.We offer our customers massages like Female to Male,Body to Body Massage, Visit massage parlour near me
Massage was used to treat many ailments by ancient peoples such as the Ancient Greeks and Egyptians, Chinese, and Chinese.Visit spa in Bangalore female to male
Nice to read, Good information here. Thanks for representing the blog.
These are gorgeous! And they seem so easy. I can’t wait to try.
You can access the official Betwinner website https://bet-winner.in/ not only through the browser on your PC. For users who prefer to bet from portable devices, a special mobile version has been developed. It is no different from the full version of Betwinner for personal computers. If only navigation on a mobile device is quite convenient. The main categories are hidden in a pull-out menu, controlled by a touchscreen. The version for mobile devices exists in two versions: the Betwiner website, which will be opened through a browser on a smartphone, and the apk application.
Tata Carnatica Tata Carnatica Bangalore will be not just an affordable real estate but a safe investment opportunity for all to partake in. The Tata Group, with decades of experience in business, is leading this project with expertise in every aspect of the industry – residential, commercial, retail, leisure and hospitality. The Tata Carnatica project has been masterminded by one of India’s most accomplished groups: The Tata Group. Live carefree at Tata Carnatica where you can enjoy better living for an affordable price with a community that’s accessible to everything and anything you could ever need. You’ll have access to education, shops, restaurants and more from your doorstep. All you need is a little bit of ambition and here at Tata Carnatica we’ll provide the rest! You will enjoy a better lifestyle while paying an affordable price with a connection to the rest of Bangalore that is uncompromised. We have unmatched development of Bangalore, establishments in IT corridors nearby, and huge private and business projects. People who live here are often associated with prime IT hubs, business centers, informative establishments, entertainment zones for its residents.
Your information about BA 3rd Year Result is very helpful for me and Thanks
massage is a great way to relieve muscle pain, soreness, and tension. It doesn’t matter whether this pain was caused by physical or mental stress, the massage will work it out for you.Visit erotic massage
It’s really good tip for making accessories from clay.
hey! this is an amazing article thanks for sharing this please keep posting
Thanks for sharing your wonderful knowledge. I really appreciate your thoughts on this topic and I will be back on your website. Thank you for your kindness! gen you youtube
Wow amazing! Very impressive! Will definitely give this a go!
It’s amazing accessories!
looks so beautiful! You should promote your job and then more people will know about you! I can share good safe platform for you https://likigram.com/ Maybe you can also using social media networks for sale your product and promote you social media networks, that it will be very useful for you
i will certainly come back again. This is an amazing blog and i have seen many of your articles on the net. But I have to say that you’ve outdone yourself this time! The article was definitely well-written, and it made my day. Thanks for sharing this great info with us !
Watch all episodes of Sasural Simar Ka season 2 online on JioCinema. HD Quality. Low Data Usage. Watch Now or Download to Watch Later!
I visit your site for the very first time and I must say that you are proving very good data. very well-written post and very informative to me. you are doing are great work through your blogs.
I just found this good blog and have high hopes for it to continue. Thank You.
The GB WhatsApp app, which is a third party WhatsApp client, is an easy way to spread the Android spyware. The app is essentially a modified version of WhatsApp that offers some added features along with the usual WhatsApp features
wow super dear nice very nice post
what a post very nice keep up sir good work
Dramacool is a free online streaming website where you can watch English Subbed and Dubbed Korean dramas. You can also watch other Asian dramas on Dramacool …
The free Instagram likes trial can be a useful tool for gaining more followers and increasing engagement on your posts. The process is simple: you sign up for a free trial, and the service will automatically start sending likes to your posts the great thing about these free Instagram Likes trials is that they are simple and straightforward. You don’t have to fill out any surveys or provide any personal information all you need to do is sign up and start using the service With the right trial.
Thank you for providing me with this useful knowledge.
Real Estate Developers In Dubai
I absolutely love the creativity showcased in “Terracotta Air Dry Clay Earrings – Four Ways!” The diverse designs and techniques make it a must-try for DIY enthusiasts. Plus, if you’re looking for inspiration or supplies, be sure to check out the best CPL networks on https://trafkings.com/ – a fantastic resource for affiliate marketers. They offer a wealth of information and reviews to help you succeed in your affiliate journey!