
Kumihimo disks are a fantastic and pretty speedy way of knocking up woven bracelets in no time. It might look complicated at first, but I assure you it’s much easier than it looks! The disks are definitely worth the small cost, or if you cant get your hands on one, cut 32 slits into a thick piece of card or foam with a circle cut out the middle and voila; one kumihimo disk.
Follow these instructions for this simple braid. I’ve done this one in several different colours to make the tutorial easier to understand (hopefully) but play around with colour and cords and see what you can get?
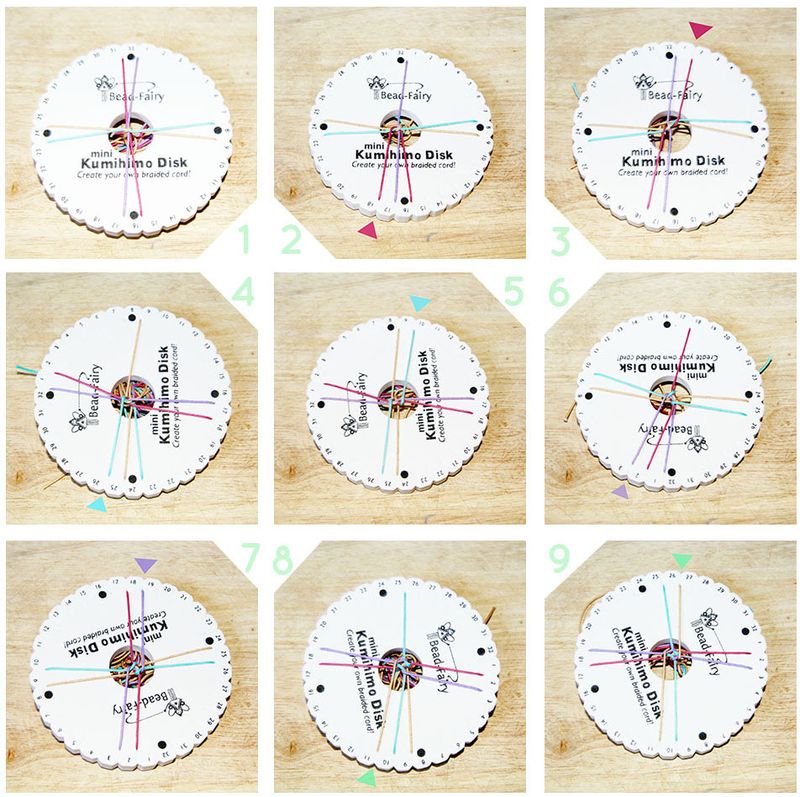
Instructions:
- Fold 4 x 1 meter long cords in half, and tie a separate piece of string around the middle bringing all 4 together. Thread the middle through the hole in your Kumihimo disk and slot 2 cords at the top, 2 at each side and 2 at the bottom.
- Move the top left hand cord to the slot to the left of the bottom left hand cord.
- Move the bottom right hand cord to the slot to the right of the remaining top cord.
- Rotate the disk 90 degrees anti clockwise and bring the top left hand cord to the slot to the left of the bottom left hand cord. (As you did in step one)
- Move the bottom right hand cord to the slot to the right of the remaining top cord.
- Rotate the disk another 90 degrees anti clockwise and bring the top left hand cord to the slot to the left of the bottom left hand cord. (As you did in step 1 and 4.) Your disk should be upside down now.
- Move the bottom right hand cord to the slot to the right of the remaining top cord.
- Rotate the disk 90 degrees anti clockwise again and bring the top left hand cord to the slot to the left of the bottom left hand cord. (As you did in step 1,4 and 6.)
- Move the bottom right hand cord to the slot to the right of the remaining top cord. Continue to turn the disk and move the cords around the board until you run out of cord.
- Take the cord off the disk and run your fingers down to stretch the braid out.
- Measure the length you need and tie embroidery thread around the braid several times to seal the end. Trim off the excess
If you have any questions please let me know and I’ll do my best to answer them! Any Kumihimo experts out there? Do you have any tips for me?


I know this website gives quality dependent articles and additional material, is there any other web page
which gives such data in quality?