If you follow me on Instagram you might have seen me posting regular updates from this project. It’s probably one of my favourite DIYs to date and that took me by surprise! When Stephenson Personal Care contacted me to collaborate on a project I must admit my first thoughts were that soap making and bar soap were a little dated, but after a little research I found out that bar soap is making a comeback in a big way. Not only can you make beautiful colours and patterns but you have control over the extras that go into the soap. You can infuse with natural scents and colours rather than the chemicals in most mass produced soaps.
Another reason I was very happy to work with Stephenson Personal Care was their strict policy against animal testing and focus on only using plant derived ingredients. That along with their long list of organic, sustainable and Fairtrade accolades gave me huge confidence that their products were ethically produced which is definitely becoming an increasingly important factor, especially in my cosmetic choices.
So I threw myself into soap making! I had a lot of comments on my DIY Silicone Mould post asking if the silicone was a suitable mould making material for soap. This project gave me the perfect opportunity to try it out and answer some of those questions (and you guys know how much I love my faux semi precious stone like this DIY Faux Geode Necklace or this Faux Agate Slice tutorial). I had so much fun colouring and shaping these soaps I’m converted and I haven’t even started to explore the possibilities of flavours and scents.
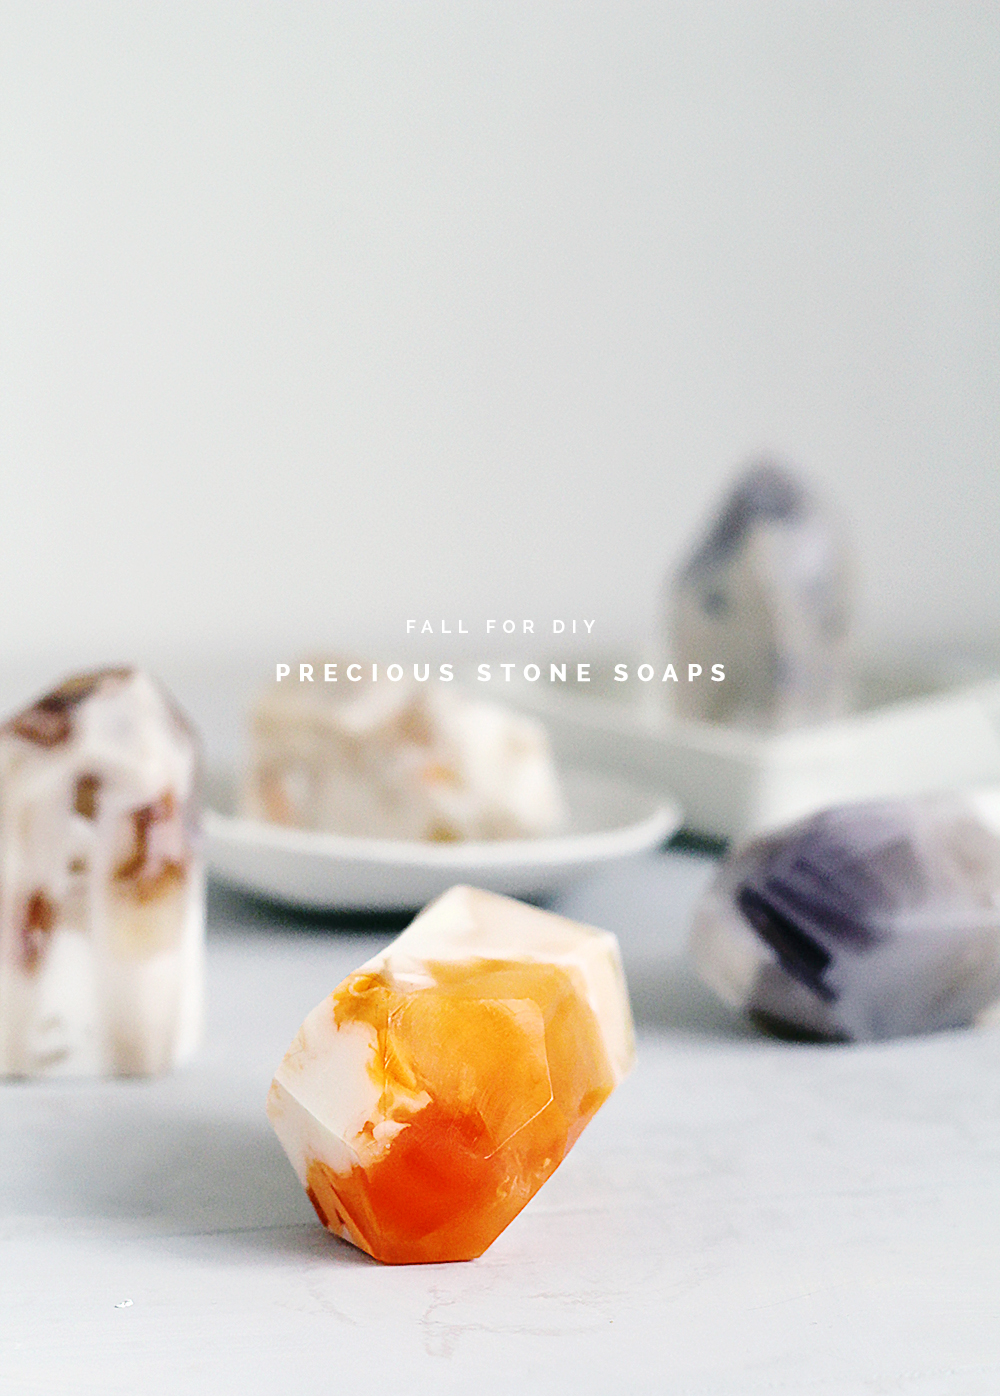
Keep reading to find out how to make these DIY Semi Precious Stone Soap yourself at home.
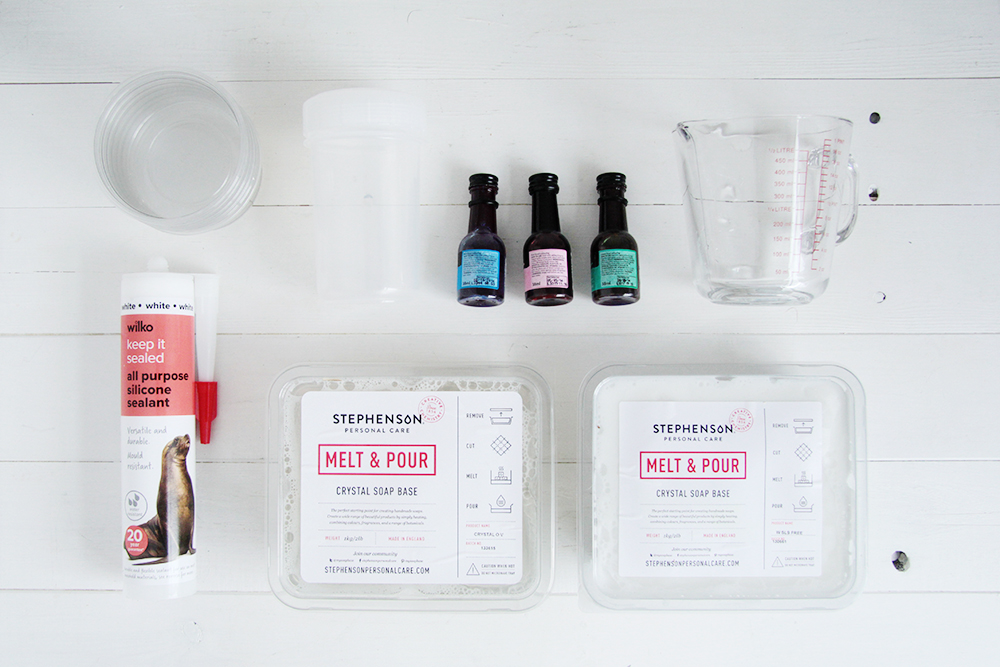
Materials:
- Stephenson Crystal Soap Base Clear and Opaque
- Food colouring
- Glass microwave safe measuring jug
- Silicone Caulk (for mould making) x 2
- Range of tupperware pots
- Stirrer
- Retractable Blade Knife
- Masking Tape
- Scissors
Instructions:
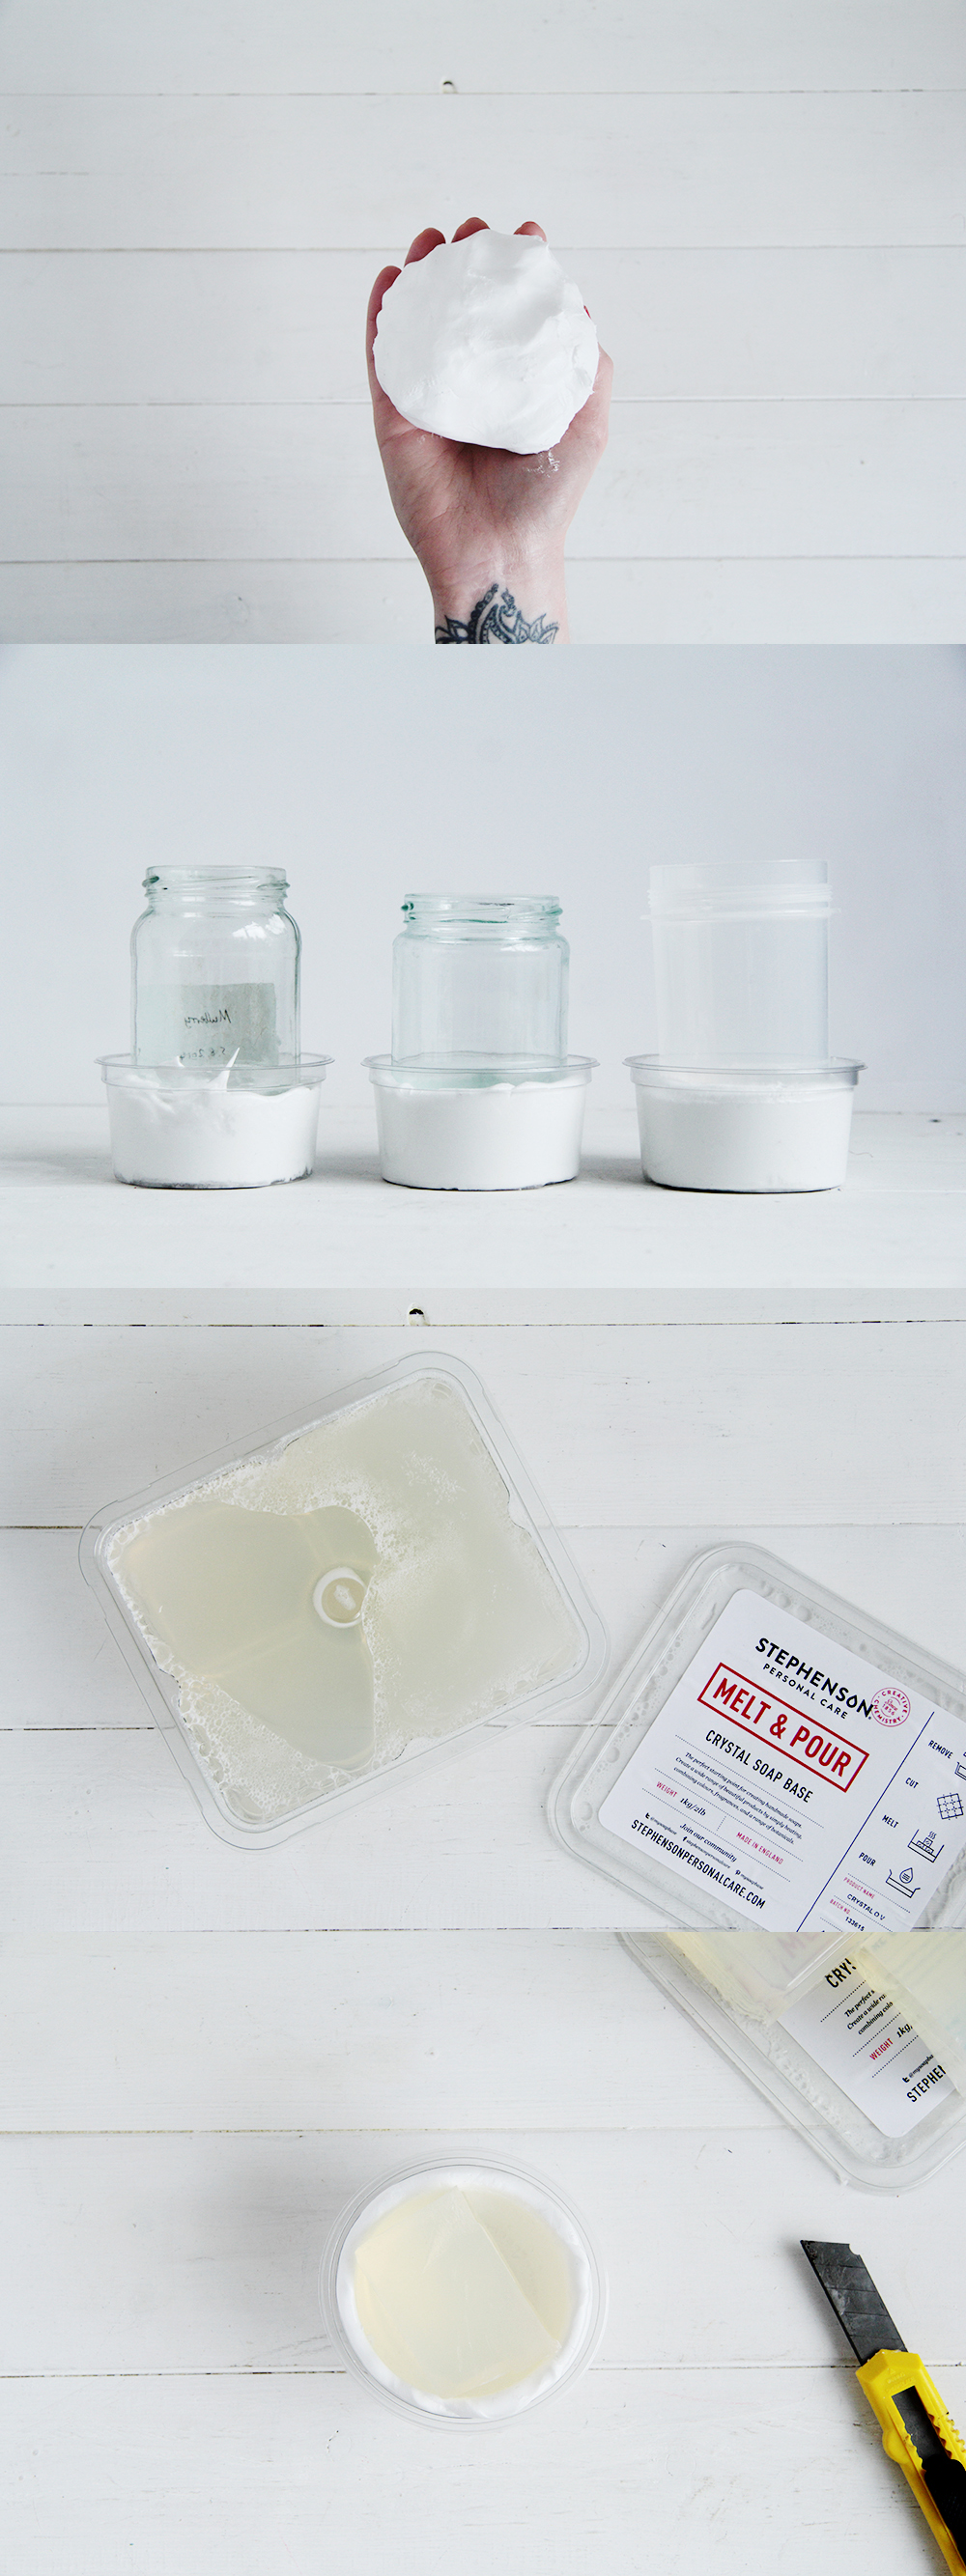
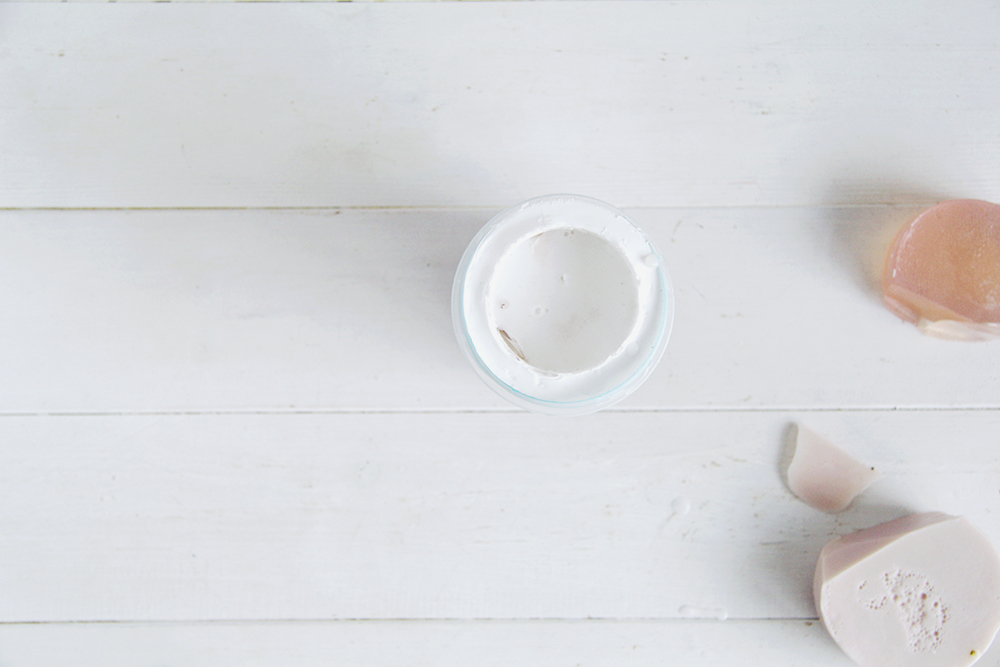
1. Follow the steps in this DIY Silicone Mould tutorial to make the base for your moulds. Spread you first batch between small pots and press slightly smaller jars into the silicone to create to small moulds. You can use heat proof containers as your moulds at this point but they must be able to withstand high heat.
2. After a few hours your moulds will be ready. Remove the jars and wash the silicone thoroughly with soap and water. Now your moulds are ready to use!
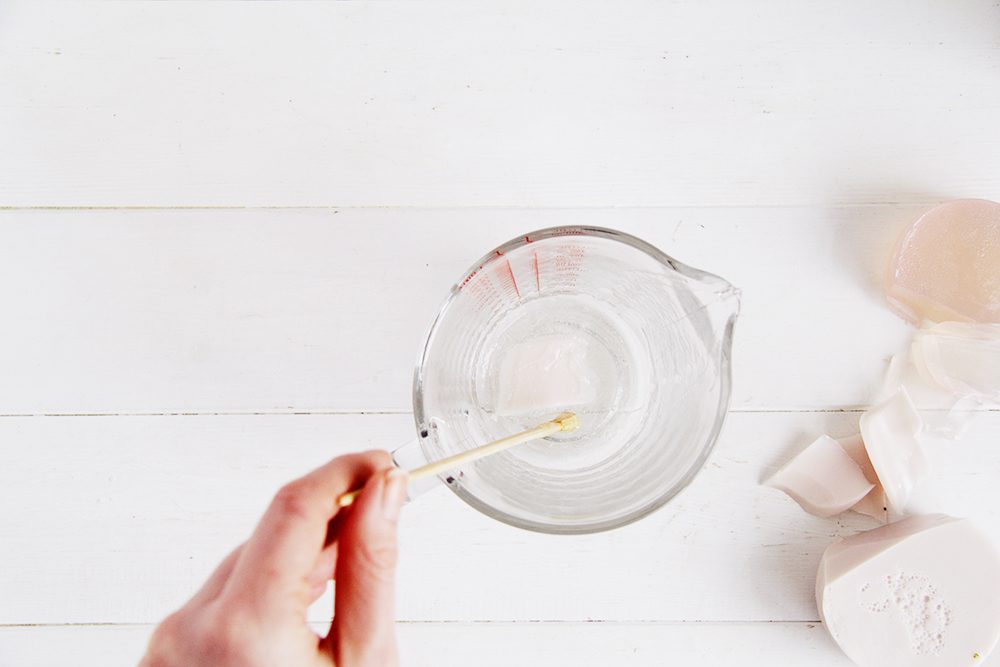
3. Cut off roughly the amount of soap you’ll need to fill the mould and chop it up into small chunks. Throw them into your microwavable jug and put in the microwave for 30-45 seconds. Take it out and stir. If any of the soap is still solid reheat for 15 seconds at a time until the soap is liquid.
4. Now comes the fun part! Colour your soap by pouring droplets of food colouring into the soap. Little by little build up colour. Mix together and pour into the silicone mould.
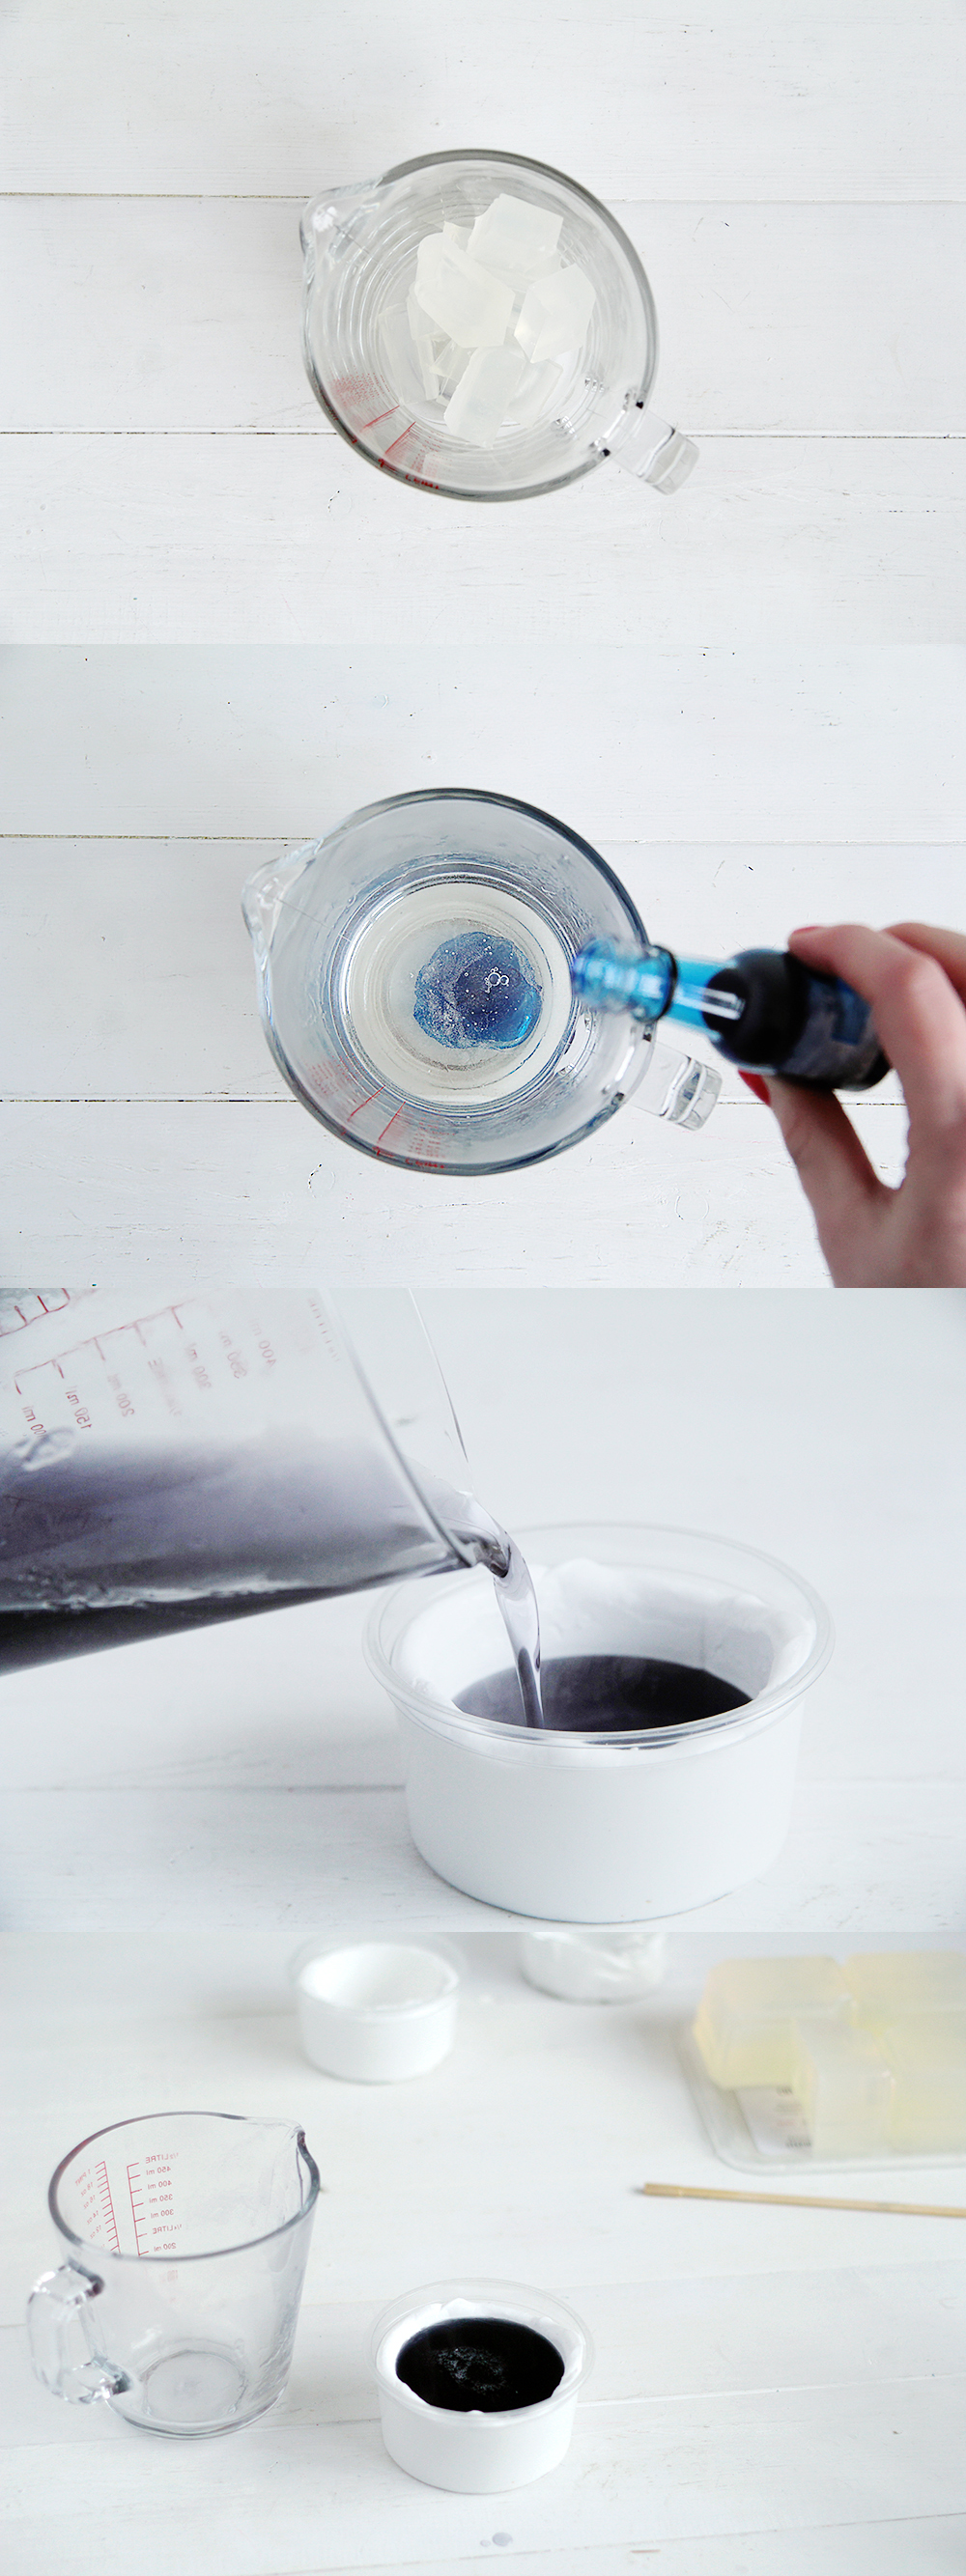
5. Now you have to leave to cool and harden. This will take about 12 hours in a cool room but I’m inpatient and put mine in the fridge for a few hours. If you’re like me make sure the mould is no where near any open food (silicone is poisonous!) and there are no curious hands around that might think this is a edible treat. No eating the soap please!
You might notice that the fist few times you use the mould the soap at the edges doesn’t set. I think this is some sort of reaction with the silicone. When you remove the soap just give it a wash to get rid of the liquid soap residue. After 2/3 uses this should stop happening.
I’ve also seen soap makers using an alcohol spray to stop the top part of the soap misting up. We don’t really need to worry about this step as we are cutting into the soap later.
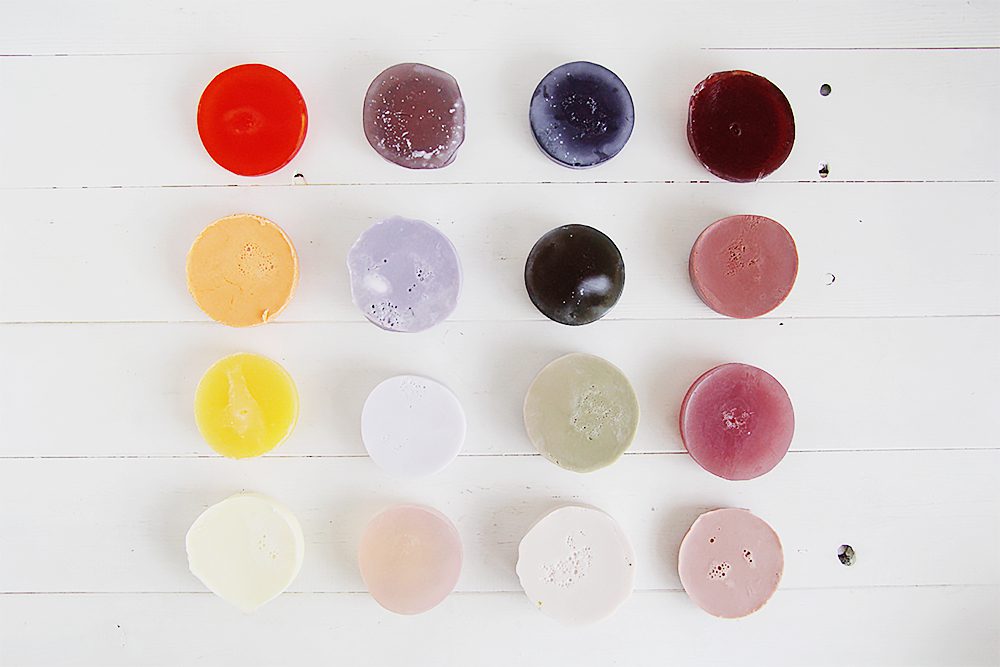
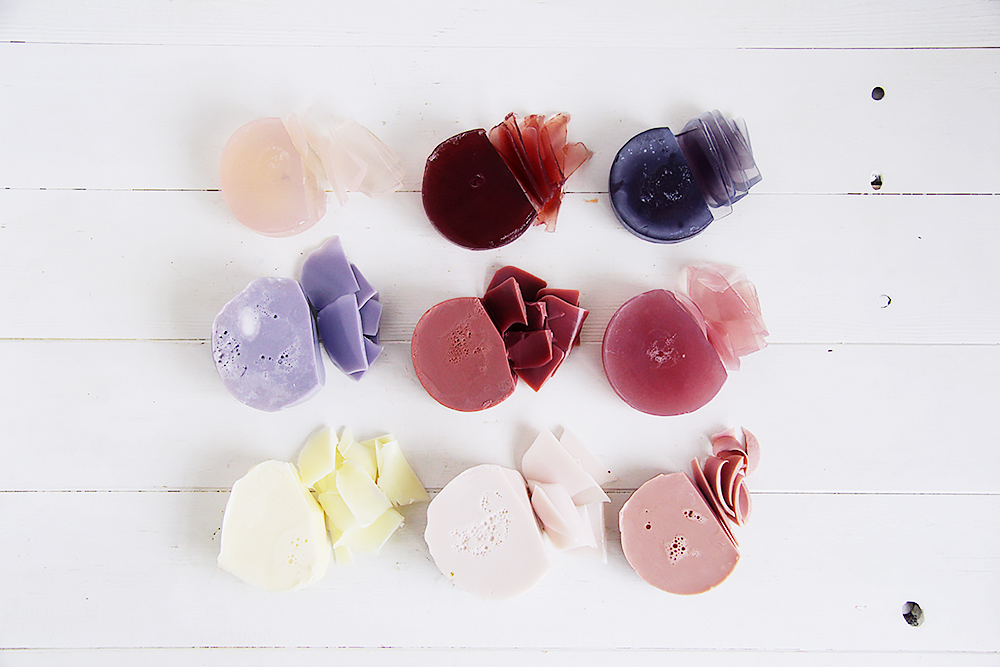
Now make all the colours! Use a mixture of clear and opaque soap bases to make translucent and solid colours.
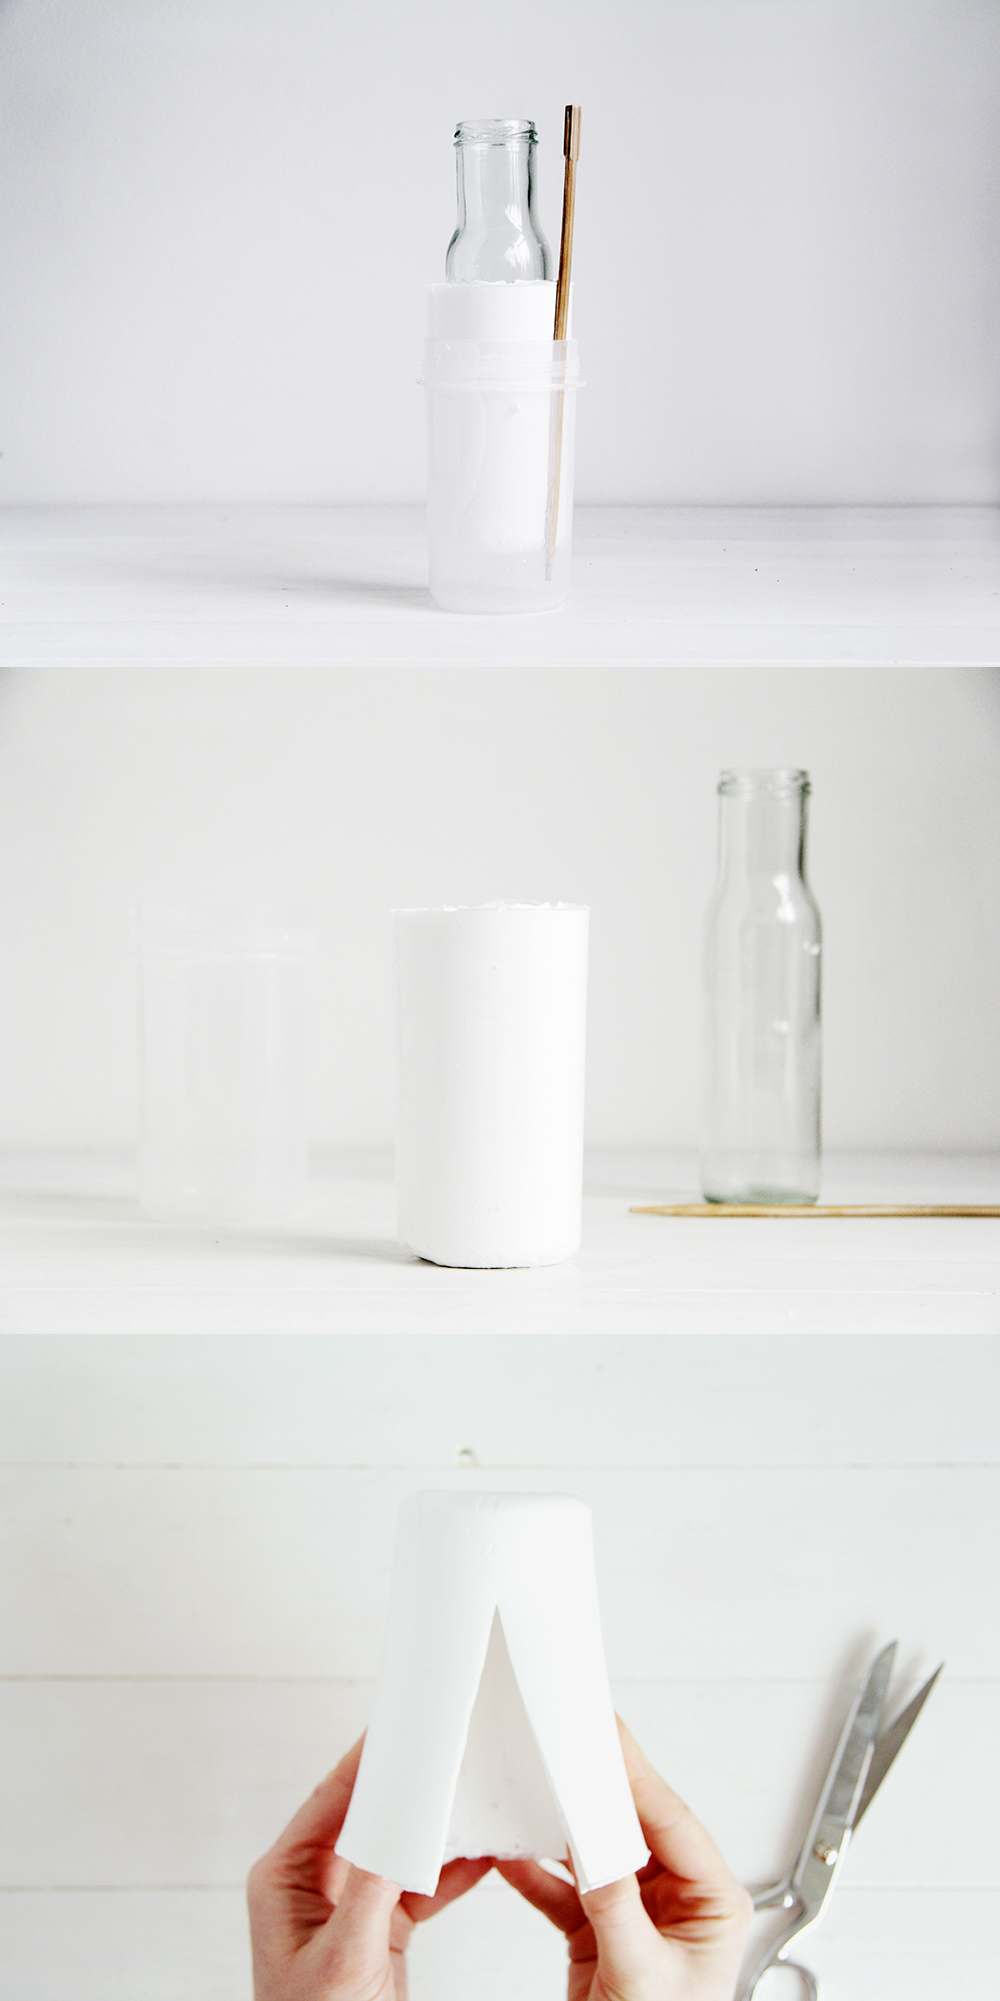
6. Whilst you’re waiting for the soaps to set (this was the hardest bit!) you can make the second mould. I would definitely recommend using the silicone to make this mould rather than just using a container. We want to make long soaps and the flexibility of the silicone makes it much easier to remove the soap in one piece!
Fill a taller container about half full with your second batch of silicone. Press into this a longer, thinner jar than before. I’m using glass jars (with the labels taken off) because their smooth surface makes removing them from the mould much, much easier! This size of this jar will be about the size of the finished stones so take a little time to source the right size.
7. Once the silicone is set remove it from the container. This is a little tricky. You need to squeeze something thin and sturdy down the sides and all the way around the mould to release it. Once it has come unstuck you can take it out. Do the same for around the edges of the bottle taking care not to damage the insides of the mould.
8. Cut a slit two thirds down the mould.
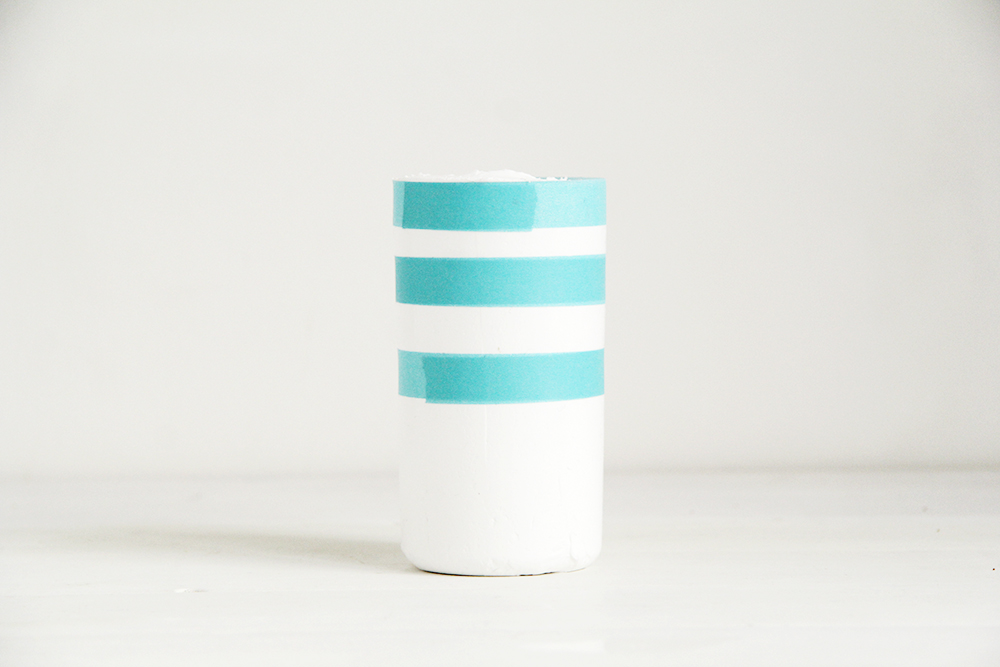
9. Tape the mould back together. I like to pop it back into it’s original container as well just to minimise any leakages. I put a solid object at the bottom of the container for the mould to sit on. This makes it easier to remove later.
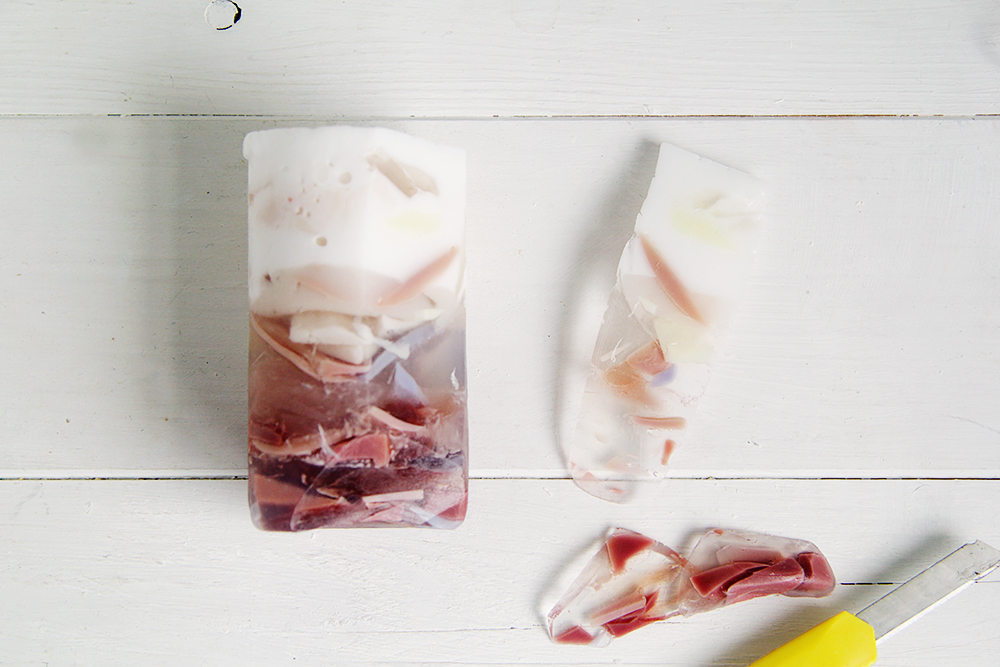
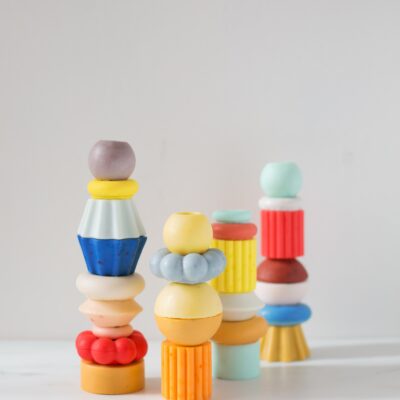
10. Now we get to start putting together our stones. Pick your colours. You can go completely random or take inspiration from real life, it’s up to you. Use the blade to shave off thin pieces of soap.
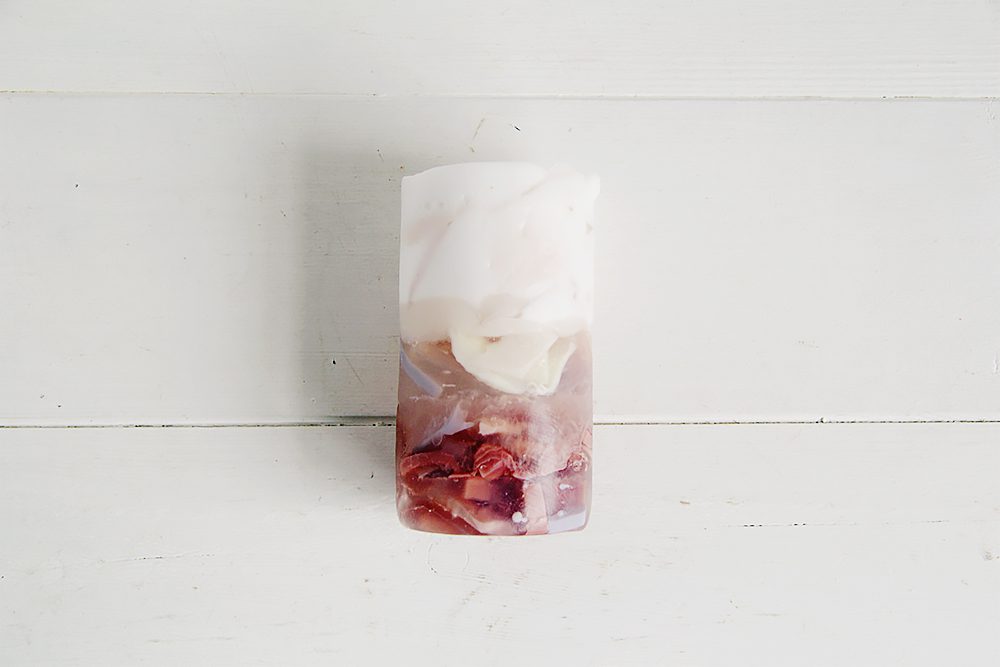
10. Take a random selection of the shavings and fill the mould with them. Try to keep them loose and mixed in a random way. Don’t push down into the mould. Let them fall in a natural way.
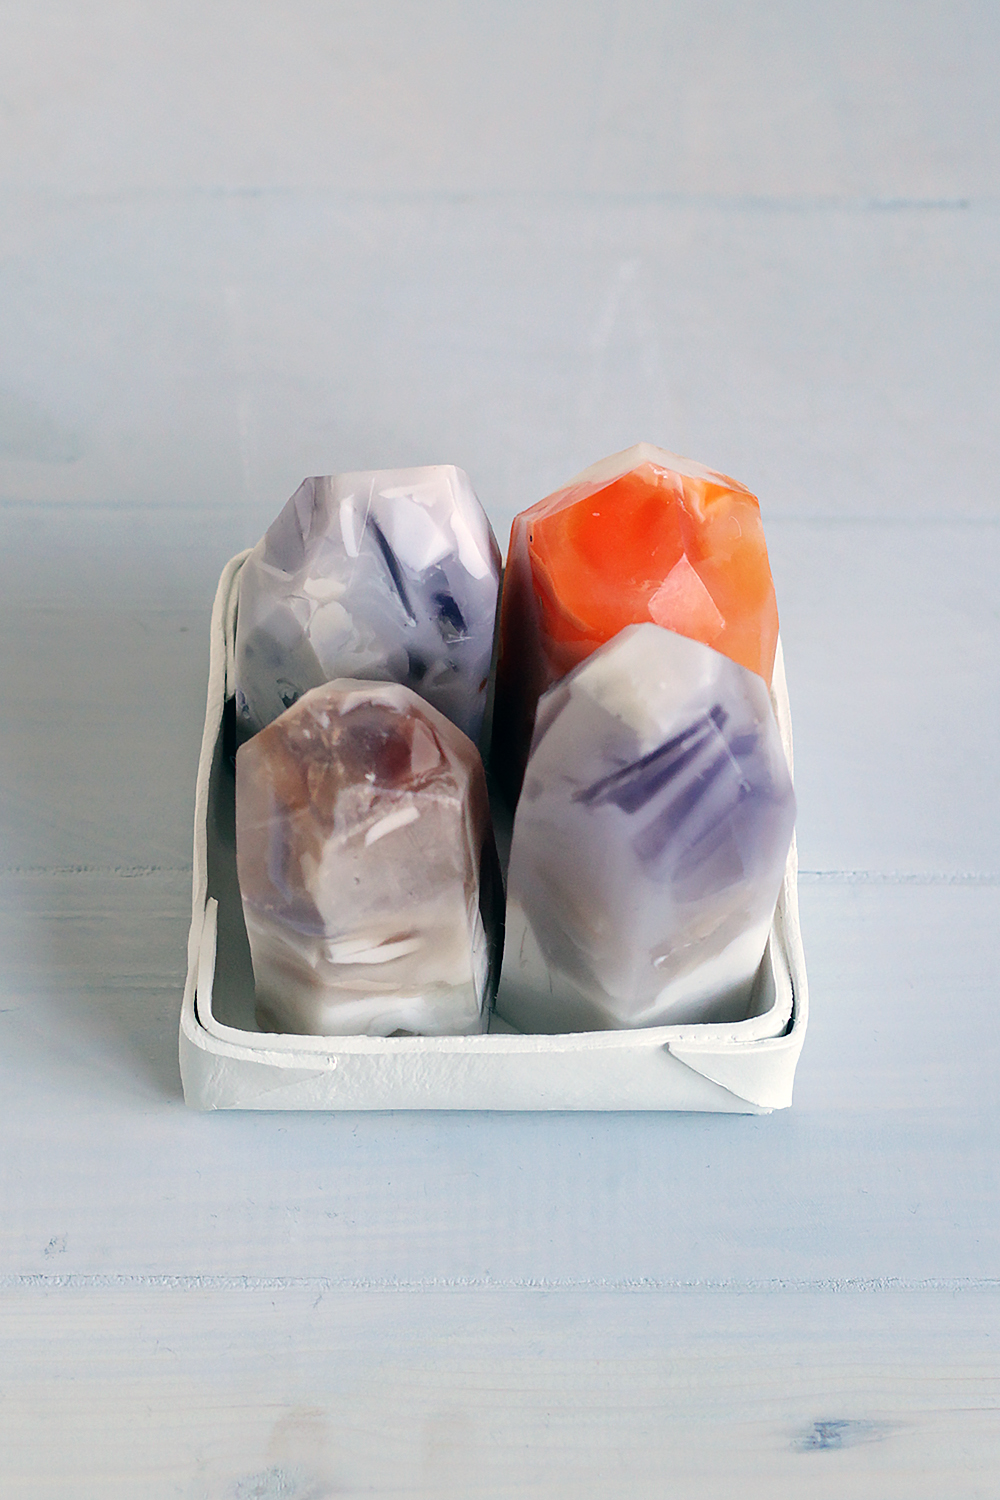
11. Separately heat and mix up more soap to pour into the mould over your flakes of soap. To create the semi precious stone look use clearer colours at the bottom of the mould and opaque colours at the top.
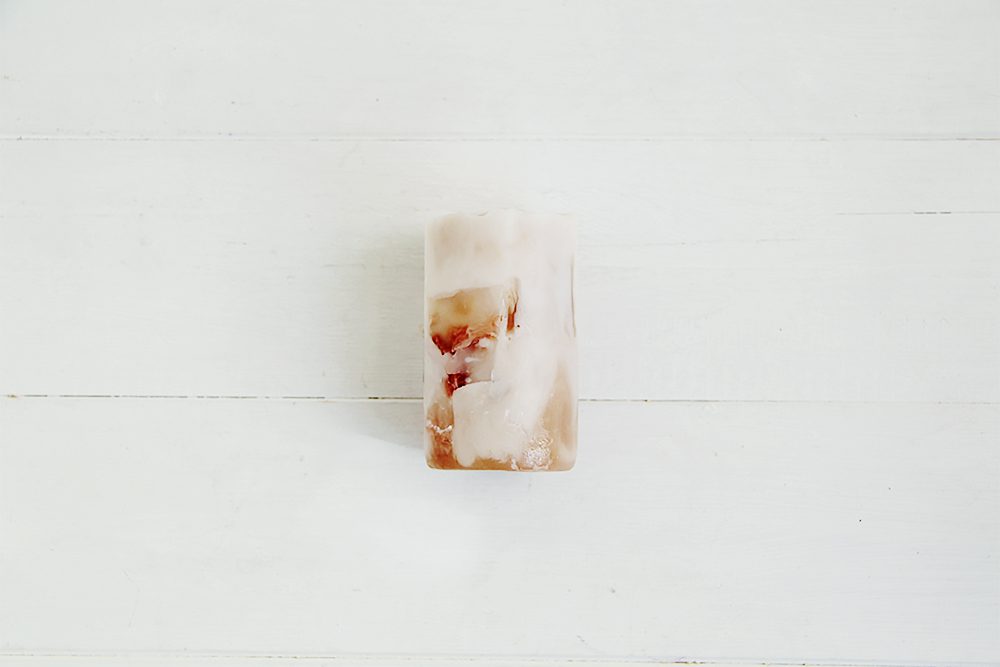
12. Leave the soap to harden and when it’s completely cool (again, muster all you patience here) remove from the mould and wash.
13. Using the knife carefully cut slices from around the edge of the soap and towards the bottom begin to cut into a rough point. You can use your off cuts in your next mould to make them even more detailed! Nothing goes to waste here.

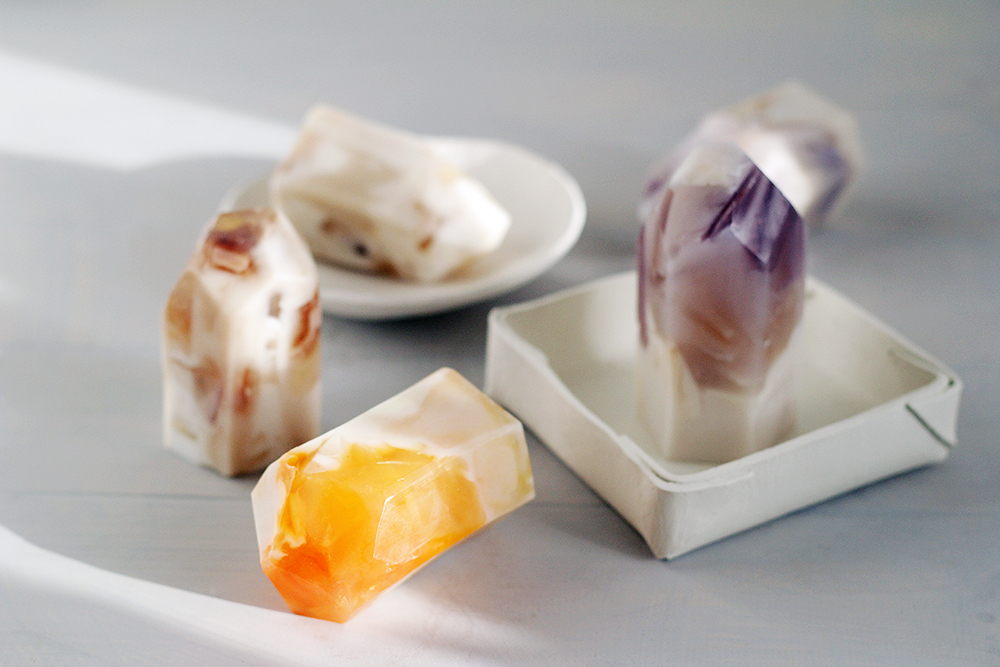
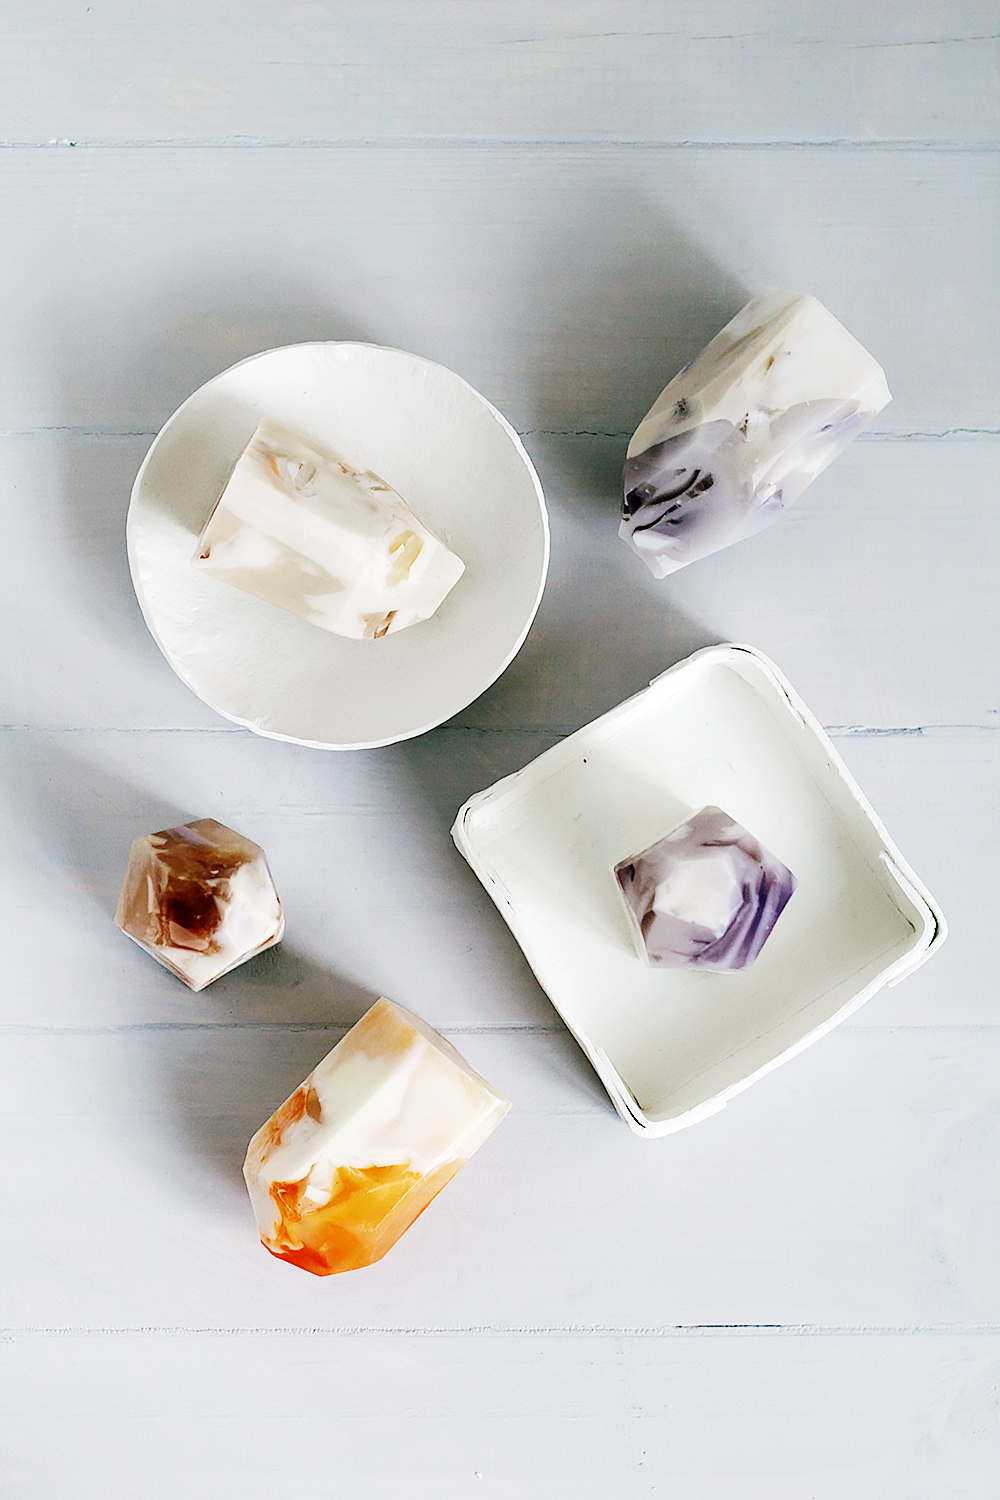
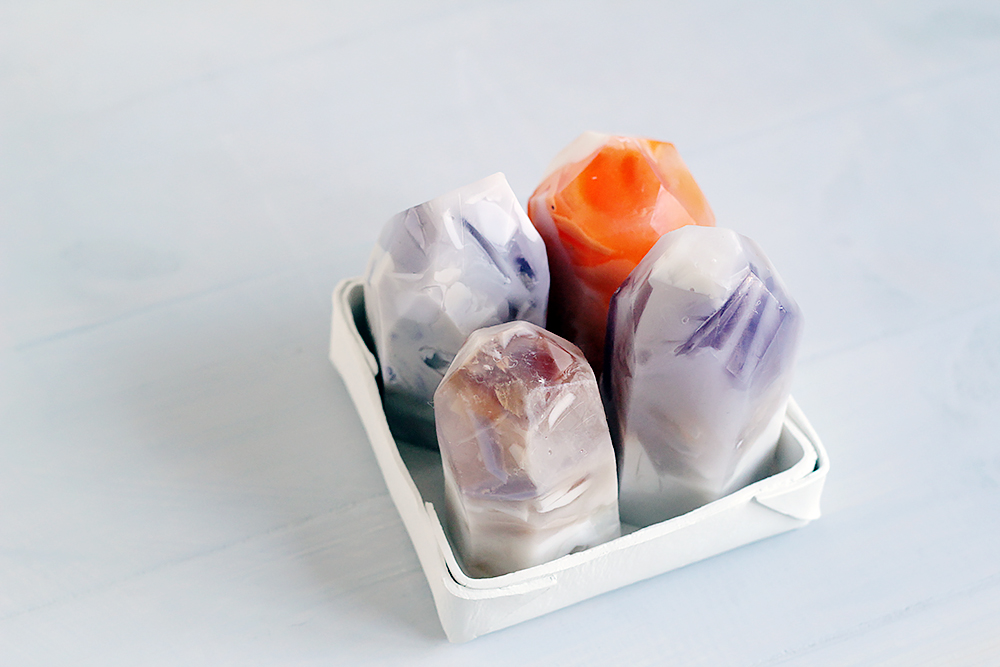
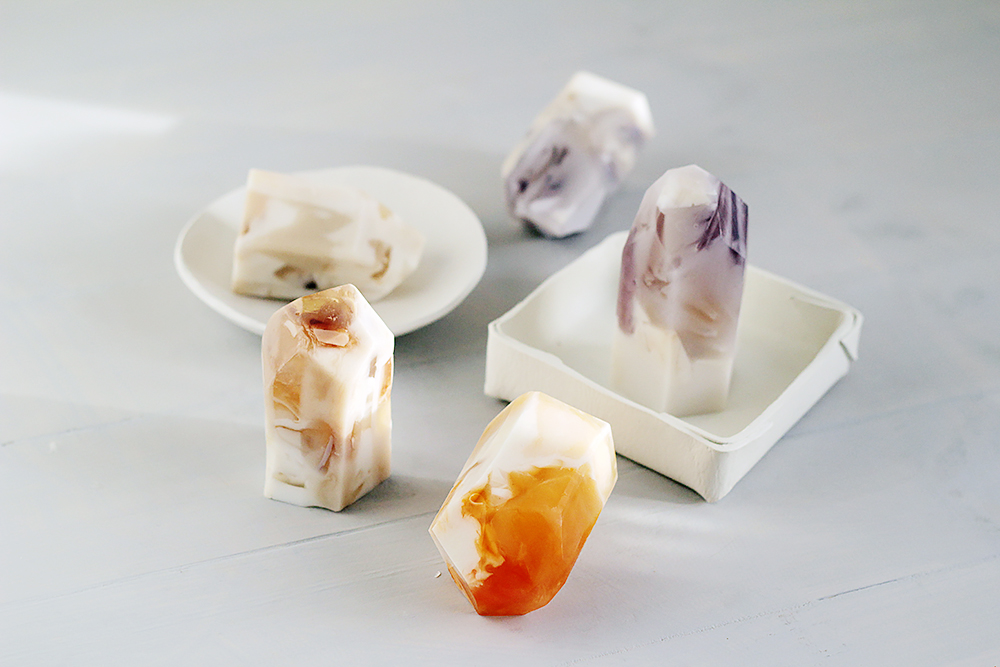
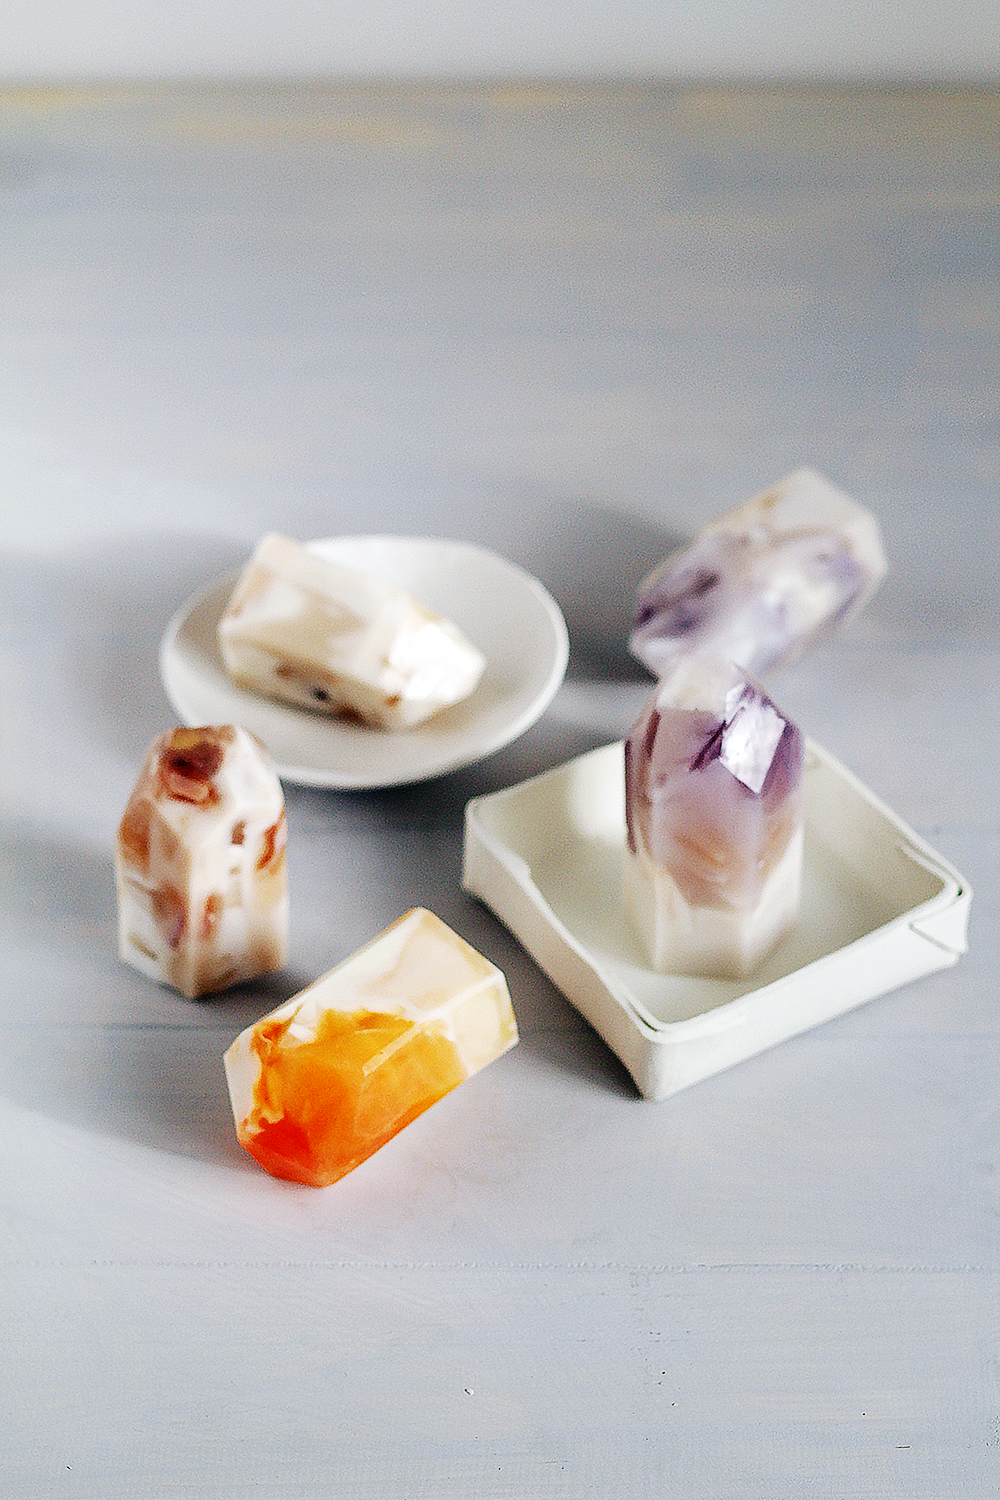
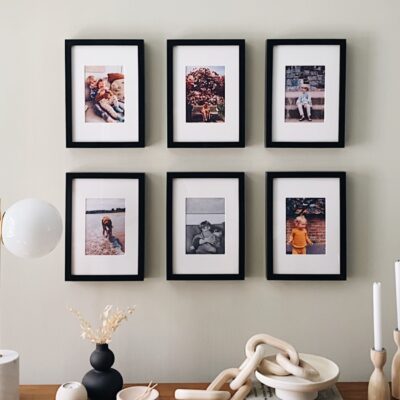
You’ll get different effects from different combinations of soap and pouring techniques. I particularly like to let the first pour set slightly whilst tilting the mould then pour the opaque soap over quickly returning the mould upright. This creates more of a mixture of colours running through the layers, like these:
The best thing about this tutorial? There is no end to the variations and techniques you can experiment with to make really uniques soaps. I’ve actually cut up and re-set a few of the soaps you see below when I wasn’t happy with the first result. I actually think that the double process gives them a much more natural, cut from the rock, aesthetic which I love!

I would love to know if you guys are making these soaps! Give me a tag on Instagram @fallfordiy to show me yours!


This is gorgeous! I didn’t skip ahead to see how the shapes were made so I kept reading on and wondering “How on earth is she making the shape of the stones with normal containers?!”
Genius. These soaps are beautiful and I love the way you cut away to find pops of blue or other colors as surprises on the inside that don’t show on the outermost layer. Definitely pinning this one and saving it for a rainy (or snowy) day!
Neha // http://nehasharmaphoto.com/blog
I was very curious about this DIY when I saw the instagram photo. you blow my mind. It has become very cool. I never knew it could with soap.
Wow these are absolutely gorgeous and well worth the effort. The colours and shapes are spectacular and are too beautiful to use!
Holy. Crap. Fran. I didn’t think soap could be so beautiful. Wow. You did an AMAZING job.
Love it!! All around great job, I immediately thought, this would be a great gift idea. Can’t wait to make it :)
wow, really nice!
You my friend, are a DIY superstar! I just can’t get over how brilliant these are – they’re definitely the prettiest soaps I’ve ever seen!
these are so cool!
Wow! Incredible!
WritingMonique
This is soo cute <3 love it
https://aspoonfulofnature.wordpress.com/
You’re so talented- these are gorgeous!!
Waoh, the resultts are wonderful, so great colours! *0*
No contest – most beautiful soap I have EVER seen. Amazing!
Wow these are gorgeous and would make perfect gifts! You did such a great job making them.
http://charmystique.com/
Absolutely in love with these. Thanks for sharing!
-Juliana | littlecupofj.com
This is so awesome! I really want to give soap making another go now! ^____^
This is brilliant! Love it! :)
Best, Albert | Palming Pebbles
Hi, I cannot wait to give this a go!! I was wondering what brand of food colors you have used and what are the best colors? I have Heard some colors can leak ect! Thankyou!!
I learnt the hard way. It isn’t food colouring, which discolours, but soap colorant. You can find it on amazon :)
These would make great gifts! They’re so fun!
Great idea Eden! Especially with Christmas coming :)
I adore this, I’m interested is selling this product. Is your line for sale on Stephenson?
Hey! Love these & currently trying out. How many drops of essential oil would you recommend??
Hey Taelar!
So excited to hear you’re trying them out. You’ll have to show me when they are done. It’s definitely difficult to say a definite amount. Different fragrances have different strengths, so there’s a bit of trial and error involved but this Fragrance Calculator might help you work it out quicker!
Hope that helps!
Fran
Hi Fran – these are so beautiful. Is that liquid food coloring you use, or a special soap colorant? I can’t wait to try these!
Hey Naomi!
I used food colouring but it does fade quite quickly. You can use a soap colourant like these ones if you want a more professional finish.
Enjoy!
Hi Fran! Absolutely beautiful! I made some that I wanted to show you but it won’t allow me to post a picture. I don’t think I cut up the pieces small enough as it has the appearance of fruitcake instead of gemstone. Try, try again! Thanks for teaching me something new! I am at my happiest while learning. Have a great day.
Hey Diana! Oh my! I would love to see them – tag me or just drop me an email fran@fallfordiy.com if you’ve got the time. And mine also looked a bit odd the first time but I sliced them up into thin strips and put some in the mould and re-melted the rest to pour over again. Second time around they were much better!
Hi Fran – your collection so amazing and this good stuff for gave gifts..
Hello! Could i ask if you remember the color combinations for the soap? Or rather even a color scheme which is complementing? Thank you :)
Hey Selina,
I went for a combination of blues, purples, oranges and yellows. Some opaque and some translucent. These seemed to go well together :D
Thanks for all the information you provided about these stones you made from soap
I like the color and pattern of this DIY Semi Precious Stone Soaps.they are like some beautiful gems.Thank you for sharing this DIY tutorial.
This is brilliant information. Thanks for sharing lovely post.
Keep Posting, Like it.
Thanks for your post.
For thousands of years, Ruby has been honored as a symbol of romance and burning passion. Rubies have raised both issues of love and battles, often associated with passion and temptations.
This soaps are amazing.
These soaps looks so beautiful. Would like to showcase it instead of using it.
It’s probably one of my favourite DIYs to date and that took me by. Thanks you
Very interesting and informative article…Thanks for sharing
your collection so amazing and this good stuff for gift. thanks
Wow, it is so informative, these DIY soaps looks stunning These designs are so cute.
Thanks for the post,
INTER MILAN will enter the race for Sergio Aguero if he is available in the summer, according to reports in Italy.
Explore our rare collectables of breath-taking Gemstones figurines, authentic collector Rudraksha, powerful Gemstones, Dakshinavarti Shankh and more sourced from different parts
of the world.
Nice Article
For best deals in Gemstones visit Gemsastro.com
Best place to Buy Gemstones Online
Keep your work up and enjoy this website here
thanks a lot for sharing this
Very beautiful, it is an innovative design.
Absolutely stunning! Thank you on a detailed impressive guide!
Amazing creativity.
Loved this article.
Pinnacle Studio Crack + Torrent Key Pinnacle Studio 24.0.2.219 Crack is an astounding video altering programming that encourages you make, alter, and redo any video and film. It accompanies a great video proofreader that joins favorable to level altering with limitless capacities to make alluring films.
Thanks for sharing this post with the community!
AstroIndusoot is a leading astrology website and mobile
application in India serving more than 2 lakh customers
around the world. We provide the best consultant & remedies
according to your problems to fulfill your needs and bring
more positivity in your life.
Visit our Official Website:-http://www.astroindusoot.com/
Very impressive post
hi,
i tried to make this type of soap in my home but can’t made this
hi,
i tried to make this type of soap in my home but can’t made this
This is a brilliant information. Thanks for sharing the lovely post.
Keep Posting, Like it.
boom 3D Crack
Nice Blog…Thanks for sharing this…
It’s Interesting to read your article thats so good and informative.
With Adobe software elements Drag and drop spreadsheets into new animation info graphics templates to quickly create visualisations of your stats.
https://upcracks.com/adobe-premiere-pro-crack/
You get functions in which the curves of the substance brands of the product are located with the value obtained from the characteristics in addition to the curves and sections of points.
at this website
very nice perfect diy, best of tattoos types best of 2021 yellow tattoo
good job. its very excellent post. i really like it. keep it up.
Amazing collections of Precious Stone. Nice information sharing. thanks.
Very Fine and Amazing Post
thank you for share :)
Keep your posts simple like this in future as well. Very good and interesting read.
Nice articles. Thanks For Sharing a very Nice Informative Details. Keep doing it
Nice post. thanks for sharing. I am very glad. nice work.
Wow! nice work. well done keep it.
amazing semi precious gemstone soap
its looking amazing semi precious stone
Great information about semi precious stone soap
Hello there, I found out about your blog by means of Google while searching for a similar subject, your site came up, it appears good. Good job on your writeup.
Best certifications exam questions to get certsquestions.com
Dumps4expert gives you the best study material
dope intrested
angle grinder discs
good work is done here. thanks
good post.
great work is done here.
amazing information. i like it.
wonderful work is done here. thank you so much.
You have done a fabulous job here. keep it up.
i visit your blog for the first time and i like this post. thanks
Good post thanks for sharing this with you and your family and friends of people with another man
Such a very useful article. Very interesting to read this article
Natural rudraksha
The saplings of Rudraksha Lovers were planted by Shri Pandit Das Ji. Rudraksha Lovers believed that everyone should be guided towards the right path. Rudraksha Lovers built a community with an influential group of people devoted to Lord Shiva and living their life for the betterment of this bhakti.
Good post. I learn something new and challenging on sites I stumbleupon every day. It will always be helpful to read content from other writers and practice something from other sites.Mock4solutions
Many thanks for the shared this informative and interesting post with us. Yodot Rar Repair
You write in such an amazing style and I really enjoy visiting your website. I hope you’ll continue to write like this in the future.
Winrar
Wow! very beautiful, great and good post. I like it very much.
avast-AntiTrack-premium
Your post style is super Awesome and unique from others I am visiting the page I like your style.
4Front TruePianos
patchzips@gmail.com
I like your post style as it’s unique from the others I’m seeing on the page. Wondershare filmora
The introduction of Scrum Exam PDF Questions has made a big difference in the preparation style of the students of Scrum Exam Questions. If you download this Prep material and start your preparation from now then you can easily pass your exam by the first attempt.
POPM PDF Exam
SSM PDF Exam
SASM PDF Exam
Agile-Software-Engineer PDF Exam
SAFe-Architect PDF Exam
SAFe-DevOps PDF Exam
SAFe-RTE PDF Exam
Scrum Prep Material has been verified by experts who have a long career in the field and know about the certifications well. You can also check the quality of the pdf exam by downloading demo pdf questions free of cost. Contact us at
Awesome tutorial
I made one for my love
thanks
The articles I read are interesting, and the food dishes are tasty, but can we really be healthy if we make or consume them on a regular basis?
I came to this website after hearing about it from
great gemstone soap.
ExamsEmpire is Top Leading Platform for Training Kit. Get Free Study Guide Tutorials!
Really! your post is based on the informative post. I think in the future you will be a great blogger. Keep it up!
Super-Duper site! I am Loving it!! Will come back again, Im taking your feed also, Thanks.
renee-passnow-crack/
Such a Very nice blog and articles. I am really very happy to visit your blog. Thanks for sharing us.
You write in such an amazing style and I really enjoy visiting your website. I hope you’ll continue to write like this in the future.
Ashlar Vellum Cobalt
You have done a great job on this article. It’s very readable and highly intelligent. You have even managed to make it understandable and easy to read.
imyfone-lockwiper-crack/
Very unique idea! One of my favrout ideas i have ever seen!
How Are You. Jason Momoa Height.I would like to take the ability of saying thanks to you for the professional suggestions I have usually enjoyed browsing your site.Excellent post. Known for her beautiful voice and attractive acting,
I Love To Read This Blog. Mark Wahlberg Height. I Am Kate.I am the Founder of MBA Caribbean Organisation which was established in 2008. We conduct seminars and workshops in leadership, management and education as well as provide motivational speeches.This is a really amazing blog wthatprovides quality information. I Daily Visit To Read This Blog Posts. This Website Is All About The Facts Of Great And Valuable Information. Thanks So Much For Sharing Such And Amazing Information With Us.
This is most amazing blog for all users.Kendall Jenner Height. I love to read this blog on daily basis. This blog is all about the facts of awesome and unique information which makes every users strong.
great blog thanks for sharing this information sir…
Thanks for the blog about precious stone
Love this “DIY Semi Precious Stone Soaps”, thanks for sharing instructions with us , will love to make this one.
Really very nice information on this site. Thanks for sharing this nice information. I hope you’ll continue to write like this in the future.
Element 3D
https://crackhow4.com/refx-nexus-crack/
Refx Nexus 4.0.6 Crack is well-known among excellent composers, and it has been announced that the Refx Nexus 3 will be released in its most recent version.
https://crackhow4.com/pubg-pc-crack/
PUBG PC 1.7.0 Crack License key is a first-person shooter with survival elements. The developers struck the proper balance between each of these types of game genres, which is why this game appears to be a fantastic production
https://crackhow4.com/adobe-photoshop-cc-crack-download/
Adobe Photoshop CC Crack is a professional image editing program that is utilized all over the world. Further, Adobe Photoshop CC is used by millions of designers, photographers, and artists across the world to create the seemingly impossible.
Kontakt 6.8.0 Crack is a software sampler that enables users to create their own virtual instruments. It also allows you to sound like a snare drum or anything else you want.
https://crackhow4.com/kontakt-crack-full-version/
https://crackhow4.com/devkinsta-crack-license/
Kinsta 2.3.0 Crack License key allows for the creation, customization, and maintenance of WordPress websites. It is simple and easy-to-use software.
https://crackhow4.com/dbvisualizer-crack-keygen/
DbVisualizer Crack is a simple and effective software solution that assists you in managing and maintaining your database with little effort. It is available on CrackHow4.com.
https://crackhow4.com/inpixio-photo-editor/
InPixio Photo Editor 11.5 Crack is software that is creating with a user-friendly interface and convenience of use in mind.
Folder Lock 7.9.0 Crack free download newest is a fantastic software tool that creates a strong password to protect your files and folders from illegal access
https://crackhow4.com/folder-lock-crack-download/
https://crackhow4.com/wolfssl-crack-download/
WolfSSL 4.8.1 Crack is an embedded SSL/TLS library designed for RTOS and embedded settings. It is simple to compile and provides mutual authentication between client and server.
https://crackhow4.com/movavi-slideshow-maker-crack/
Movavi Slideshow Maker 8.0.0 Crack is a simple yet powerful tool for creating captivating slideshows that can also be used to develop your screen.
LiquidText Crack is software that has a modern appearance. It is a simple and easy-to-use tool. Its work process is amazing.
https://crackhow4.com/liquidtext-crack/
LiquidText Crack is software that has a modern appearance. It is a simple and easy-to-use tool. Its work process is amazing.
https://crackhow4.com/liquidtext-crack/
Nice Article with great knowledge, get Free Gemstone Recommendation from well known astrologers.
Great article with good images.
ImyFone Lock Wiper, I have very interest this type of Software.
iMyFone LockWiper Download Free can totally remove these infestations.
Excellent article.
You can free download it.
https://cracksys.com/imyfone-lock-wiper-crack-7-1-3-full-serial-key-2021/
ImyFone Lock Wiper is a great software that you can use to unlock your lock.
With the help of this software, we can easily solve the infections caused by the voice of the internet.
This is fantastic data software.
You can free download it.
https://cracksys.com/imyfone-lock-wiper-crack-7-1-3-full-serial-key-2021/
Your site is so nice. All issues have been explained clearly and openly. I certainly found the presentation informative.
I appreciate your site.
iSunshare Product Key Finder
Delhi Male To Female Full Body TO Body Massage Services
Great Information about DIY Stone Soaps. Brilliant article.
Incredible post.It is really a useful piece of information. I’m glad that you shared this useful info with us.
Thanks for sharing. Asta Powerproject
Free Download Pro 9 Full Version Offline Installer for Windows PC is a powerful scanning application that allows you to get great pictures using a flatbed scanner or film scanner. If you are not satisfied with the software provided by the scanner manufacturer or want to improve it with new features, you may want to try this program. VueScan, the world’s most popular scanner software, is widely used by photographers, home users, scanning services and industry. VueScan Pro Serial Number Full Download
thanks for sharing this information.soaps have difficulties and DIY semi precious stones is new concept to bath.after bath please wear a rudraksha.in your life will save.click here to know rudraksha
If you are interested in Android Apps, PC Softwares and MAC Applications then you can visit our official websites for registered applications where you can download full free without paying any charges.
Nexus Crack
The majority of the professional gamers are playing Football Manager Crack that’s related to numerous fantastic features. Sports Interactive has developed such a fantastic game and launched on 19 November 2019. To win a game with maximum points, the user must create a strong team. If you’re an Android or IOS user, then such a game is out there for you.
https://crackingkeys.com/football-manager-2020-crack/
GstarCAD Crack Free Download has an interface that is somewhat similar to AutoCAD and is compatible with OpenDWG scripts. You can use it to make, post. Also, display CAD drawings in a versatile 2D/3D CAD program (computer-aided design or computer-aided design). Furthermore, the Gstar CAD program supports the DXF file format, as well as the ability to switch away from any object endpoint. This CAD framework is a robust CAD program that lets you make a wide range of 3D sketches, comprehensive design details, and applications. As well as quickly draw any kind of drawing. GstarCAD provides advancing performance, extensive functionality, and creative PDFs, including barcode and QR code support.
https://crackinfree.com/gstarcad-crack/
Football Manager 2022 Crack Free Download is a famous athletic team management game. You can download Football Manager Full Crack its latest version free of cost. Also, it is boring to use other management applications. But I think that this team manager app is very fascinating and helpful. A game involving a group of players to control is considered a burden. In the same way, the reason is that you have to consider all aspects of your team deeply. So, this is a very difficult thing to perform as you will face many troubles in it. Though after a series of FIFA 18 applications, Football Manager PC Crack has made it a simple task for every user. All in all, it entertains the players on monitors all around the world. In the same way, it is simple to use. And New players can also play it. It has made revolutionary changes in the world of managing applications.
https://crackpromac.com/football-manager-crack/
Football Manager 2022 Crack Interactive is developed that delivers great levels of the drama & authenticity of football. It is becoming a main part of the Football Manager Series. The initial release date of Football Manager 2022 is 10 November 2020 and is available for Xbox Series X, Series S, Xbox One, macOS, Microsoft Windows & Macintosh operating systems. A person must find out a platform where you will be able to get Football Manager 2022 Steam Download. It is becoming the best thing where you will be able to manage the best clubs in the world.
https://vstsoftz.com/football-manager-crack/
Subway Surfers Crack Free Download is an “endless running” mobile game co-developed by Kiloo. This game is available on Android, iOS, Kindle, and Windows Phone platforms. Also, Players of the game take the role of youthful hooligans who, upon being caught in the act of applying graffiti to (tagging) a metro railway site, run down the tracks to escape the Inspector and his dog. As the hooligans run, they grab gold coins out of the air while simultaneously dodging collisions with railway cars and other objects. Special objects, such as the Weekly Hunt, can result in an award in the game. All in all, Download Subway Surfers APK MOD.
https://crackmakers.com/subway-surfers-crack-mod-apk/
I really enjoyed reading this article. Tq for Information. we are also writing this type of article about RUDRAKSHA. Anyone wants pls read.
our Site :https://divinetherapy.in/
It’s great to have you here. I really like the colours and theme.
Is this your website? I’d like to start working on my project as soon as possible.
If you don’t mind, I was curious to know where you got this or what theme you’re using.
Thank you.
HowT o Crack Mac OS
Hello, Dear Thanks for sharing such great content with the US it’s really amazing content so please keep sharing. I also have something for you so please check out
HowT o Crack Mac OS
Thanks for the info! Keep writing articles like this.
https://softkeygen.com/spyhunter-crack-download/
Love this amazing DIY Semi Precious Stone Soaps, this one is amazing and unique . Will love to try this stone .
You Can Also Get Cracked Software For Windows & Mac Free Download
https://miancrack.com/d5-render-crack/
It is really enjoyable to visit your website because you have such an amazing writing style.
BlueSoleil Crack
Shapewear Is the Canvas and the Clothes Are the Art
Saree Shapewear
Yellowsapphire.org.in completely focuses on selling high quality of yellow sapphire gemstones (origin-Ceylon) online. We deals in both domestic as well as international market. Yellowsapphire.org.in Having a strong physical distribution network worldwide, with more than 2000 and still counting Jewelers, distributors, fashion designers, exporters and astrologers under their belt. (less)
Love this DIY Semi Precious Stone Soaps, amazing one . Thanks for sharing this one with us, I never tried this craft.
Octane Render Crack is the fastest GPU-accelerated, accurate renderer. More, Octane uses the graphics card in your PC to render photo-realistic pictures. Also, you can produce gorgeous works in a fraction of the time. More, it brings new progressive tools ne’er seen before in any production renderer. Also, options embody volumetrical light-weight field primitives and deep motion buffers for top frame rate VR rendering. The discharges conjointly incorporate necessary trade standards for GPU rendering, together with Open Shader Language (OpenSL) and OpenVDB for particle simulation.
https://crackingkeys.com/octane-render-crack/
Canva Mod APK is available with all premium features of canvas for free. Also, Canva Mod APK is simple to use. So, if you want to create a logo or banner for your business but you are unaware of any Graphic Design, Video Collage, or Logo Maker app then this post is for you. In this post, you will get a premium version of the wonderful and most popular app that will help you to create stunning social media graphics, presentations, posters, and other visual content. Sometime before today, you had to do a lot of flicks to make logos, posters, presentations, Facebook covers, or Youtube Thumbnails. Because without computers it was not easy but thanks to Android Phones which made everything easy.
https://crackinfree.com/canva-crack-mod-apk/
Toon Boom Harmony Crack is an outstanding program that is a mixture of 3D and 2D animation. It is a complete 3D and 2D animation studio. Similarly, this tool provides the best technique to produce professional projects. More, it is unique in working performance. Also, very easy to use and soo simple application. It means that you can download it very easily. There is no need for any access to downloading it. Moreover, Toon Boom Harmony Crack toll is very useful today. It means that every user is interested with this tool in this tool. Due to its best quality working.
https://getvstcracks.com/toon-boom-harmony-crack/
What is the first thing you think concerning a graphics design app? Perhaps Adobe Illustrator or any other application would be. These applications, nevertheless, need money to get all of their premium features that might matter in the long term. Thus, is there some other tool a designer might benefit from? Yes, Canva Mod apk for Android is the finest design application. Because Canva Pro Crack enables users to publish in the blink of an eye all their efforts. So, everyone can also produce a host of different designs, from billboards and banners to brochures and business cards. Moreover, there is nothing from your creative skills when you get the amazing mobile design app Canva Pro Crack Mod Apk the exact as Intro Maker Mod Apk.
https://crackpromac.com/canva-pro-crack-mod-apk/
Shadow Fight Crack Mod Apk Free Download is here. Also, Shadow Fight Cracked is the best action-packed game created for Android and iOS phones. No game can be proud of having access to over 100 million downloads worldwide, and that is just from the Google Play store. However, Shadow Fight 2 Free Download has broken this incredible hurdle. Every day a huge number of individuals look for Shadow Fight 2 MOD APK on the web. You are likewise one of them, that is the reason you are here on apkzoon.com. Everyone who has played the game has immediately become a fan of this masterpiece. I like fighting games and my fa free fire. Shadow Fight 2 Mod is a modified form of the original game. For providing unlimited unlocked features for free Shadow Fight 2 APK was developed.
https://crackmakers.com/shadow-fight-crack-mod-apk/
Surfshark VPN Crack Free Download is a fabulous VPN service. It provides you with unlimited services. You can gain full access to Netflix from another location. More, exclusive content from a distant land for your video game. Further, make your internet connexion less exposed. One potential choice is the VPN offered by Surfshark VPN Crack, offering proper rates for this increasingly famous service. Though VPN connexions are seen as a way to become less transparent to the world and are usually associated with shady, hidden, or dangerous activities, without necessarily needing to be frowned upon, there are plenty of reasons to use a VPN connexion. Privacy is one of the most desirable subjects, and the amount of it that we should be given is more so. So, Download Surfshark VPN with Crack and visit those websites which are restricted in your location.
https://vstsoftz.com/surfshark-vpn-crack/
Please share more Information on this.
Digital Groups is the best mobile tower installation service provider in India. We provide the best mobile tower installation in every corner of India
Tower Installation Company India
nice to see this diy semi precious stone soaps…
It is one of the best posts for this topic and I really appreciate your great efforts. Thanks for sharing us.
Rudraksha is known to be one of the most precious beads, owing to its divine healing powers. Buy Rudraksha Online from HarekrishnaMart.
I am impressed with your work. After a long time, I found a platform like this. The site shares the latest content which keeps readers updated.
Thanks for sharing. Dragon ball fighters crack
Site. We Offer The Best Satta Matka Tips & Tricks In
Matka 786 Guessing Group.
Thank you!
thank you very well written.
Windscribe VPN Premium Crack has been keen on the largest and most popular proxy server application and service available.
Windscribe VPN Premium Crack
VocALign Pro Crack is the most complex version of the popular software that allows instant and precise alignment of one audio source with another. Simp
VocALign Pro Crack
PGSharp Activation Key is an Android app that allows you to change your GPS location while playing Pokemon GO. With this program, you can organize
PGSharp Activation Key
ezCheckPrinting 8.0.1 Crack is MICR software that designs and prints reports for small and large businesses. It allows you to personalize, write and print
ezCheckPrinting 8.0.1 Crack
UnHackMe Pro Crack 2022 is a malware and Trojans protection program. It needs additional processing and most ant virus development. It is the novice and professional in removing
UnHackMe Pro Crack
Remouse License Key is an automated program that allows you to record and replay a series of mouse and keyboard movements and save operational data
Remouse License Key
VideoProc 4.8 With Crack (formerly WinX HD Video Converter Deluxe) – the most powerful video processing software designed for editing (4K), trimming
VideoProc 4.8 With Crack</
Your concern is genuine as we do need this right now.
Talk to Astrologer
thanks for sharing.Tenorshare 4uKey Crack
Our team of experts handles all of the mining for Samadhi Quartz. This valuable and rare Quartz is mined from the Kullu Valley in the Kullu District of Himachal Pradesh, India. By entrusting our team with this important task, you can be sure that you’re getting the best possible product.
yacht market
I have decided to be one of your daily visitors after discovering the vital information you published on your blog. Keep posting valid content like this.
I found this blog. For what you have suggested to us, I have found some new data in your post, all things considered. The cerebrum is incredibly satisfying and I am all thanks to the astonishing degree of your article. https://totoforce.com/
Wow, what an amazing informative blog. Your article was interesting to read because there were many amazing and interesting elements. I really like to read such good articles. Thank you! Keep shaking it. https://majornoriter.com/
It’s really great. Thank you for providing a quality article.
Hi there, You’ve done a great job. I’ll definitely digg it and personally recommend it to my friends. I’m sure they will be benefited from this website.
We have all the study guide and preparation material that will allow you to prepare for any certification exam OraclePDF is your guarantee of success. You can get a list of well-adjusted questions and answers that will help you prepare for the exam and you can also practice using it. Our practice test software for real assessment.
visit : https://www.oraclepdf.com
Web software agency Istanbul provides e-commerce site, web software, web design, web and desktop programming, corporate website services.
Modern design bioclimatic pergola, aesthetic bioclimatic pergola, aluminum pergolas.
Modern design bioclimatic pergola, aesthetic bioclimatic pergola, aluminum pergola useful in all seasons, stylish, high quality and suitable awning pergola systems
I am very satisfied of this website and I also rate it daily whenever I do and my whole family is also very agree with this website. I like it so much.
i am very satisfied with this website
AN informative blog really impressive
I am very satisfied of this website and I also rate it daily whenever I do and my whole family is also very agree with this website. I like it so much. i am satisfied.
I am very satisfied of this website and I also rate it daily whenever I do and my whole family is also very agree with this website. I like it so much.
I am very satisfied of this website and I also rate it daily whenever I do and my whole family is also very agree with this website. I like it so much. i am satisfied.
Good post. I was constantly checking this blog and I got good information. I was impressed! ;) 먹튀검증
I am very satisfied with this website,I visit this website everyday and get lot of information.
I like this website. I am very satisfied with it.
Highly attested dumps pdf are available for the beginners who want success in limited time
I’m grateful for coming across your blog. Your posts always provide valuable insights
visit us for best content :https://astromiracle.in/blogs
When I saw the Instagram photo for this DIY, I was so much interested. You amaze me so much. It’s grown incredibly cool. I had no idea soap could do that.