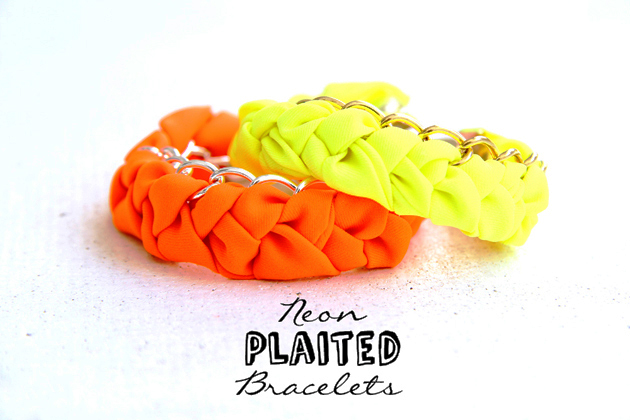
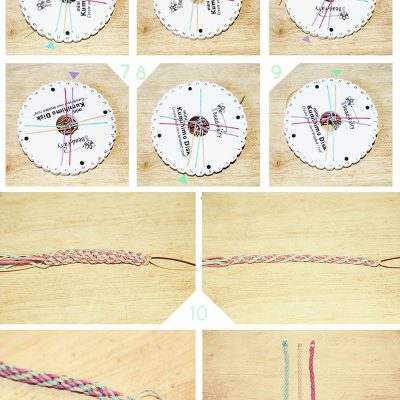
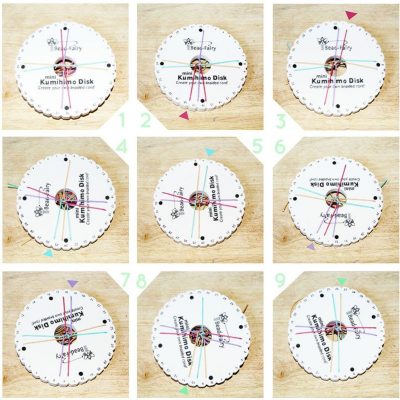
• Home
  • Blog
  • About
  • Collaborate
    • Media Kit
  • We Make
    • Bloglovin
    • Facebook
    • Instagram
    • Pinterest
    • Twitter
    • YouTube

Fall For DIY

  • DIY
  • Interiors
    • Planters
    • Paper
    • embroidery
    • Drinks
  • Blogging
    • Photography
    • Instagram
  • fashion
    • Jewellery
    • Accessories
  • Inspiration
    • Round Up
    • 50 DIYs
  • Office
    • Free Printables
    • Organize
  • Party
    • Christmas
    • Halloween

Our favourite things in your inbox every month!

DIY Holographic Stripe Tshirt

My inspiration for this tshirt was from Jonathan Saunders Spring-Summer 2013 ready to wear show, in particular these holographic threads. It’s had quite a reaction from my friends, and I love it! I’m going to shine like a disco ball this summer. Instructions Cut the holographic fabric into strips around 2 inches wide. Pin the pieces onto the tshirt. Take extra time to keep them straight. Pin the pieces 2 inches apart to create an even stripe. Either sew on your strips, or use hemming web and iron on the strips. I prefer the hemming web, as it gives a… Read More

DIY Bag Tassel Charm

Instructions   Cut many lengths of suede all around the same size (mine were around 30cm). Keep folding the in half and checking they fit into the cord end until you can’t fit anymore in. Wrap an elastic band around all the cords, slightly to one side of the centre, securing them all together. Fold the longer ends outwards over the elastic band and the shorter ends of suede. Move them around until you have a neat bundle Put some strong glue into the cord end. Squeeze the folded strips of suede into the cord end. Trim the ends so… Read More

DIY Neon Fringe Necklace

The sun is out here! (a fact all our fellow British readers will appreciate is pretty rare) So I’m currently sitting on a wooden chair on a mound of grass in my garden thinking about tassels. Well, I love them. I want to put tassels onto everything I own, and I started with a statement necklace tutorial. Instructions Measure and cut 17cm of tassel fringing and diamante strip and 22cm of chain. Tie a knot in the end of your embroidery thread and sew onto the solid strip at the top of the fringing. Begin to sew the diamante strip… Read More

DIY Rose Ring

I’m quite ashamed to admit it, but this was my first ever time using polymer clay. I think up until now I just assumed it was quite a labour intensive procedure to make charms and beads, but after whipping up this delicate rose in about 10 minutes I must say I am converted. I’ve got some great plans for more tutorials… but lets stick with this one for now. I love this ring. It reminds me of Frida Khalo and Mexican flower bouquets, and was inspired by the Oscar de la Renta ring in our Inspire// Fresh Florals post. If you… Read More

DIY Statement Jumper

I’ve got to admit, I have a tendency to play it safe when I buying clothes, especially in the winter. The grey/black/navy jumper is my go to every time. So when spring does eventually come it all seems a bit dull and boring. Bring in the multicoloured crystal shapes! Instructions: Layout the rhinestones playing with the composition until you’re happy. Taking your time, glue these onto your jumper using a glue gun, or a strong fabric glue. About 3/4 of the way through lay out the rest of the stones onto your jumper, just to make sure they are spaced correctly… Read More

DIY Kumihimo Bracelet

I recently bought a Kumihimo disk, and since then it’s gone everywhere with me. I had been wanting to try this style of braiding out for such a long time, so when I saw Vina sold them in my local bead shop I couldn’t resist. Once you get going it’s so quick and easy, I’ve become a bit obsessed… So I hope you like this tutorial, because there will be more!ll need:  You’ll need: Kumihimo Disk (alternatively cut 32 slits into a circle of foam/thick cardboard) 4 x 1 metre cotton cord/embroidery threads Bell closer cord end, extension chain and clasp. Mine… Read More

How To… Kumihimo Braid

Kumihimo disks are a fantastic and pretty speedy way of knocking up woven bracelets in no time. It might look complicated at first, but I assure you it’s much easier than it looks! The disks are definitely worth the small cost, or if you cant get your hands on one, cut 32 slits into a thick piece of card or foam with a circle cut out the middle and voila; one kumihimo disk. Follow these instructions for this simple braid. I’ve done this one in several different colours to make the tutorial easier to understand (hopefully) but play around with… Read More

DIY Feather and Chain Hairgrip

How to make a Feather and Chain Hairgrip: Glue the cabochon onto the hairgrip. Alternatively pop a jump ring straight onto the hairgrip. Attach two lengths of chain to the jump ring, one longer than the other. Cut the feathers to size, thread on beads and attach your box clasps/cord ends onto the ends. (For a cord end tutorial click here) Attach the feathers to the ends of the chain using jump rings. (For a jump ring tutorial click here) Using a jump ring attach any charms you would like to the chain. Hope you’ve enjoyed today’s post! Fran  

  • « Previous Page
  • 1
  • …
  • 82
  • 83
  • 84
  • 85
  • 86
  • Next Page »

Search

About

Preorder My New Book Easter

FESTIVE

Follow

Featured

shop earrings

Partners

Terms & Conditions
Private Policy Statement

DIY

DIY Easy Festive Stars

DIY Easy Christmas Star Decorations made using Card (with templates!)

Easily Add Machine Embroidered patches to Anything and Everything with Skitch

DIY Air Dry Clay Wavy Painted Bowl

Testing the LokLik Cutting Machine to Upcycle Old Clothes

How to Hack Your Bedroom for a Good Night’s Sleep

Folded Paper Christmas Decorations

7 Paper Christmas Decorations You Can Make Today

A Very Merry Christmas – Festive Trends 2023

DIY Bobbin Picture Memory Frame

Why I Replaced my Laminate Flooring with Vinyl (spoiler – because it’s AMAZING!)

A Green Garden Refresh with Durapost Vento Fences

More Posts from this Category

Copyright © 2025 ·Brand New Child Savory · Genesis Framework by StudioPress · WordPress · Log in