I know I’m not alone when I say how much I’ve loved watching this weaving trend develop and grow. As a textile design graduate anything involving building up textures and creating fabrics gets my heart pumping and I’ve jealously looked on at all the beautiful pieces on Instagram and Etsy. I wanted to join in and be making them as well – so it’s taken a while but I’ve decided that I would just go ahead and get weaving. But before I did I spent some time thinking about what was stopping me in the first place? Writing this blog I sometimes feel like I have to be ahead of the game at all times. I have to do things that haven’t been done yet. I’ll often have ideas, research them for a week and be beaten to the post by another blogger who has the same influences as me and the same inspirations. I’ll be honest, it can feel demoralising. But I forget that even though I read many of these DIY blogs (I’m obsessed) perhaps many of you don’t. It’s actually ridiculous to think that just because someone else has done something before me I can no longer do it myself because someone will always have done everything before me! I can put my own stamp on an idea but it will always be just that, a rework of an existing idea. I’ve never wanted to claim I am some design genius. I just like making things I love.
That’s why I’ve decided to go further than just creating tutorials to show you guys how to make these things as well. I want to see your makes. I want a place to share what we do and what we love online and in real life. I want to bring you the hard to find supplies and range of skills to give you that last little push and make it easier to do that something you keep putting off. We Make Collective will bring together the bloggers, the makers and the tryers, anyone with just the glint of creativity in their eye. We’re still in the early stages but I’m so excited about where this is going! Sign up to the mailing list below and I’ll send weekly updates on what’s happening and how you can get involved. If you like weaving you’re going to love this!
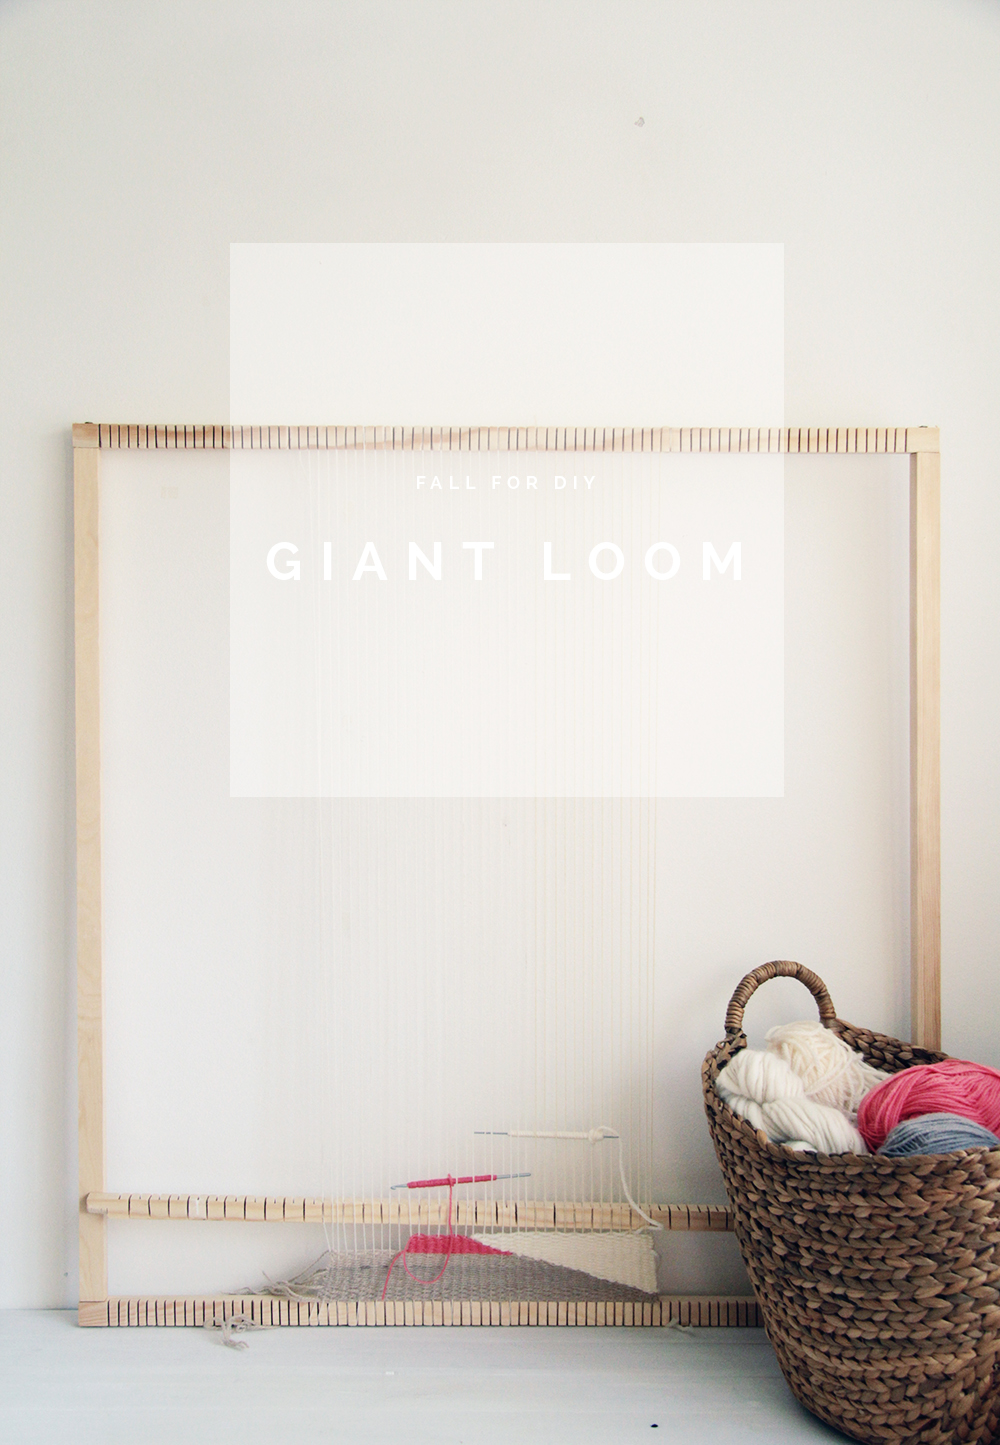
But until then it’s back to the loom! I realise there’s a lot of loom DIYs (see, I’m doing it again) but I wanted to make a loom that would give me the chance to make some oversized pieces and be sturdy enough to use again and again. So I got a few cheap hand tools and some wooden dowel and got to work.
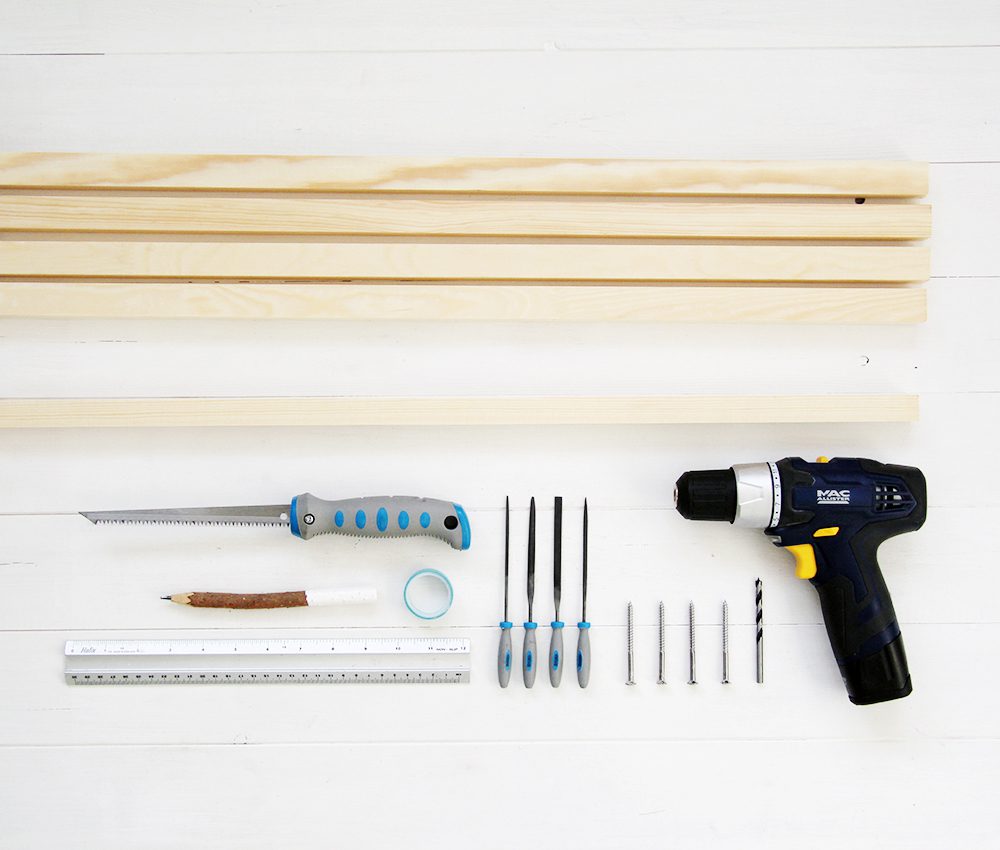
Materials:
- 1 meter/3ft Rectangular dowel rods x 4
- Hand saw knife
- Pencil
- Ruler
- Masking tape
- Small files
- Long screws
- Drill
- Wood drill bit (the same diameter as the screws)
Instructions:
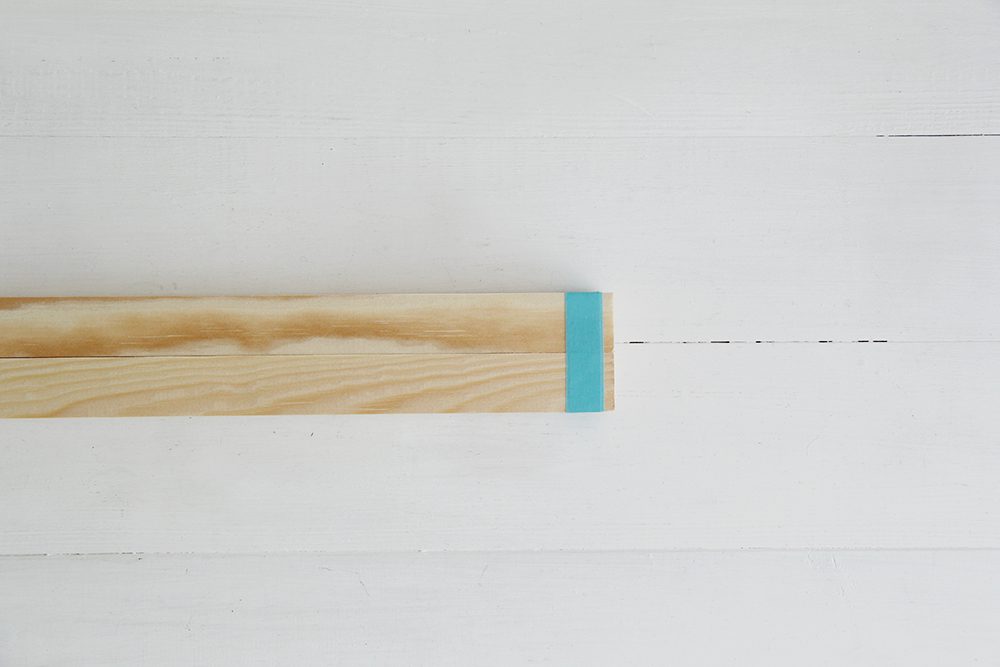
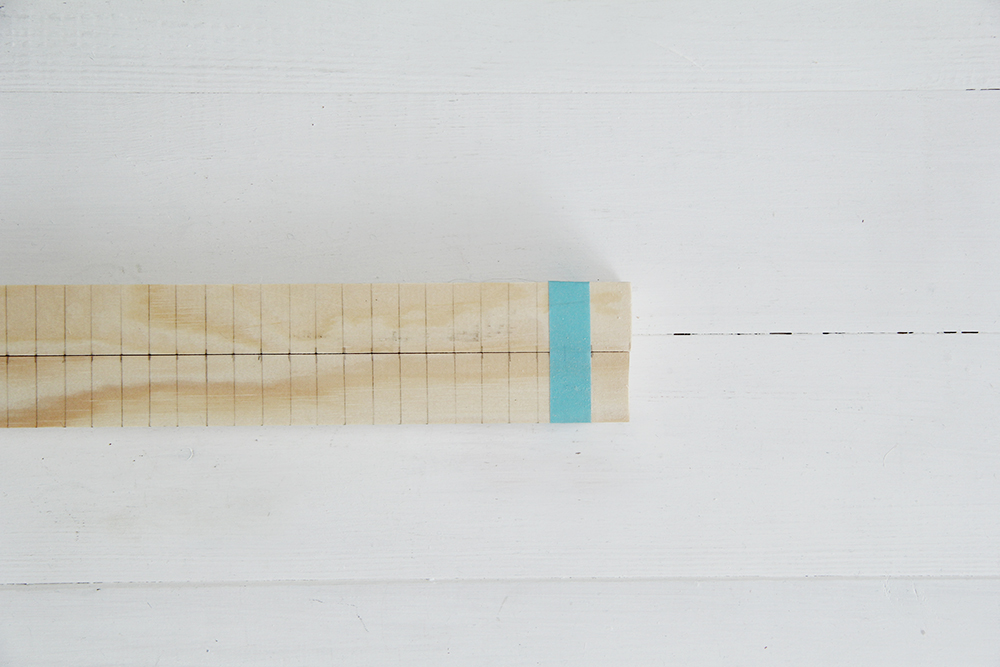
1. Take two of the dowels and lay them together longest sides facing each other and tape together in place. Make sure that the ends are aligned.
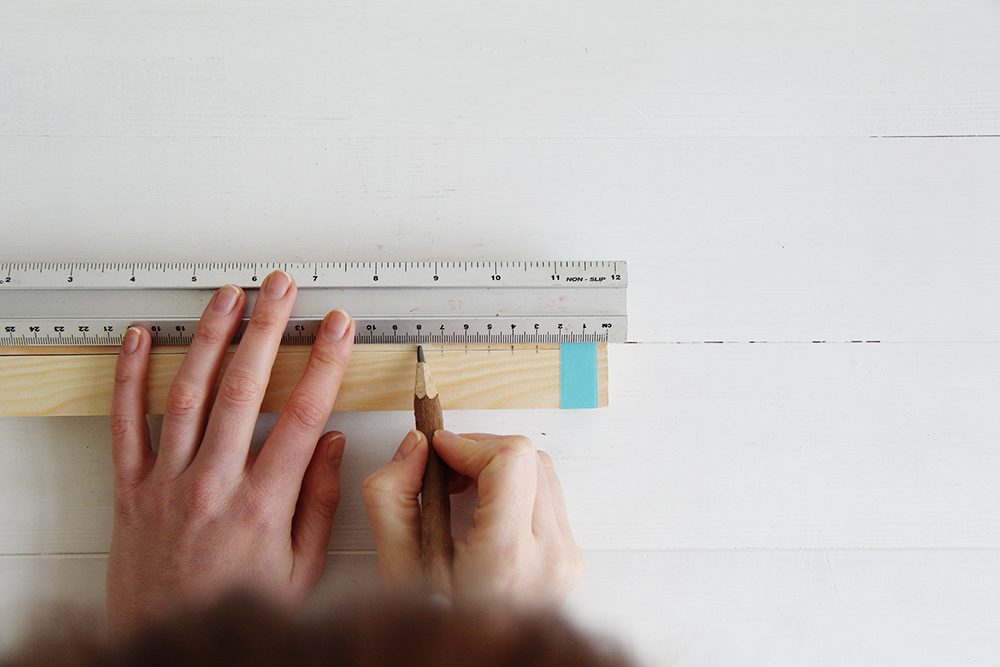
2. Mark 1/2″/1 cm intervals along both pieces of dowel where they join starting and finishing around 1 1/2″/3 cm from the ends.
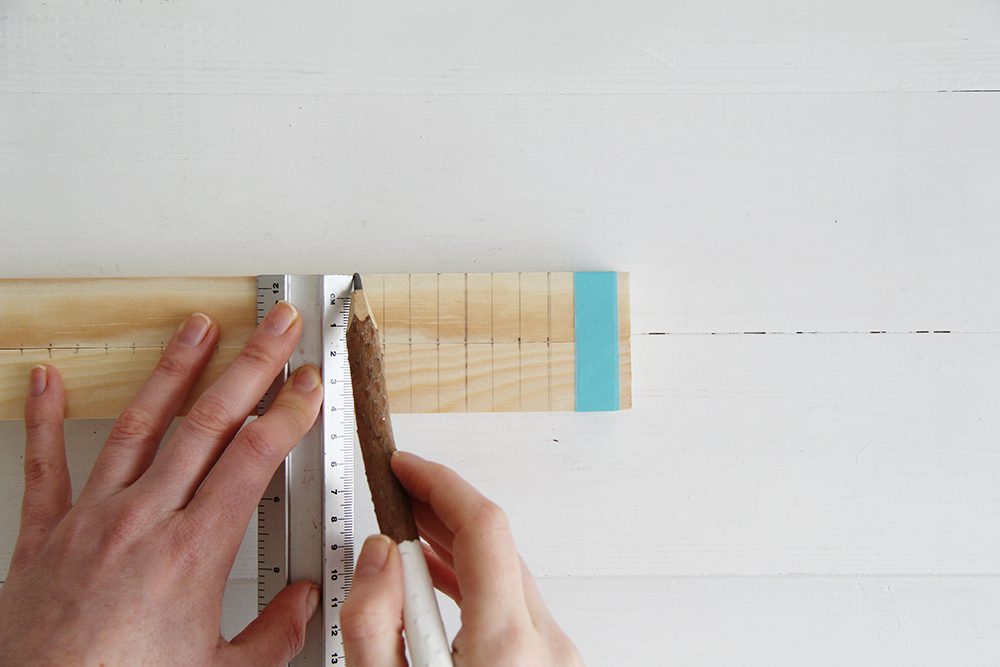
3. Once you’ve marked the wood line the end of the rule up with the top of the dowel and draw pencil lines over the top of both at each marked interval.
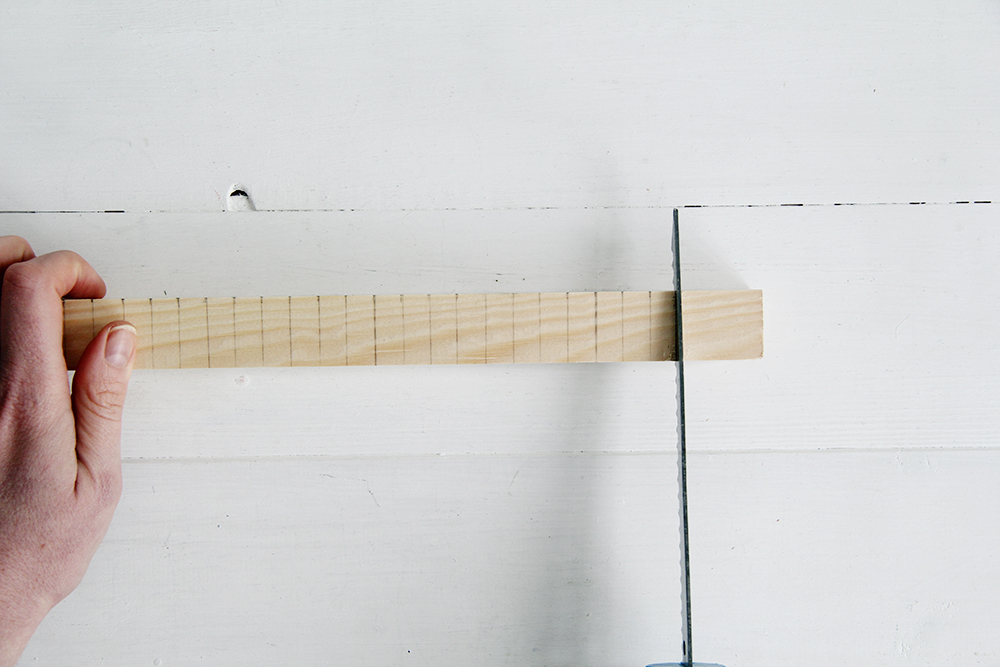
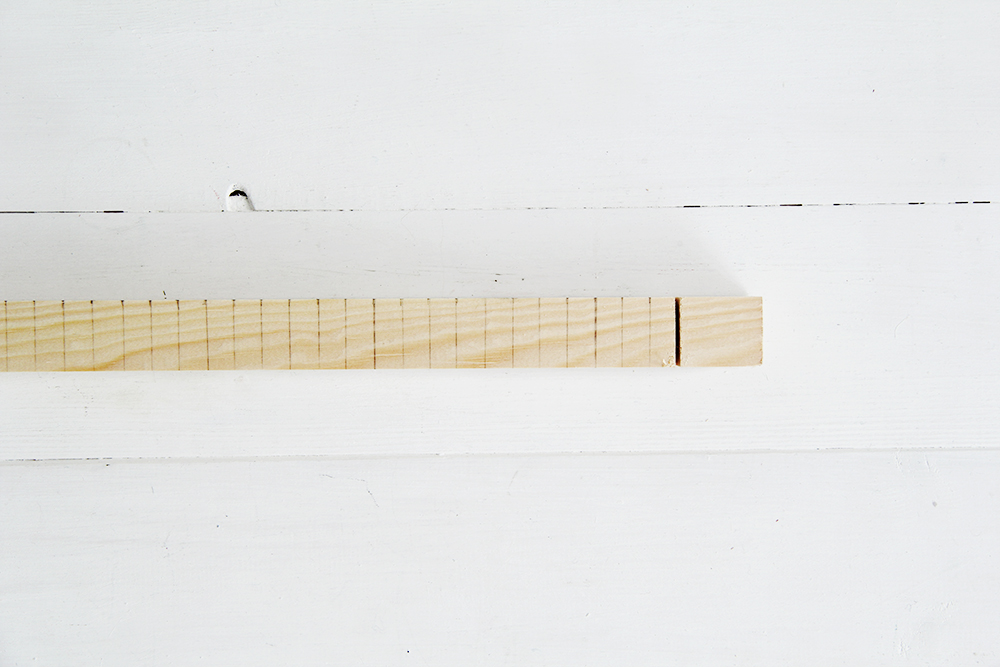
4. Use your hand saw to create a slit at each of these lines. The reason I used this type of saw is that it gives a wider cut than say a hack saw. This makes it easier to file smooth. To make cutting easier use a vice and file a groove at each point before sawing.

This stage takes some time so don’t rush it. Take your time and you’ll have a loom you can use for years!

5. Once all the grooves are cut secure the dowel in a vice so that the side of the wood is facing up and drill a hole in the centre of the wood 1/2″/1 cm away from the end. Drill all the way through.

6. Take the uncut dowel and place at a right angle to the grooved wood. Push your screw through the drilled hole and screw into the end of the uncut dowel (use a slow setting with a screw bit in your drill to make this a bit easier).
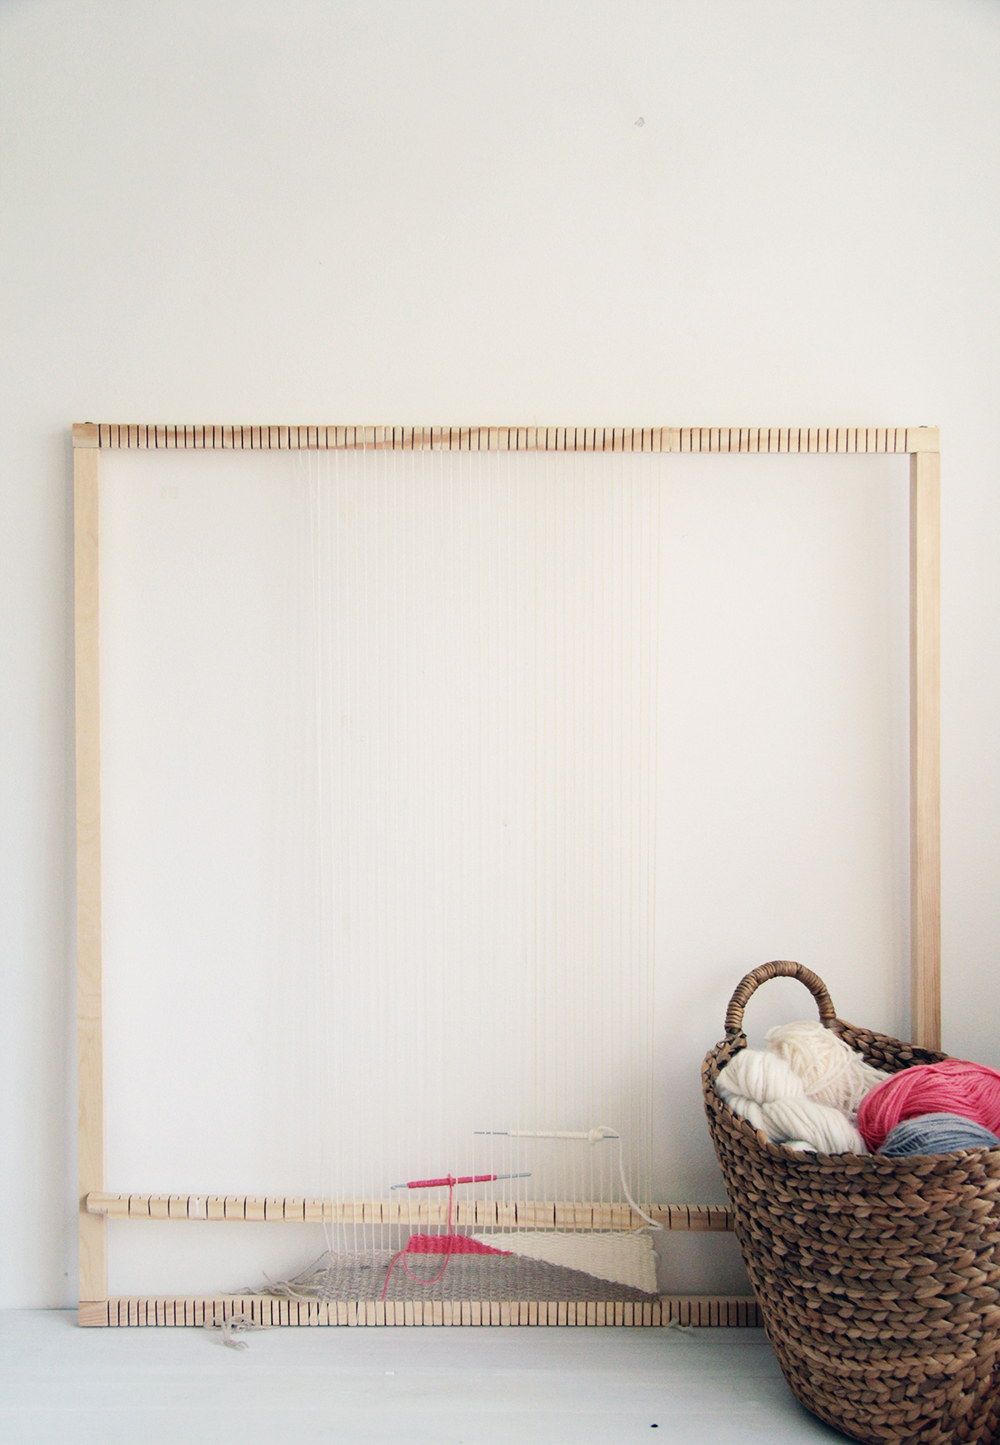
7. Do this for all four corners to create a large square loom with grooved dowels at the top and the bottom. You can stabilise the corners with wood supports or glueing square pieces of dowel into the corners. After weaving on my loom for the first time I will definitely be putting some sort of support into the corners to keep it sturdy as I go.
I’ve also made a heddle bar tutorial to help separate the warp threads!
As always I just love to see what you’ve been making! Hashtag #fallfordiy over on Instagram and I’ll share them with my followers as well. Let’s spread some inspiration around!


I agree. They do say there is nothing really new anymore. Lots of what crafters do are ancient arts anyway. I don’t have time to read lots of blogs and love the inspiration from the few places I have a chance to visit. Go for it!
Thanks Bec! I’m just going to do what I want to do. :)
Francesca, reading you is like being thinking out loud. I feel the same too many times :) But you are right we need to relax. Almost everithing is already made, even if it isn’t on pinterest :)
Love your work <3
http://www.fabricadeimaginacion.com/
What!? Not on Pinterest? Does this thing exist ;) haha! Thank you for commenting xx
How exciting! Totally empathise about trying to be ahead of the crowd but it also takes me a while to source everything, make it, photograph it and process it. Definitely need to be content with putting our own stamp on something. I think you do! x
Thanks Teri! It takes so much time to do all the rest of the tutorial besides actually making the item it’s impossible to be ahead of the crowd all the time! I am so inspired by bloggers like yourself who always have such beautiful ideas and make DIY’s with such care it’s worth the time and effort! xx
Hay Fran,
Totally get where you are with this, H and I often talk about feeling like we are ‘playing’ at this blogging malarkey! But we remind each other that our blog/s are our spaces to do with what we please, share what we want, when we want, there are no hard and fast rules, as long as you are always honest
I LOVE what you have created here at FFD. and yes I think as bloggers, or just people in the industry, we feel that its all been done before, But your own perspective and style is always interesting and very worthy of sharing.
I literally can’t wait to see what you have in store for your future. It is a bright one I am sure of it!
P.S. I adore this loom, I am off to make one now, like right now!
Sammy xxx
Thanks Sammy! How did you get on with the loom!!? (sorry for the massively delayed reply) Thanks for your wonderful comments. I really don’t think I would still be blogging if it wasn’t for such a wonderful community we have. It’s so fantastic to have you guys around for a pep talk every now and then!
xxx
I think that’s part of the exciting thing about the internet; we’re all such a hive-mind of innovation that feeds off one another. You might draw inspiration from another blogger, or many bloggers who are all feeling the same cultural trends and noticing the same uses for materials, but you add to it your own touches, your own spin and art that makes it personal and that in turn fuels others’ ideas as they make it their own :) In that way, as a culture we all innovative collectively, and yet art still ends up being uniquely fingerprinted. You don’t have to do something that has never been remotely thought of in order to inspire us with things we’ve never thought of and make things that have some new, unique, individual element that only you could have presented just that way :D
You inspire me and excite me and I am super grateful for all the work you’ve put into your site! Thanks!
Thank you so much for your beautiful comment Calise.
I love your thoughts about the Internet. A place to share, learn and grow our creative sides together. When we have so many influences both online and offline even if we are producing similar things there will always be an element of inspiration that is unique and that in itself helps us to make work of our own.
xx
Totally get you on that one. It’s halted me a number of times, and yet I absolutely believe it’s about taking the branches of your inspirations & creating your own style. Thanks for sharing this, it’s very encouraging, and you’re doing amazing things! x
LOVE the loom! I’ve had a small lap loom for over a year and got put off after my first try as I couldn’t make as big I wanted – this is brilliant!
Thank you so much Sarah-Lou! I’m sorry to say it’s comforting that it’s not just me, but I hope that both of us can power through and be really happy with what we’re creating :)
I’m so glad you like the loom! Let me know how you get on with it xx
Thank you for saying it out loud ,
Really its painstaking and often puts you of the line ,destroys your zeal but we should not be discouraged because we are rarely inventors and mostly discoverers lets embrace what we are capable off and that should reduce our guilt and undermine us less.
Too true! Thanks for backing me up
how well does the warp stay in the grooves? do you knot or loop it?
thanks for the diy!
I couldn’t find the instructions on how to make this loom.
Hey Joanna! Are you trying to view them on your phone? My plugins were conflicting. I’ve fixed it and you should be able to see the instructions now though. Thanks x
I am interested in instructions for weaving.
Hi Harriet! Try again now. You should be able to see the instructions now :) x
I’m using an Apple iPhone 5c with my Pinterest app and even though I can see the picture I can’t find the instructions! :( it won’t let me click “read more” in the caption either! It just re-loads the page and shows me the same thing! But it looks very interesting!
Thank you Chelsea! It was a conflict between a couple of my plugins that made it impossible to see the tutorial. All is sorted now thanks to the info you sent me :) Enjoy x
Thanks for the inspiration, which reminds me of long-ago weaving projects in the 1970s when I was in high school! The instructions are clear, the materials straightforward. My only comment: as a writer I am always on the lookout for typos. For craft and construction purposes, what you want is a “vise” (a tool), not a “vice” (bad habit). All the best on your crafting and future endeavors!
Thanks for the typo heads up Faith! I did not know it was spelt differently. I’ll remember that. Thanks for stopping by :)
Hello again Faith! I’m just editing this post and my spell check is telling me that’s the wrong spelling now. I think this could be a British spelling is different from American spelling moment. It’s like a minefield! So I’ve changed it back to the UK spelling just because it feels wrong to spell things a different way to the way it should be here. xx
I think your loom is delightful and very well explained. I would really like to see a tutorial on stringing the warp. I had a floor loom years ago and this was always a stumbling block since it took two people to string it. I would love to see how you do it. I think I would be encouraged to build one if the warp was easy to do.
I would like to give weaving a try. I don’t know if I would take the time of tedious cutting for this project.
I will have to come up with another way of making a weaving loom or I think I will search on line and
purchase one. Happy weaving……..
I wonder if a triloom with nails would be easier to make and uses less equipment, such as a saw, etc.
What diameter do the dowels need to be? I’ve seen both .25 inch and .5 inch.
Hey Krystal. I think mine were about 1″ thick which gave me good support. If you go a little thinner it might be a good idea to make the loom a little smaller to compensate. Hope that helps!
Thanks! I appreciate the response- now it’s off to the store for me.
I am excited to make the Giant Loom for my GD. I think it will help her open her creative side. How do I print the directions?
Thanks Joyce! If you right click over a white area on the post (not and image or the text) and click print you should get a document with just the instructions ready to be sent to the printer. Hope that works for you! xx
I really want to make my own donegal tweed waistcoat. Would this loom be large enough to make 1meter of fabric?
Hey Siobhan! This sounds like such an interesting project. From yarn to garment! I think to make a metre of fabric you have two options. You can make the loom larger than 1 metre or you can loop the yarn all the way around the front and the back of the loom (instead of just up and down) and then pull the whole fabric around the loom when you need more space! Does that make sense? X
Hi Fran,
I really want to give this a go but having issues finding the tools. Where did you get your hand saw and is it an electric one? Also, where did you get the dowels.
Thanks
Hey Daisy!
The saw isn’t an electric one – it is just like a serrated knife really. It’s called a jab saw – click here to find them online. I got this and the dowels from my local DIY store. Hope this helps!
Thank you :)
OMG! I didn’t see that! You did this with a hand saw! Momma don’t do nothing without her awesome power tools! My hat is off to you. My hands hurt in sympathy. Hardcore crafter.
HAHA! Shannon! That’s so funny and yes, this project inspired me to use more power tools! ;D
I know this post was a while ago, I found this by searching make your own weaving loom… This is a great tutorial, and along the lines of how I thought one would build a loom, but I wanted a short-cut (LESS SAWING!!) so I was hoping I was going to find a source to buy the peg board strip things for the top and bottom bars (they are hard to find!!) Thanks for sharing… I REALL APPRECIATE your sentiment about feeling as though if someone else has done this it can’t be blogged about, I get that totally! But what art project CAN you blog that hasn’t been blogged before??? I thought I had invented a “Kitten Mitten” to play with my cat, without scratches and you can’t believe how many others have made it, applied for patent, and are currently selling it… so yeah. nothing is new, LOL!!! Thanks!
HAHA! Oh yes Julie! I completely understand. This did take me quite some time to complete with all that sawing. You have given me a great idea though. Perhaps I can make another big loom with pegs instead….? SO much easier :D (also something that has probably been done before but not here!) Thanks lovely!
Hi Fran! I’ve spent the last few days debating on whether to buy an overpriced loom or making it myself and this tutorial has totally convinced me to give it a try. Though instead of making the loom from scratch i was thinking of using a picture frame and sawing the slits into it as i don’t have a drill. Do you think that would work? Thanks :)
Hi!
I want to begin weaving rugs and I figured this design would be the perfect place to start. Where I’m confused is just the ridges in the top and bottom part of the loom. Do you loop your thread up and over on between those ridges? I’ve seen giant looms done with nails as well, and I also grow a little confused with those.
Thank you for blogging this design! It’s great! Just curious how to go about it.
Haley
Hi Fran!
I was so super excited to find your website I almost peed my pants – lol!!! I was initially looking to make a giant ‘peg loom’, if that’s what it’s called….but OMG, this is absolutely WONDERFUL!!!!!! I’ve never seen square dowels around here, only round, but I do have 16ft of 1″ x 1″ boards (they actually measure 1 1/2″ x 1 1/2″ but they call them 1″ x 1″. I bet if you used this size of wood, your loom may be stronger.
I wanted to make a loom that will make a 24″ square of fabric. The loom that I am talking about uses brad nails or finishing nails as pegs. It also weaves differently than what you are doing as per youtube: https://www.youtube.com/watch?v=KjKM_YtUH5k
Fran, from what I see, you are crazy talented! I’m a crafter at heart and do a little bit of everything. I really appreciate homemade items. Your ideas, like the giant peg board is on my list to try and make and of course your giant weaving loom.
I look forward to thoroughly look at your websit!
Happy crafting and all of your DIY projects!
Take care!
Thank you so much for sharing this, I’m really excited to give it a go! I have so much scrap wool hanging around begging to be woven!
Hi, I commented on your diy heddle bar the other day…I have my loom! Only problem is, I don’t think my dad cut the grooves quite deeply enough, plus it’s made of oak, so quite slippery (but beautiful!). How do you warp your loom? Is it the zig zag method or the figure of eight? I would like to know if my warps popping off are because of my warping or my loom.
Hope you can understand that gibberish!
Many thanks
Kirsty
I would add (as a woodsman/Jack-of-all-trades) that when making the cuts for the threads to lay in, a backsaw should be used, and they should be cut, and drilled at the same time (i.e. still taped together).
Cheers! I’m working on getting started, frontier life is the life for me!
I have questions about taking project off loom. How do you take it off?
If you want a beater bar, spacer, and bigger shed, check out my latest frame loom creation!
https://designson9th.com/2017/07/11/the-quickest-easiest-diy-frame-loom-youll-ever-use/
This is great :)
thanks again :)
I don’t understand the measurements given 1/2″/1 cm. That is half an inch or one centimeter, correct? 1/2 inch = 1.27 cm tho right? Please help me understand!
Hello, I have been looking all over the place for a frame loom I can make western saddle blankets with, and for the life of me, I can not find a single tutorial, blog, or anything to help me. SO, do you happen to know if this would be good for that? They have to be sturdy because of the tension, about the equivalent of a loom good enough for rugs.
Lol, I’ve been looking for info about that as well and I haven’t found anything either. I haven’t tried making a loom or weaving on a loom before, but I’m going to try out wood screws instead of nails just for some more sturdiness. They might be a little to thick though. For the frame, I am using an old box spring I had. If I find anything or get any headway, I’ll let you know.
I think your loom is charming and well-explained. I’d love to see a tutorial on threading the warp. Years ago, I had a floor loom, and stringing it was always a challenge because it required two persons. I’d like to see how you do it.
Super site, continuez à en poster!
This is a subject that is head to me… Major succeeding! Where must your touch subtleties at some point however be?