
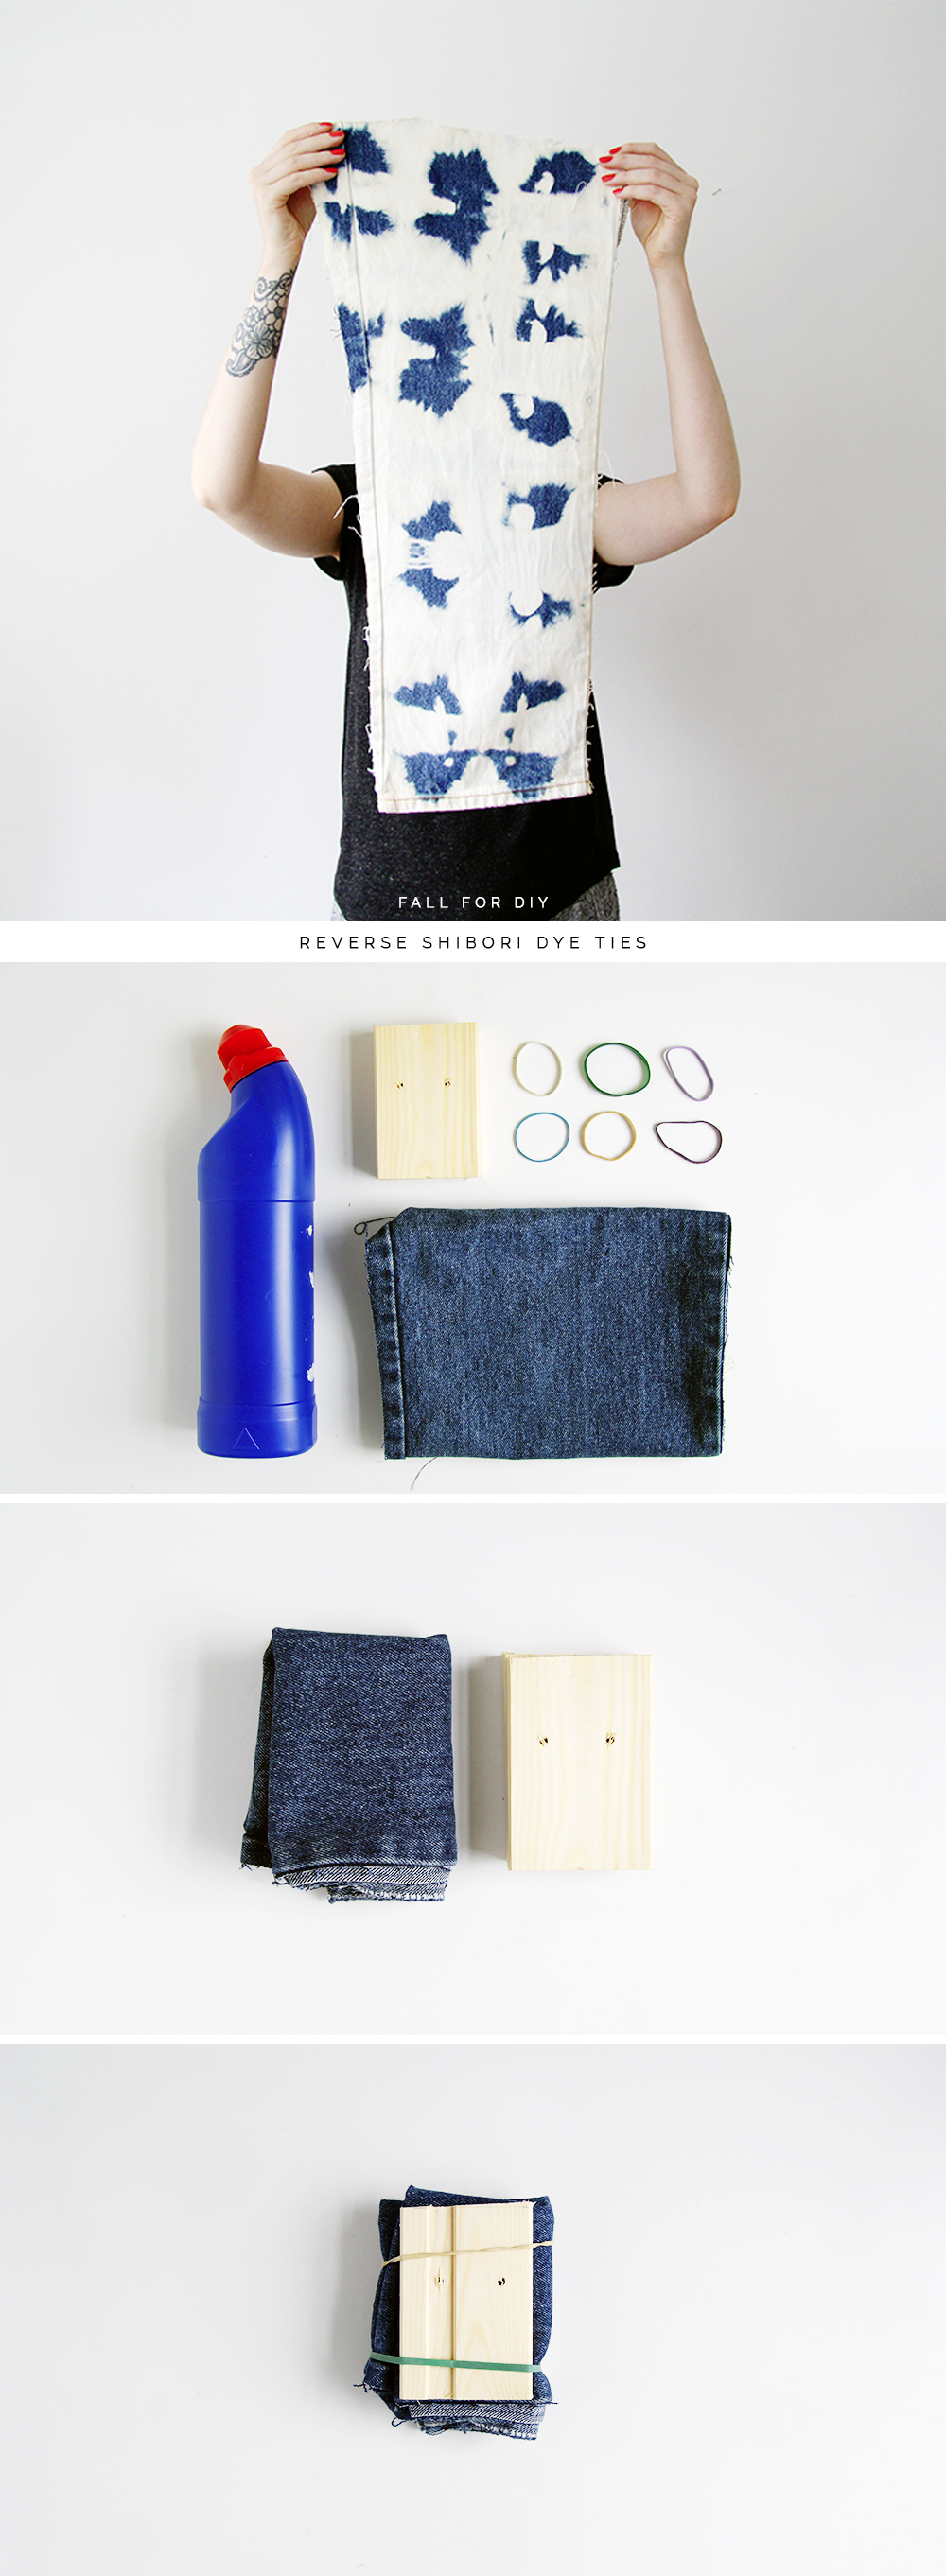
I don’t know if many of you know this but I have a degree in textile design. It’s been a while since I finished but I’m still fascinated with texture, pattern and surface design especially of tactile materials like fabric and porcelain. What I absolutely love is pattern made from random formations and gradients, so you can imagine how excited I was to find a really easy way to create this fabric at home with old denim jeans off cuts. There are two different techniques I’m going to show you in this tutorial; Shibori and tie dye. Lets start with the reverse Shibori style tying process.
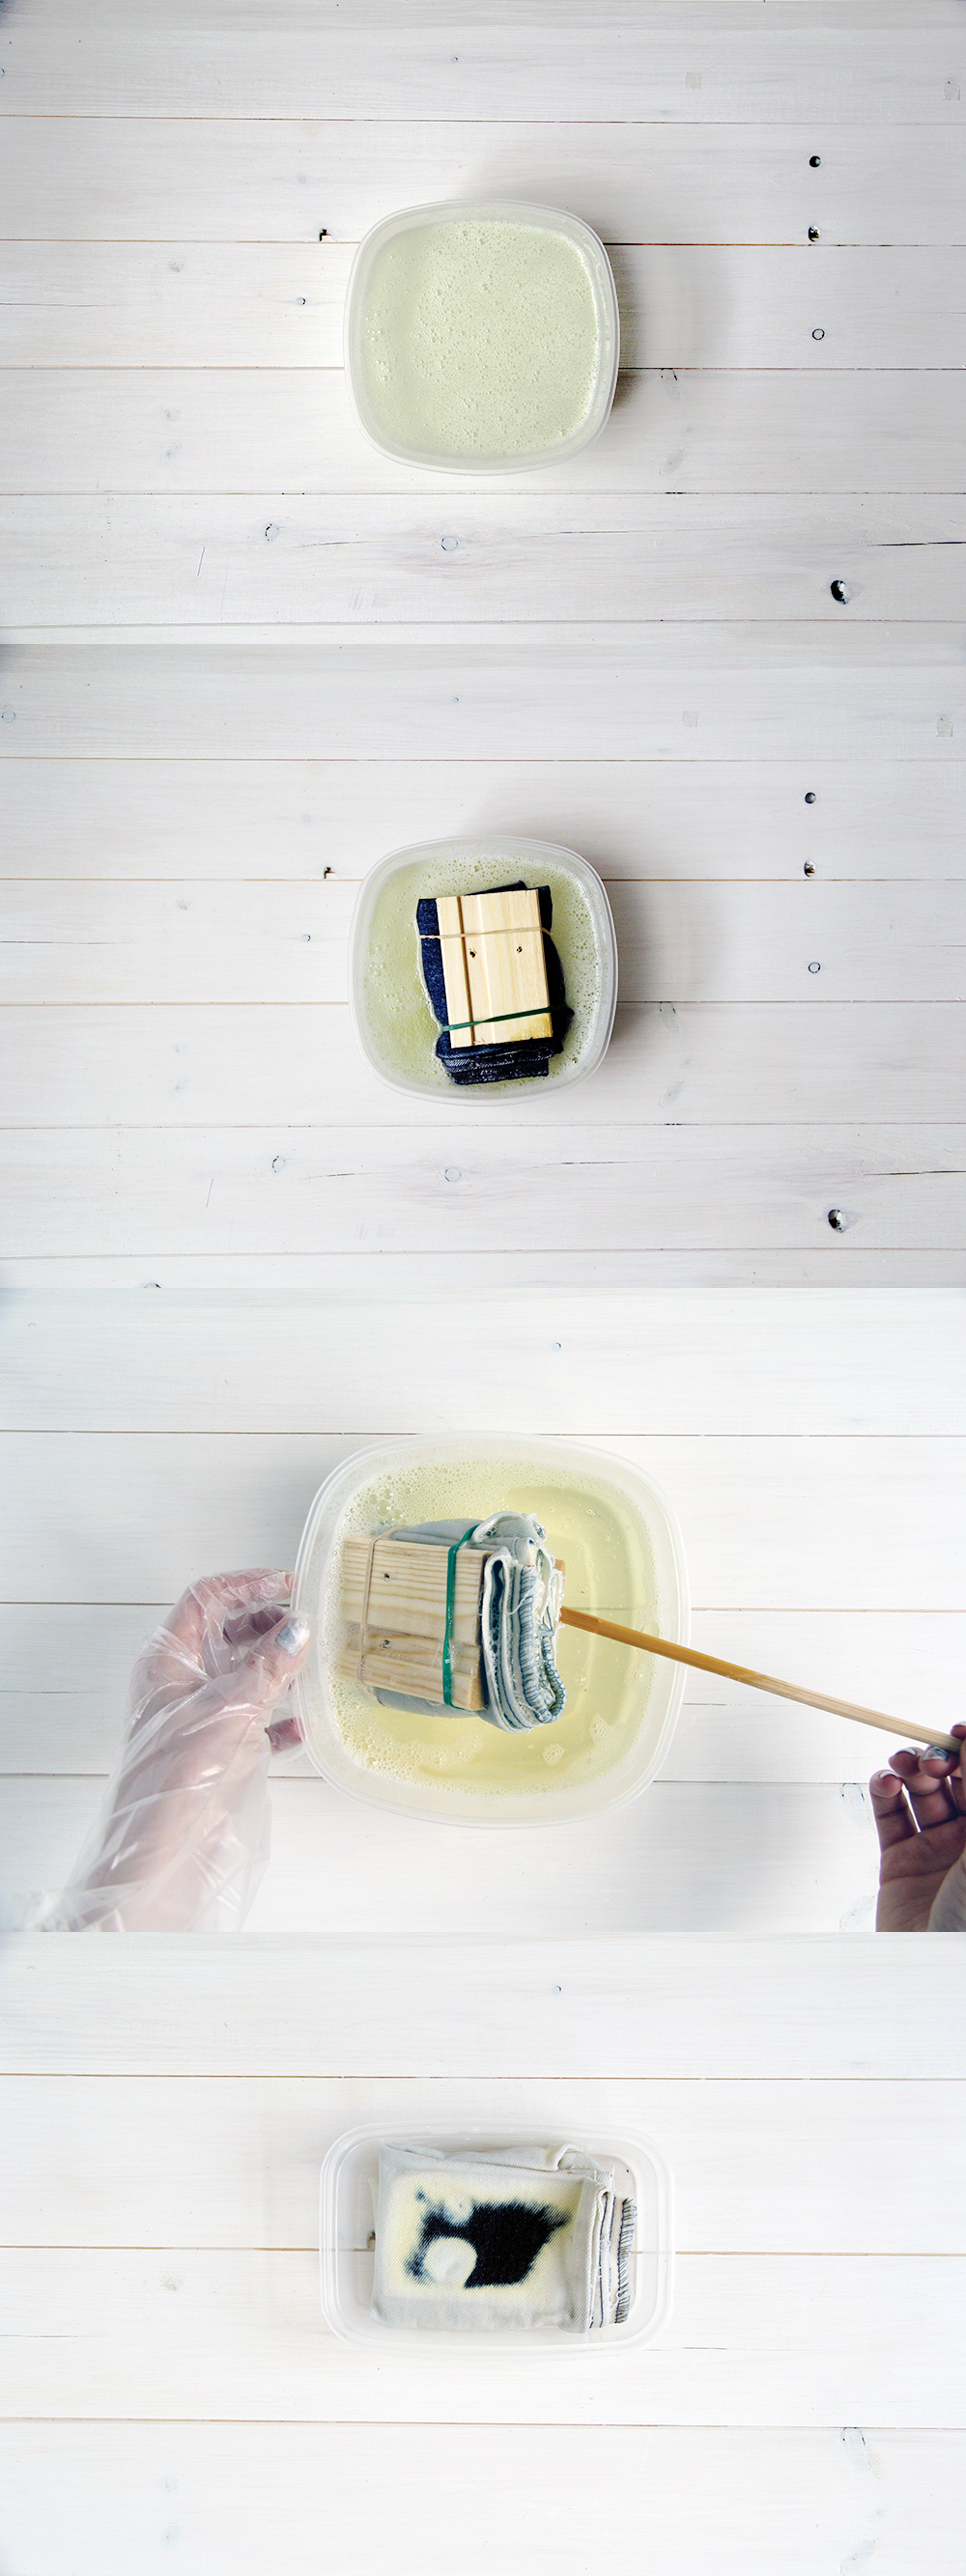
Materials:
Bleach
Denim Fabric – The perfect use for all those denim short cut offs!
Small off cuts of wood/plastic
Elastic bands
Shibori Instructions:
1. To create the uniform shibori dye style fold the fabric neatly into a square/triangles.
2. Secure wood blocks and/or elastic bands to block off sections of material.
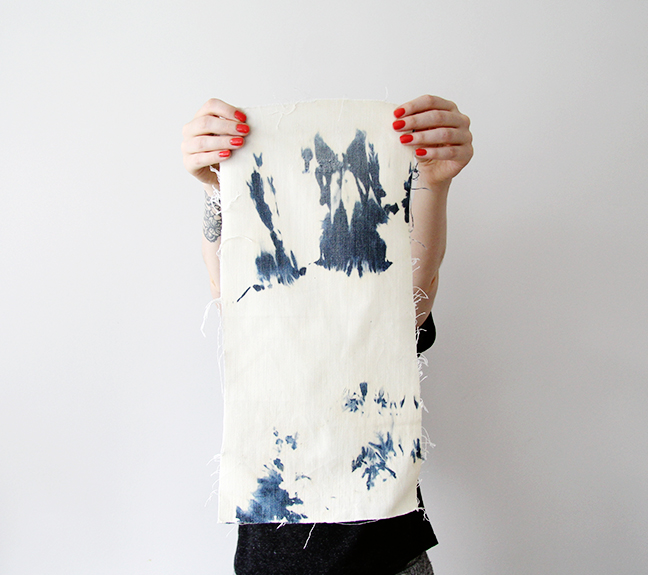
Tie Dye Instructions:
1. Take the fabric in both hands and twist in opposite directions.
2. Fold the twist in half and secure with elastic bands. Keep twisting and folding until you have a small ball of fabric. Hold in place with an elastic band.
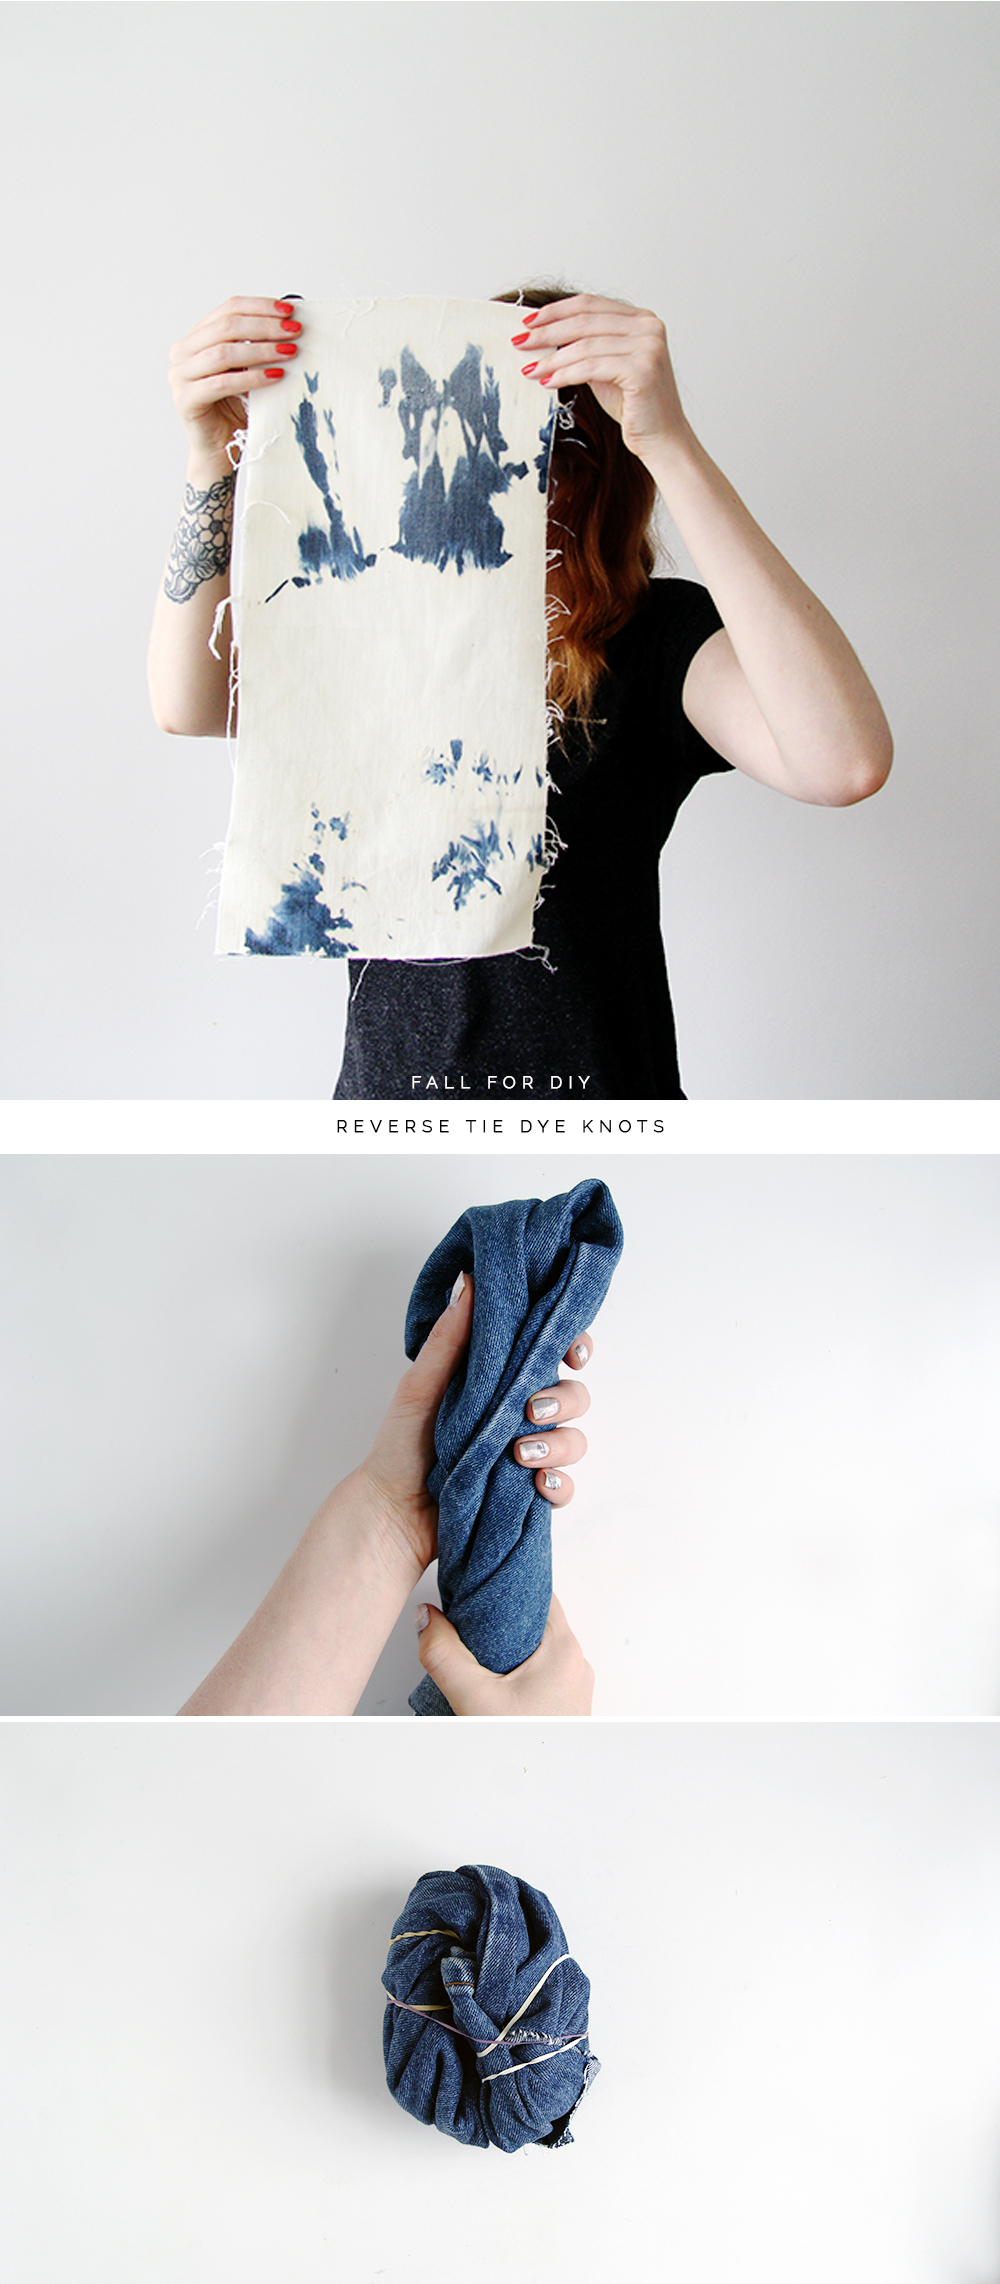
Bleaching Instructions:
1. Pop on some rubber gloves. You don’t want to get bleach on your hands… trust me.
2. Submerge your tied fabric in the bleach. It will probably float so you will need to weigh it down with something heavy that you don’t mind getting a bit bleachy. I used an old plastic bottle full of water.
3. Leave for around 10 minutes and then turn over. After another 10 minutes check the colour. Keep turning the fabric until you have bleached the exposed fabric to a lighter shade.
4. Once you’re happy take the material out of the bleach, remove the elastic bands and wood blocks and rinse thoroughly for about 5 minutes until all of the bleach is removed. Once you’ve made enough fabric for your project put it all on a quick wash in your washing machine to get rid of that strong bleach smell.
Now your fabric is ready to iron, cut and sew up into whatever your heart desires! My favourite project is this Clutch I made using this Zipper Pouch Tutorial. What do you think?


This is awesome! I’m sure I have some denim pant legs in my stash that would benefit from this. :)
Ok, sorry about the silly question, but I’m just that kind of person XD
How is the best way to cut a pair of jeans so there’s less waste?
I’m dying to try thisssss!!
Hey there Clau,
No way is that a silly question! It’s taken me a while to perfect it. If you have good quality, thick denim it’s really easy to rip the seams with a seam ripper to separate the leg fabric. I will then cut along the top, just under the waste band at the back with my fabric scissors and down to the crotch. Go under the pocket at the front and get as much of the fabric as you can before cutting down the the crotch again at the front. I then take the back pocket off using the seam ripper again.
You can also unpick the zip and use that in another project! I try to use as much as possible really. Love upcycling! xxx
Is it better to do this on heavier weight fabrics? Would it work on cotton? I have not done much shibori dyeing and I know people do it on linen, but I wasn’t sure if the bleach alters the process / level of soaking in very much?
Hey! Sorry for the late reply. I think it depends most on the way the fabric is dyed in the first place. If you’re wondering how a material might react to the bleach you could ask for samples and do a test run first. Real thick denim works better than thinner ‘jeggin’ or skinny jean materials. I think it would work well on cotton also.
Hope that was helpful!
xx
The effect is beautiful, but it would be safer to use a discharge paste rather then bleach. Bleach is a strong chemical plus works in the fabric even after rinsing, eventually damaging it’s structure.
Hey Melody,
I’ve never tried using discharge paste. I’ll have to give it a go! Thanks x
A discharge chemical doesn’t work on Indigo. It just turns it green and oxygen turns it back. You do have to use bleach if you want to get indigo white. The nature of indigo means it can’t be removed like other dyes with reduction chemicals
Did you have any problems with the bleach burning holes in the material? I have had a bad experience after not diluting the bleach on thinner fabrics, but I haven’t tried it on denim. The project that I was working on looked fine right after the bleaching, but after a couple of washes, it was riddled with holes. Now I always dilute at least 50% but it doesn’t get a really bright white that way.
I only use the really thick denim to bleach onto so I’ve always been ok up until now. I don’t know what would happen to a thinner ‘skinny jeans’ type denim… by the sounds of it, holes!
I also make bags and accessories that don’t require very much washing. This could be an option if you wanted to use a thinner fabric.
Another reader suggested discharge paste. This looks ideal for you!
I just shibori indigo dyed 2 large pieces of linen. I dyed them too dark. No real pattern shows up. I didn’t realize linen would take up the dye so quickly! Anyway I know I can’t use bleach on linen because it’ll degrade the material. Have you ever tried to reverse dye indigo with RIT Color Remover? Will it even work? I really hope to save this fabric. Thanks, Karen
I think 10 mins is WAY long. If you’re using concentrated bleach (which most is these days), then only a minute or two is needed. If you’re using a lightweight fabric then even less. You can easily burn holes in the fabric and even your fingers by leaving it in too long!
When using bleach on fabric it is important to neutralize it afterwards otherwise you will have holes in the fabric eventually. Simply washing the fabric afterwards is not enough. There are various chemicals you can buy. I have used a product from Dharma trading Co. It is called bleach stop. Hope that helps. ☺
Thanks for the advise Vivian! I’ll have to get some x
in the shibori technique, i understand the woodblocks block off sections of the material, but how does the effect differ from the tie dye technique?
Great tutorial Fran! X
Hi Fran, I just tested this and my (dark) denim turned orange!
Why is that ?
Should I leave it longer ?
Thank you!
Hey Ines,
Yes, sometimes darker denim goes orange before the colour is all removed. If the denim is thick you’re ok to leave it longer but if it’s a thinner demin make sure you remove it as soon as the dye has gone so you don’t get holes in the fabric. I think someone also commented that you can use a special product that is less harsh on the fabric. That might be worth a try if the fabric is more delicate.
Thanks xx
tried this today on cotton fabric, rather than denim…
interestingly, my reverse shibori turned out the reverse of expectations !
I tried pieces with squares (using plastic from milk container instead of wood) as well as “spots” – for both, the whitest bits are where the rubber bands and plastic were, with the exposed parts (that I thought would be whitest) retaining their colour for longer !
hey! Thanks for the tutorial on this!
I love the look. i have been teaching workshops in Shibori technique and i like this as an option to explore.
I have never seen this before, It’s so cool! I just made a post on how to upcycle old denim and someone mentioned this. Thanks so much for sharing, I can’t wait to try it!
Can I just say what a aid to search out someone who truly is aware of what theyre speaking about on the internet. You positively know learn how to carry an issue to gentle and make it important. More folks need to learn this and understand this side of the story. I cant imagine youre no more common since you undoubtedly have the gift.