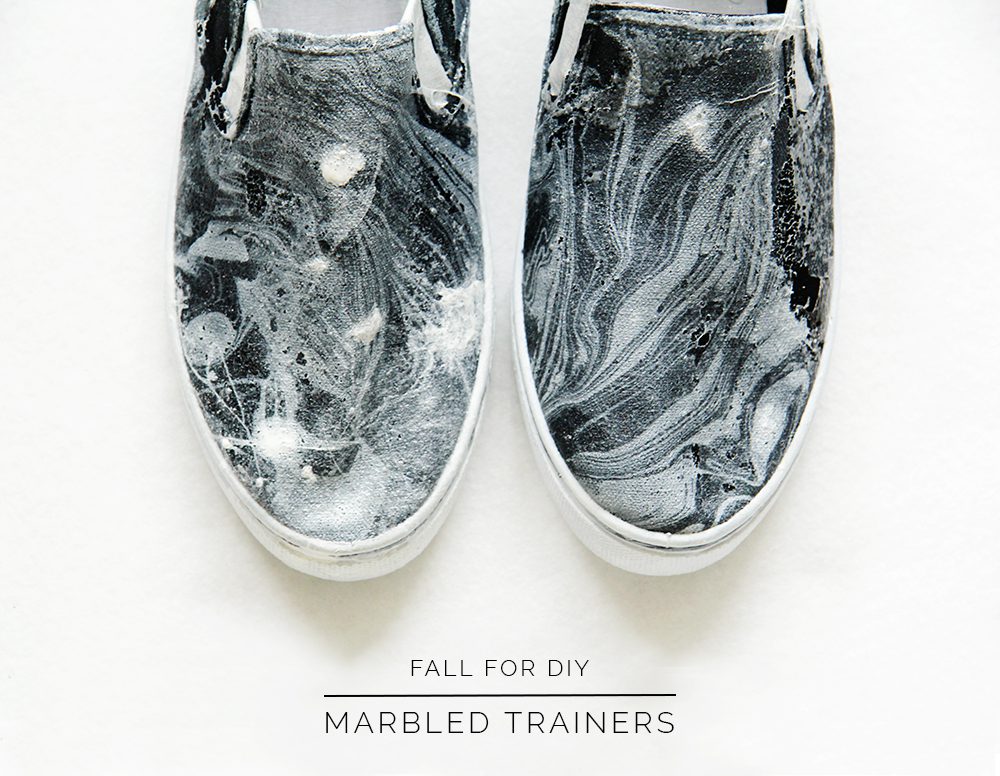
I’ve been making a start on DIYing my perfect Paris break wardrobe and I was so excited about this one it had to be the first! I’d never marbled onto fabric before now, so there was a bit of trial and error involved in making these, but I’m so pleased with the outcome. I’m imagining running around on the banks of the river Seine in these little beauties. The perfect item for the tourist trail!
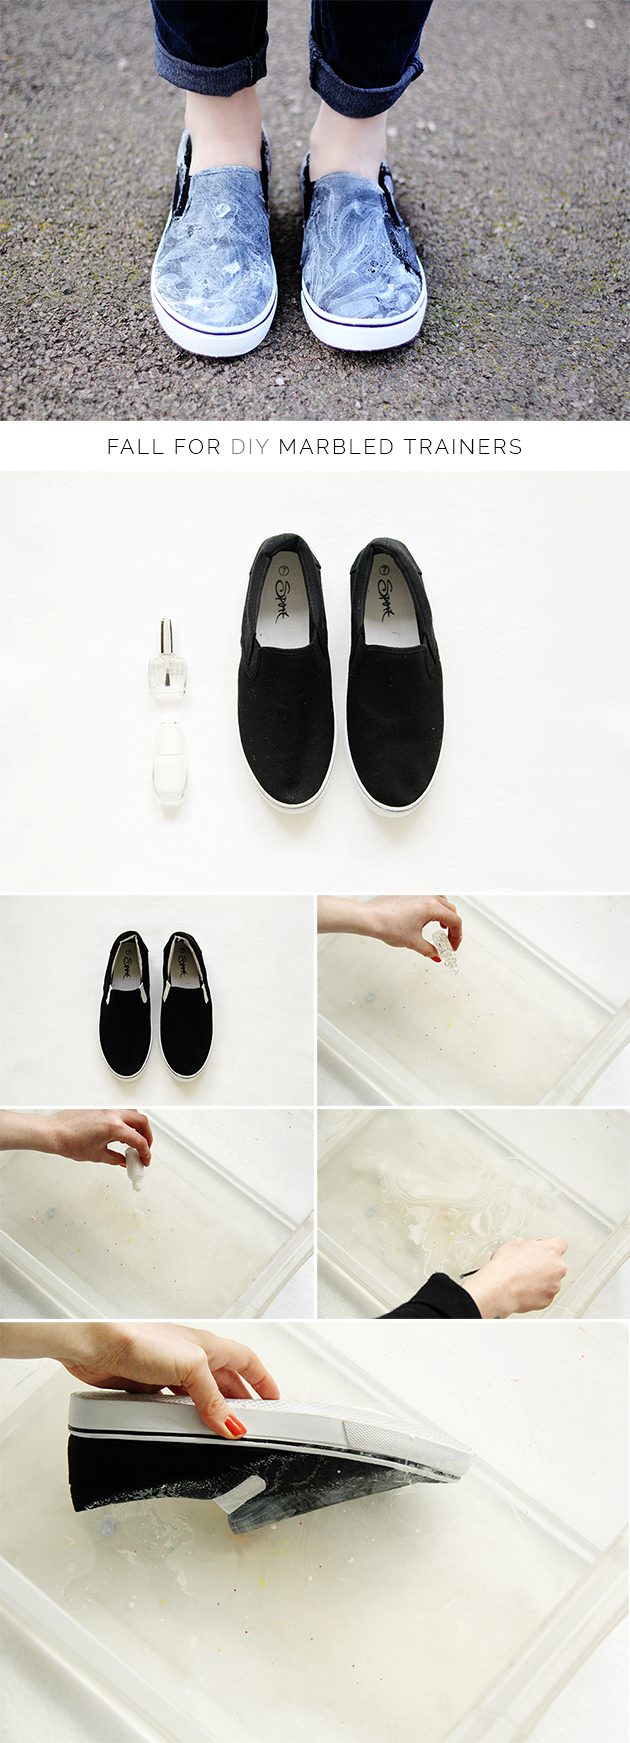
Materials:
Nail Varnish
Instructions:
1. Masking tape off any sections you don’t want to get marbled.
2. Pour a couple of inches of water into a container that is large enough to fit the shoe.
3. First pour clear nail varnish into the water. This will create the base to marble the white on, but you will have to judge how much to put in because you can’t see it. You might want to practice a couple of times with some scrap fabric or paper.
4. Drizzle the white nail varnish over the clear and use a stick to marble the varnish. You have to work fast because it dries pretty quickly!
5. Dip the trainer fabric into the water over the varnish. You don’t need to fully submerge to whole shoe. Instead work your way around the sides. Take out and repeat. You want about two layers to create a good marbled gradient. When the varnish starts to get stringy take the excess out and start the process again.
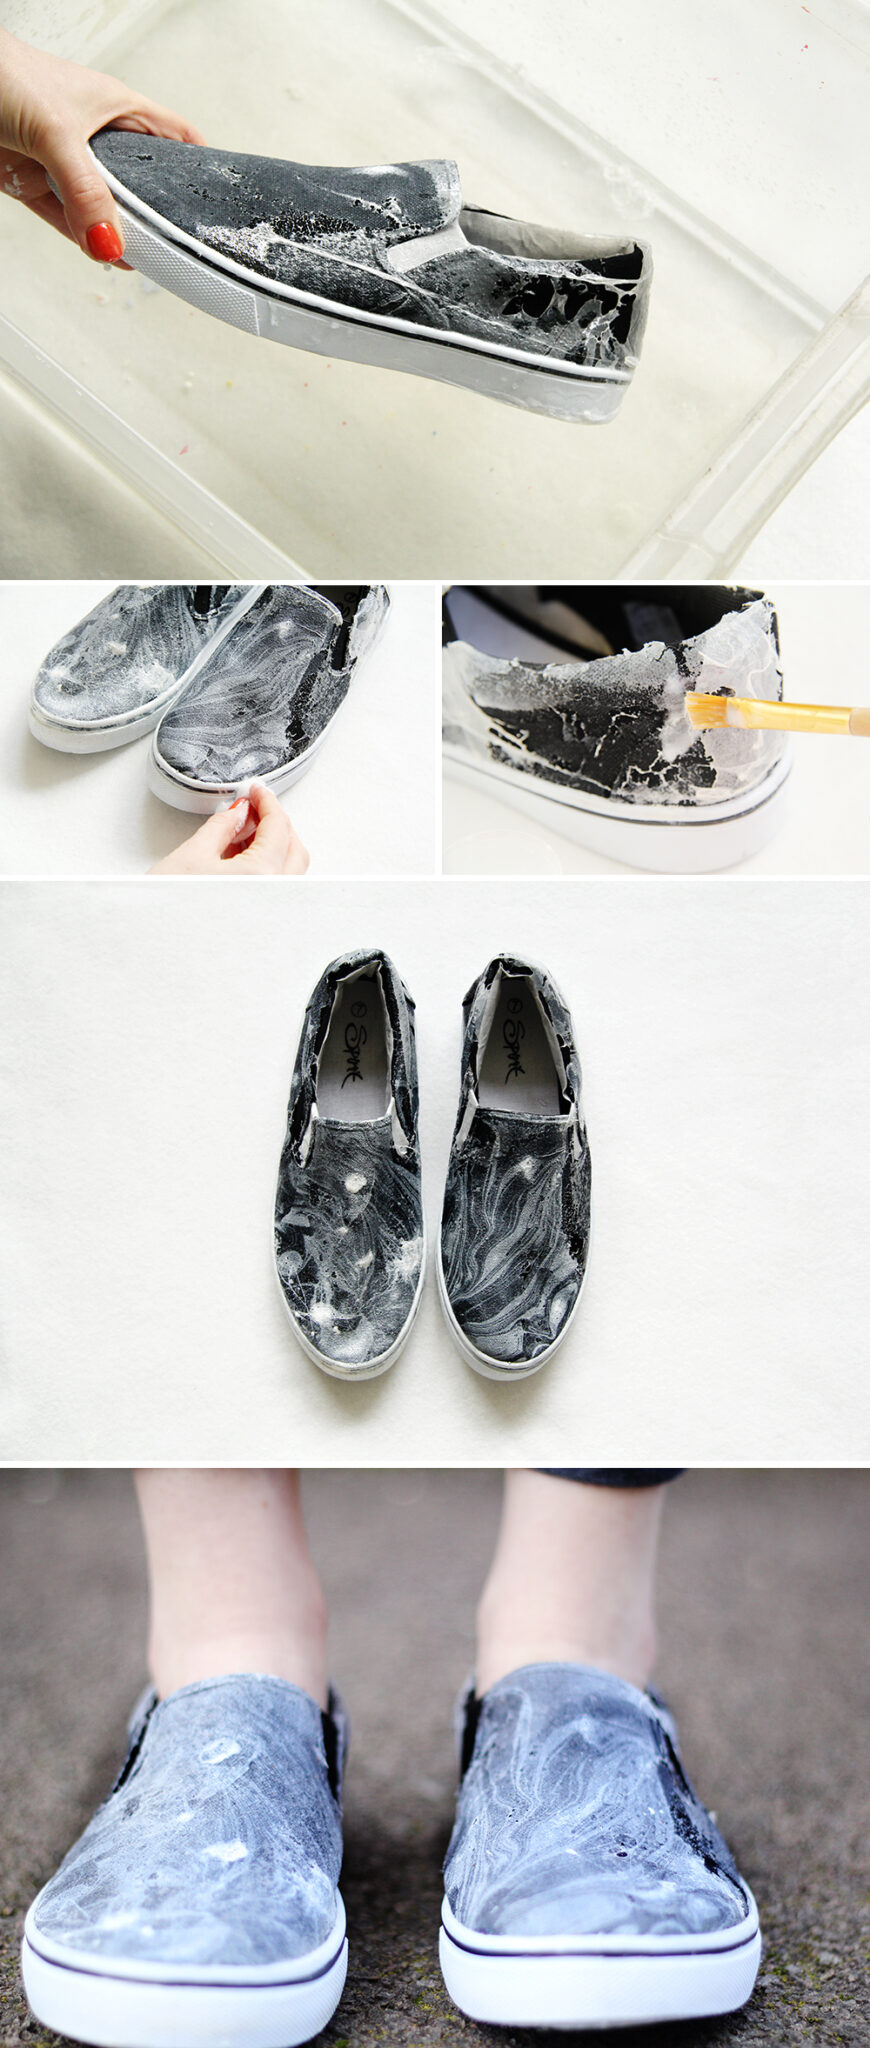
6. Use cotton wool and nail varnish remover to clean the nail varnish off the soles of the shoe.
7. Cover any flaky bits with glue to stop them peeling off.


So cool! I had no idea you could marble shoes!
Really amazing! Definately gonna make this!
Oh ! Amazing ! I love it
Hi,
I love marbled things and tie dye things.
If you are using white, you could put the clear bin on something dark or use a dark bin
so you can see the white.
Great shoes!
Exactly! x
These are so pretty! I’m planning on doing them, and I thought of using decoupage glue, but I’m not sure that would work. Do you have any tips? :-)
Hey Lea,
I’ve not tried it but I think decoupage glue would work really well. What you could do is test a little on the inside of the shoe, leave it to dry and see how it looks. Or you could even try it out on a scrap of fabric first! I hope that helps :)
This is such an amazing discovery!! after treading this, i immediately went to walmart and bought myself a cheap pair of trainers that i marbled that day. I also coated them in a thin layer of mod podge to keep them sealed. However, i’ve worn them a few times now, and they’re starting to crack and peel on the top a bit. Have you noticed this happening at all with your pair? If so, how did you fix them? I’m going to try adding a little more mod podge to the cracked bits but if you know of anything that will work better i’d love to give it a try. They’re just so cute i want them to last forever! Thanks!!
Ahhh! I’m so happy you made the DIY! I would totally love to see the result. Unfortunately I had the same problem with my pair. After a few weeks it did begin to crack and peal a little. I think Mod Podge is actually one of the best things you can use for this. I’m really sorry I can’t help you more. Maybe try a heavy duty varnish? But it’s probably best to test it on a piece of fabric coated with a layer of nail varnish first (I did try spray varnish but the nail varnish began to disintegrate!!). Good luck! Thanks so much for getting in touch and I’m so chuffed you like the trainers :) x
I was excited to see these! I do have some help to offer though… If they are canvas they can be dyed quite successfully with Fibre Reactive Dye (very reliable permanent dye) and some shaving cream! Then it is absorbed into the fabric and does not peel. You can see how to here: https://www.madebybarb.com/2021/03/28/super-cool-fabric-dyeing-designs/
Hope that helps!
hey! i was wondering, where did you buy those trainers? and how much do they cost? cause i was searching for shoes like this i mean slip on shoes to make this DIY or sth different but i couldn’t find them!
and i was thinking, what glue do you use to do this?
Hi Eliza!
I got my shoes from a market but I’ve added a Materials list with links to a pair of cheap slip ons and glue. I hope that helps! Tag me when you’ve made them :)
Awesome idea.
http://thinkworkandgo.blogspot.com/
What a great idea, these look awesome – with nail varnish too! x
http://www.styleconfessional.com
Such a great DIY, they look awesome
http://www.kcwong1.blogspot.co.uk
This is so creative! And not to mention beautiful.
Wow, these look amazing! Thanks for sharing!
Hey it’s tracy !
i’m gonna try tomorrw on my vans !, do you think on jeans it could be easy ? could be Fancy
enjoy your day Xx.
Hey Tracy!
I’d LOVE to see how the Vans worked out (tag me on Instagram if you’ve got it). I think it could work on jeans, but I’m not sure how it would go through the wash a lot. Maybe try it out on an old pair? Have a great weekend xx
Cute project. I’ve marbled my nails and an art canvas. Must try to do shoes! A tip: Regular Mod Podge is water soluble. It is not meant to be waterproof. I believe they make an outdoor variety, that would work better. They have a fabric version but I’m not sure if the formula is washer safe. You could always give it a clear coat of spray paint. I’d mask off any areas like the inside and sole.
Hey DH,
Thank you so much for the tip! I’ll definitely look out for the outdoor Mod Podge and the fabric version. Perhaps a layer of that to protect the varnish they a layer of spray over that?
Fran
Hi,
i would like to know, if you know how to remove the nail marble effect ? with wich products ?
love from france.
Xx
Hey Tracy! I don’t know if you can remove the polish completely but you could test a bit of the inside with nail polish remover. I did this tutorial on very inexpensive trainers so I didn’t have to worry about that!