One of the best ways to keep people on your blog long enough to discover some of the hidden treasures is a category page. An easy to access, complete round up of all of you posts in one place making it easy to find new content and way more difficult to leave!
There are many ways to do this and depending on your technical know how you may be able to automatically create and update this each time you post, but for the rest of us we have to find another way. I’m going to show you the way to write HTML code on a page to create a table and fill it with images that link to different pages and I’m throwing in a little extra code that lets you overlay the image when the mouse hovers above.
Now, full disclosure, the way I write this is very old school. It’s the sort of thing a techie would scoff at for the lack of css (as my bosses at Handmake Me have done on several occassions!) This is definitely not the best way but it is the easiest (for me) to understand and allows even a novice to quickly add an organised, attractive category page.
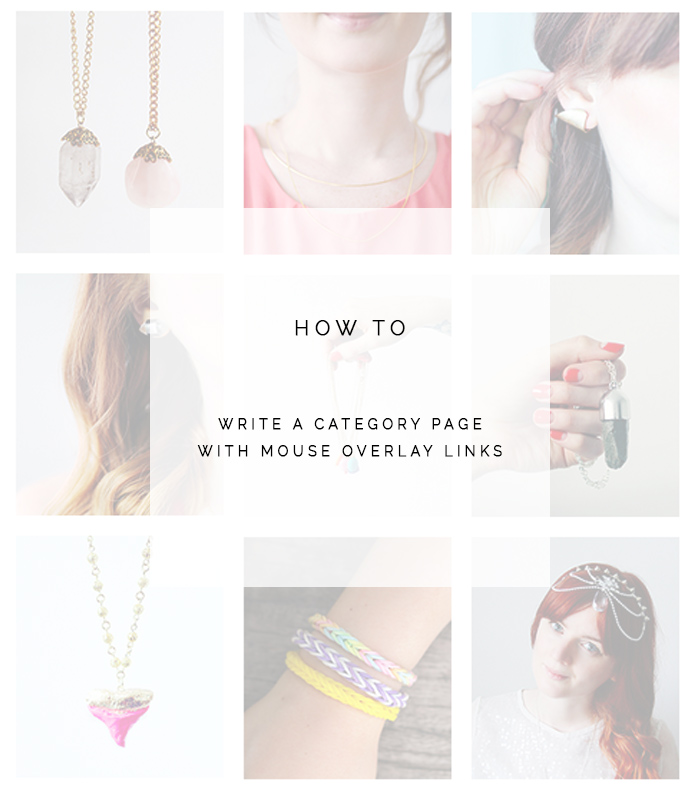
This is the first row on my DIY Jewellery page
 |
 |
 |
This is what the code looks like for this (don’t panic. I’ll break this down). For anyone new to HTML it is a little overwhelming at first but it gets easier. I’ll also explain where you need to post your code later on in the tutorial.
<table border=”0″>
<tbody>
<tr>
<td><img onmouseover=”this.src=‘http://fallfordiy.com//wp-content/uploads/2014/08/Fall-For-DIY_Decadent-Crystal-Necklaces-tutorial-overlay.jpg‘” onmouseout=”this.src=‘http://fallfordiy.com//wp-content/uploads/2014/08/Fall-For-DIY_Decadent-Crystal-Necklaces-tutorial1.jpg’” alt=”DIY Decadent Crystal Necklaces” src=“http://fallfordiy.com//wp-content/uploads/2014/08/Fall-For-DIY_Decadent-Crystal-Necklaces-tutorial1.jpg” width=”200″></td>
<td><img onmouseover=”this.src=‘http://fallfordiy.com//wp-content/uploads/2014/08/Fall-For-DIY-Collar-Chain-Necklace-overlay.jpg’” onmouseout=”this.src=‘http://fallfordiy.com//wp-content/uploads/2014/08/Fall-For-DIY-Collar-Chain-Necklace.jpg’” alt=”DIY Collar Chain Necklace” src=“http://fallfordiy.com//wp-content/uploads/2014/08/Fall-For-DIY-Collar-Chain-Necklace.jpg” width=”200″></td>
<td><img onmouseover=”this.src=‘http://fallfordiy.com//wp-content/uploads/2014/08/Fall-For-DIY-Gold-Cuff-Earrings-overlay.jpg’” onmouseout=”this.src=‘http://fallfordiy.com//wp-content/uploads/2014/08/Fall-For-DIY-Gold-Cuff-Earrings.jpg’” alt=”DIY Faux Gold Cuff Earrings” src=“http://fallfordiy.com//wp-content/uploads/2014/08/Fall-For-DIY-Gold-Cuff-Earrings.jpg” width=”200″></td>
</tr>
</tbody>
</table>
Before you start writing your own personalised code you will need two images that will inform the reader what the post is about. I have a basic image to start with and the same image with a brief title over the top for the mouse hover. You can do whatever you like here. You can use different images, image to text, text to image or play with light and colour. Go nuts. Upload these into your blogs media files and copy and paste the URL of each into a word file ready to use.
Let’s get started with the code. You will always need to start the table with:
<table border=”0″>
<tbody>
and end it with:
</tbody>
</table>
all the code for the images and links needs to be in the middle of these.
Next we have <tr> which gives us a new row to work with. I have three boxes in each row of my table so after three links I close this with </tr> to signal the end of the row and then open the next starting with <tr> again.
Now we’ve started a row we need to start a column using <td>. You’ll need to add this to the start of each link and add </td> to the end of each link as well.
Once this is done we need to add the images. After <td> copy and paste <img onmouseover=”this.src= then ‘your image URL’“ for the mouse over. Remember to close the quotation marks starting at “this.src and ending after the image URL’.
Adding the second image is exactly the same apart from the beginning which is: onmouseout=”this.src= When you read this it’s pretty obvious to see which image is meant to go where is which so that helps a little.
Now add your link source after src=“Blog post link”
I’ve added width=”200″> at the end of the image URL before > to make sure all of my links are the correct size. (you can add height=”200″ as well if you like) and an alt= after one of the images to help with SEO.
for an even quicker way of doing this just copy and paste the code below into the “text” or HTML section of a new page and change the colourful bits for your own images and links.
<table border=”0″>
<tbody>
<tr>
<td><img onmouseover=”this.src=‘mouse over image’” onmouseout=”this.src=‘mouse out image’” alt=”” src=“Blog post URL” width=”200″></td>
<td><img onmouseover=”this.src=‘mouse over image’” onmouseout=”this.src=‘mouse out image’” alt=”” src=“Blog post URL” width=”200″></td>
<td><img onmouseover=”this.src=‘mouse over image’” onmouseout=”this.src=‘mouse out image’” alt=”” src=“Blog post URL” width=”200″></td>
</tr>
</tbody>
</table>
That should do the trick!


This is really helpful Fran, thanks for sharing. I don’t know anything about html/css coding but this is really easy to follow. Might give it a go! x
This is a really great idea for categories. I use a drop-down list that brings the user to all entries in that category, but a visual overview like this might work even better! Thanks for the great tutorial.
Rae of Love from Berlin
Thanks for sharing this Fran. I need to update my DIY page, so this will be very helpful. XoXo. Nicole
This is great, thank you!
This tutorial is EXACTLY what I needed today!! Such a simple and clean look to help better organize my newbie blog! Thank you!!!
Thanks a lot for this . i am looking for table border. this help me very much . i get good information about “TD” i use it here Tetris
eyebrow makeup
paracombe winery
dragon
patio builders
amd share price
speakeasy
penthouse plan