This post has been sponsored by Quick-Step.
Wooo, I’m starting this new year with what is definitely my favourite room makeover to date. Kids bedrooms are so much fun to design and even though Amber is no longer a baby really, she’s still young enough to have more of a nursery style room than a more functional, older kids room (which is on the to do list for 2022 for the almost four year old!)
If you’ve been following this room makeover on Instagram then it might feel like it’s taken forever to a, start and b, finish. And you’d be right! Living in a small home without a garage means if you need to move one piece of furniture you need to move another to create space, and another to make space for the second etc, etc, working down the line until you remove something from your home/achieve Tetris master level of interior design and everything somehow magically fits together again. So emptying an entire room has a massive knock on effect on the rest of the house and in turn we’ve had to find/create space for Amber’s furniture going in and Alex’s office furniture (and boxes of who knows what) coming out!
Add into the mix a newborn, severe long covid (for Alex, but he is recovering now) and minimal childcare through lockdowns, we’ve had to turn a simple room makeover into hundreds of tiny steps of moving and sorting on and on and on to complete the room. But even though this has felt frustrating, it is made 1000 times better now the work is done. Not only does Amber have such a beautiful room but the rest of the house suddenly feels so spacious and tidy and calm. I’m walking into rooms just to look at the space, sigh with relief and then leave again!
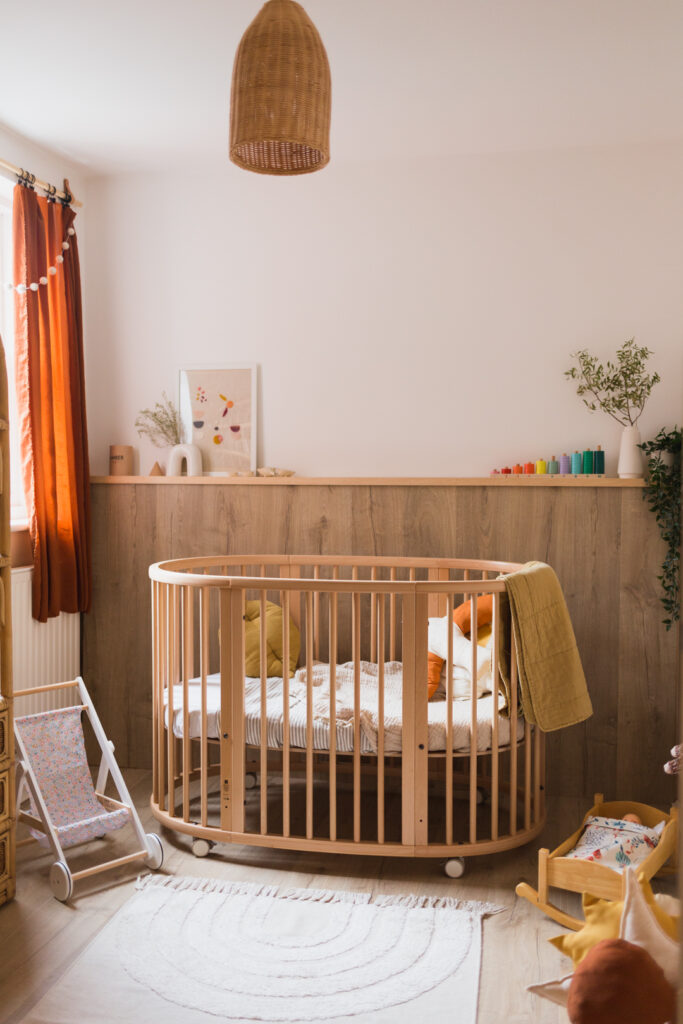
Anyway, back to Amber’s bedroom. One year after she was born we finally had the room cleared and ripped out the carpet. Just in time for one big festive content push! (My busiest work period) Luckily I quickly got this stunning Quick-Step flooring in place before the chaos of Christmas kicked it.
I can’t get over the quality of this laminate flooring. It feels so solid underfoot and is completely silent to walk on. No creaking or moving. I can easily creep out of the room once Amber is asleep without making a sound! Clearly for me this is one of the main benefits, but Quick-Step laminate has so many plus points to choose from! It’s waterproof and easy to clean. This might not sound that important for a bedroom but… kids. They always surprise you, especially when it comes to their ability to trail mud. How does so much mud get on such little feet? Anyway, I’m so thankful to my past self for working so hard to fit that as one it gave me a gorgeous backdrop to photograph against. And as soon as Christmas was over I had a clear run to steam ahead with the rest of the room makeover.
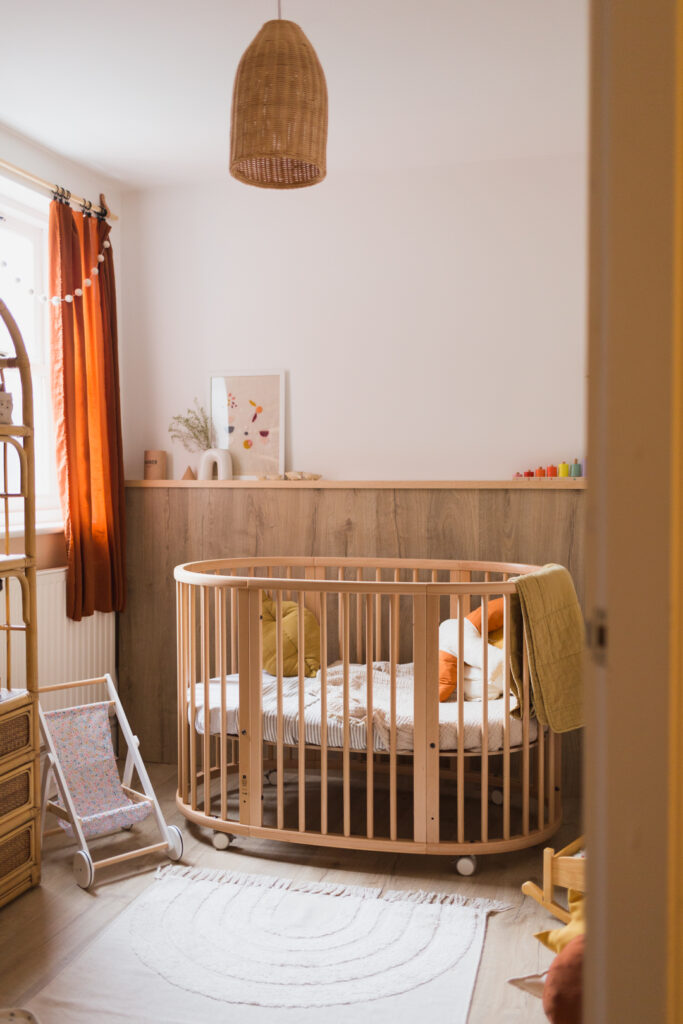
Laying the flooring was actually surprisingly quick, even with quite a few fiddly cuts in the room. I used the Long Island Oak Light which had a beautiful natural colour without any orange or yellow tones. One you get the knack of the click system it’s easy to securely attach the pieces together without needing glue. It sits perfectly straight and even. It took just a few hours to put that in place and once it was finished I could work on the frame for the wall section.
(If you’d like to watch a very sped up video of me laying the floor and wall panelling click here!)
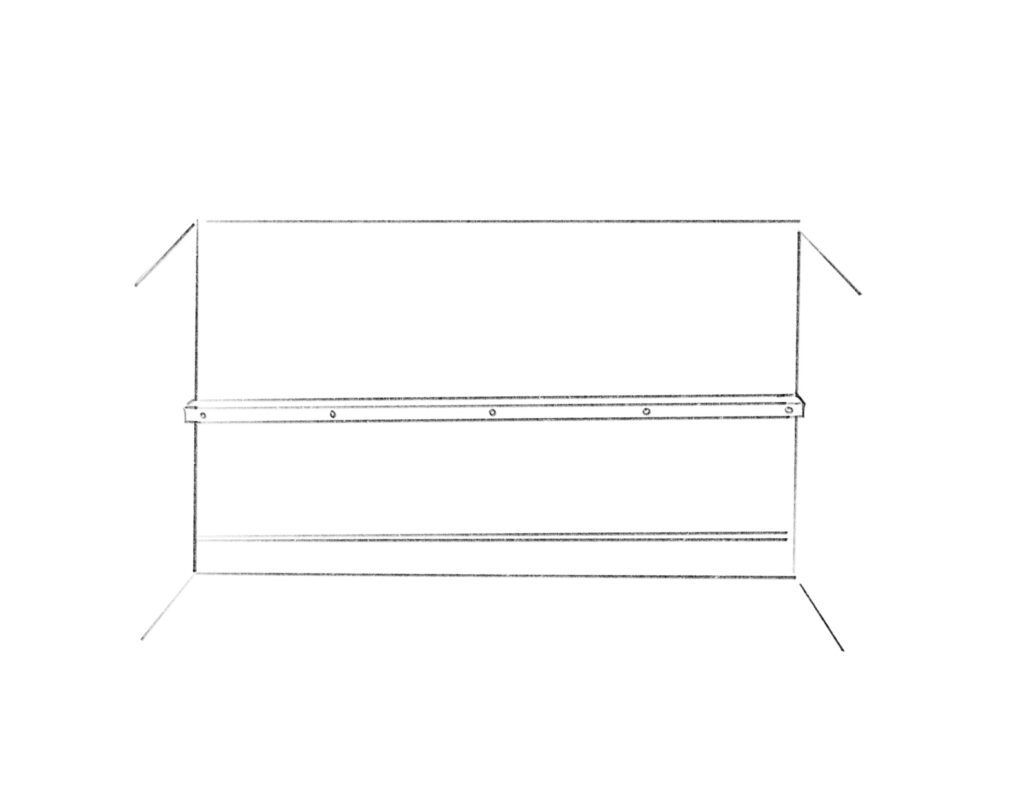
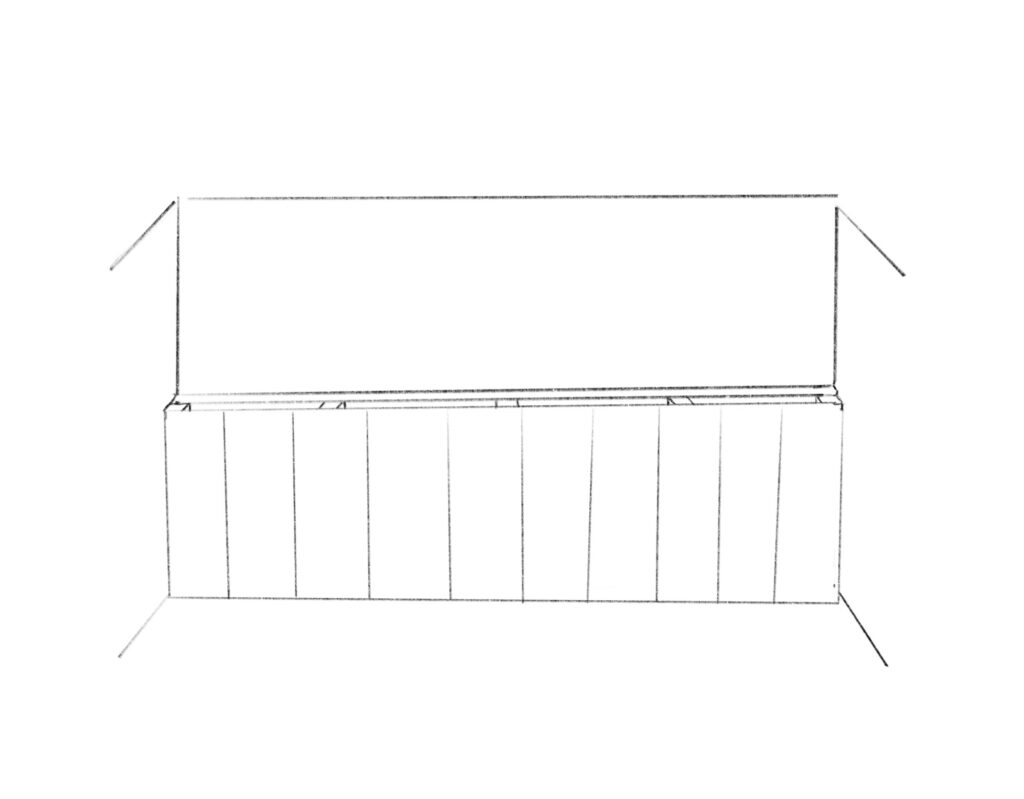
The frame was a very simple construction. It doesn’t need to be pretty – it will be covered by the flooring! It just needs to create a secure mounting for the laminate pieces to sit against. I didn’t want to take off the skirting so I decided to attach a strip of wood to the wall that was the same depth as the skirting board to work from. I attached this along the length of the wall at the height I wanted the panels to reach, using screws and rawl plugs.
Then I placed five vertical battens along the wall at equal distances from each other. These each went from the floor to the top of the strip attached to the wall. Attach these to the horizontal strip at the top using wood screws.
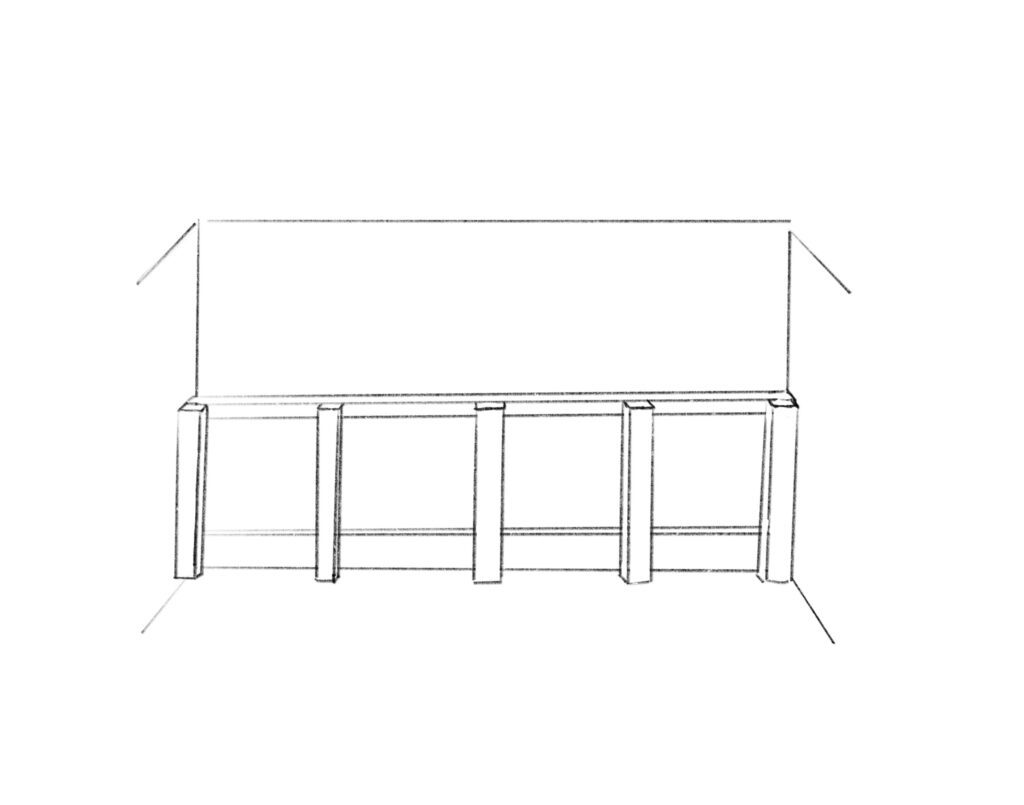
After using a spirit level to make sure these battens were straight I cut and attached horizontal beams in between the battens, staggering them to allow a larger area to secure the laminate pieces to.
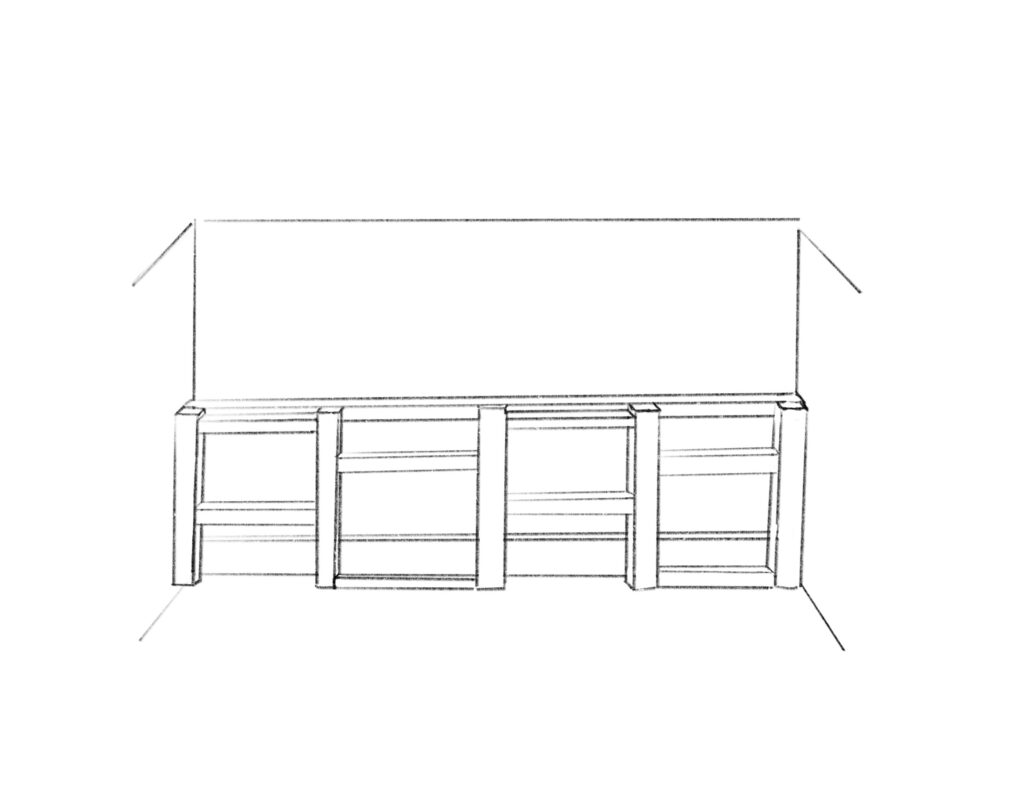
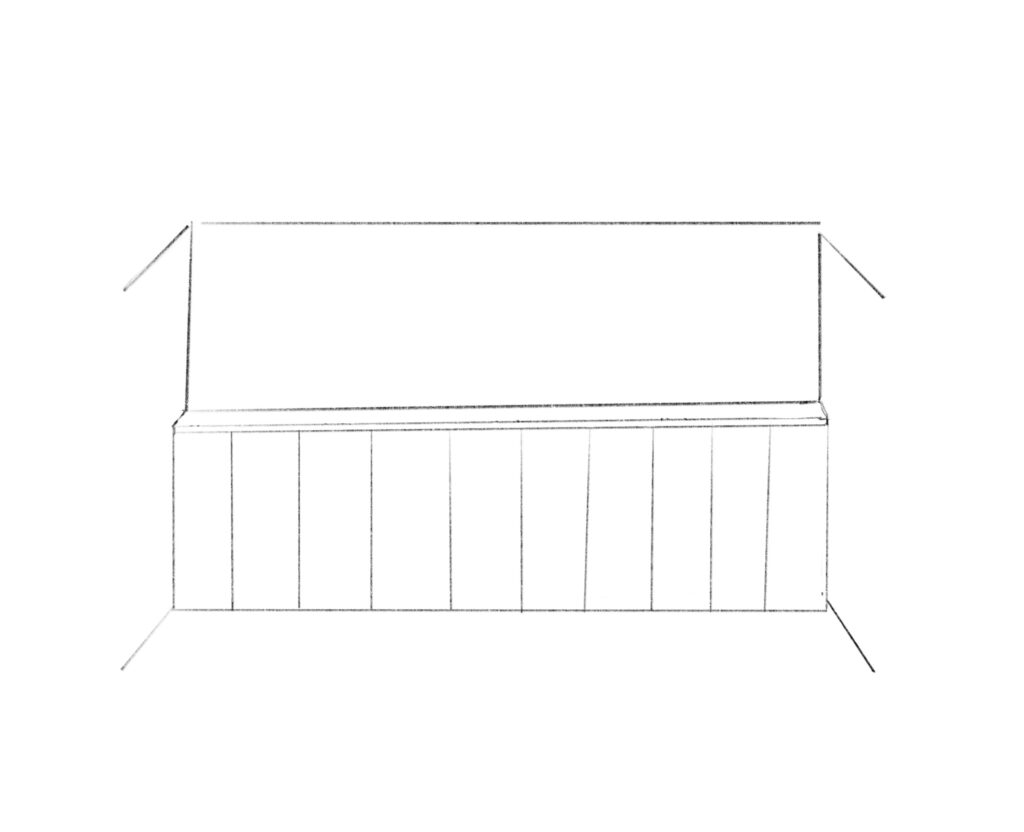
Now that the frame was ready it was time to cut and attach the flooring. I cut all the pieces the same size and secured the first panel in place using glue and a nail gun. I was working from right to left – in the same direction I laid the floor – so I made sure the piece was in the correct position to attach the second piece onto.
Then I simply worked along the frame attaching the panels as I went. I lined the frame with glue to secure the laminate in place and used my nail gun to add extra strength along points in the frame. After about 10 minutes the wall was finished and I could finally see the vision coming to life!
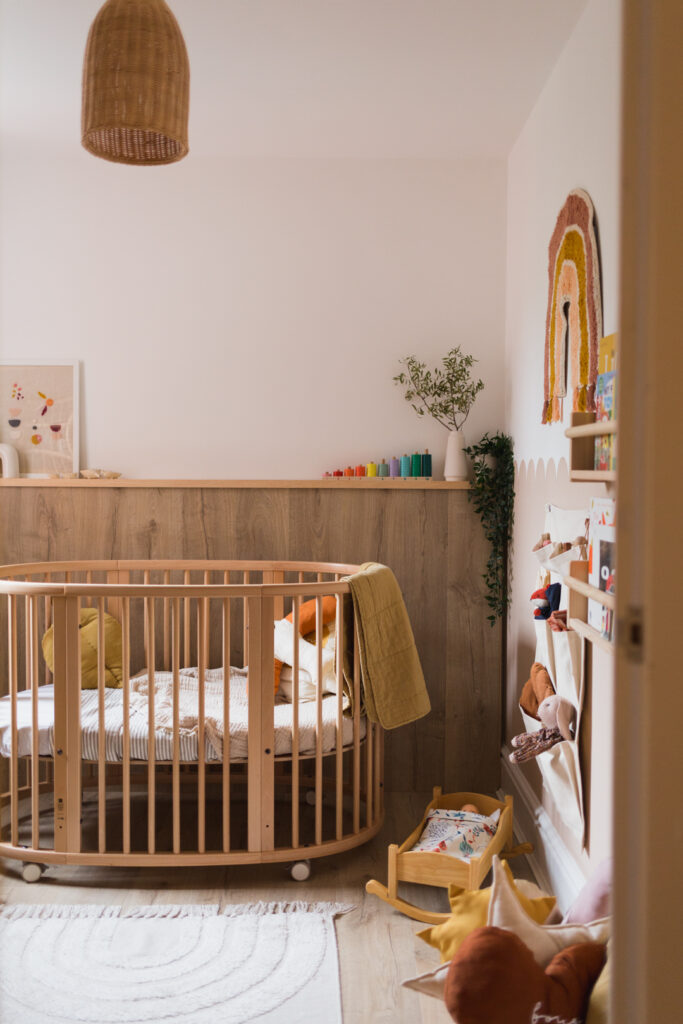
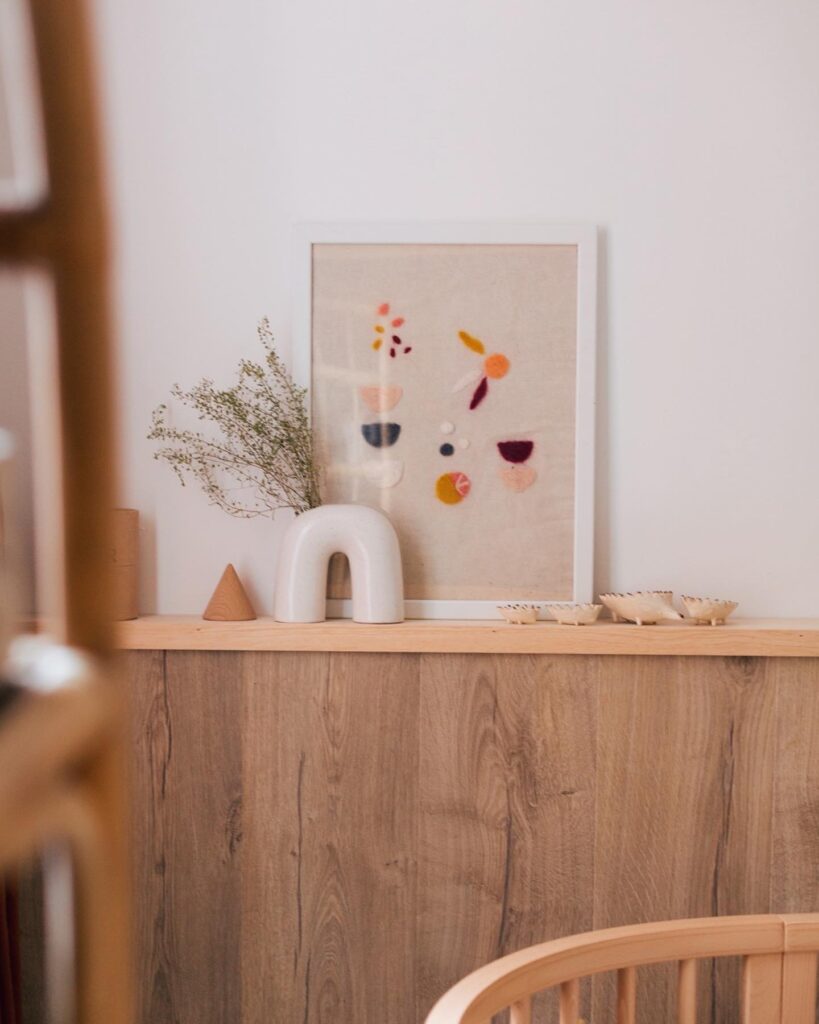
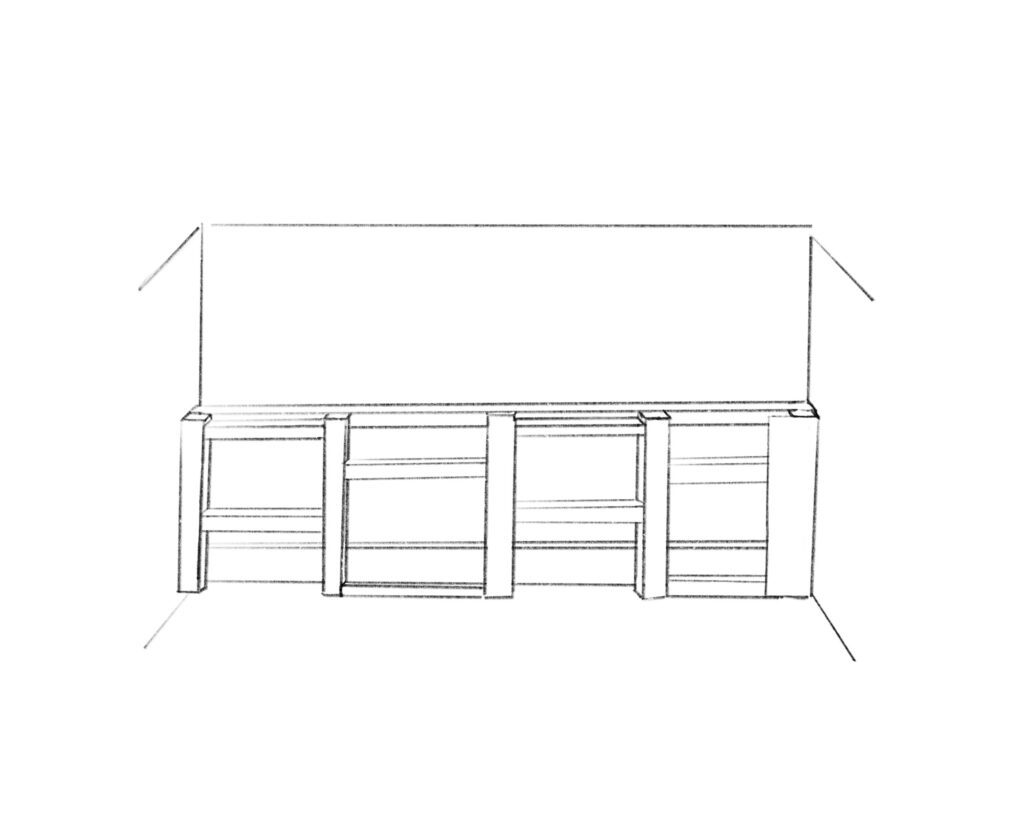
The final step was to create a small shelf. Luckily I found a piece of wood just slightly wider than the space between the laminate and the wall and attached a thin strip of wood to one edge creating an ‘L’ shape. Once in place this hid the top edge of the laminate.
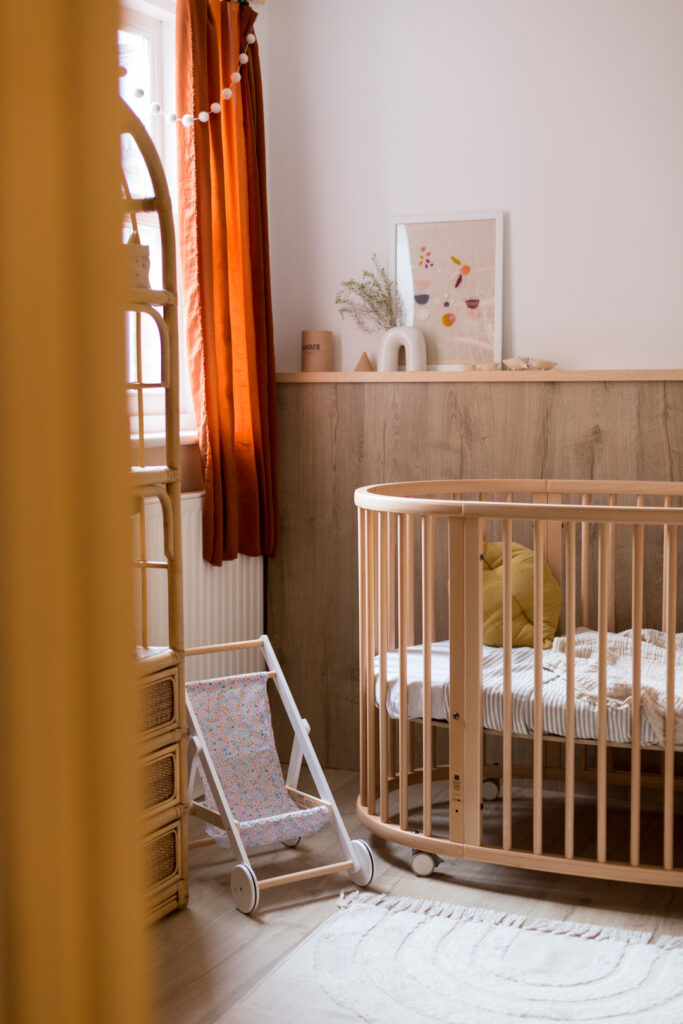
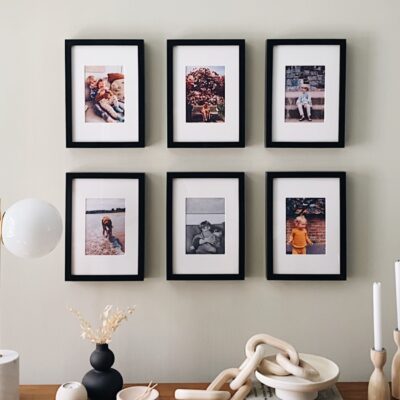
I absolutely love it! I think it’s creates such a beautiful, natural vibe to this bedroom. The wood tones go fantastically well with the muted paint colour I wanted in this space, but would go equally well with something brighter or even a warm white. The shelf is so much fun to style and I hope she enjoys putting her treasures up on it as she grows older as much as I do now!


Wow, your article is very helpful. I love making things at home with my own hands, And this will be a great suggestion for me. Thank a lot.
Wow! I love it! Thank you for sharing the detailed tutorial!
TinkerLab started in Rachelle’s dining room in 2010, and has grown into a hub for hands-on creativity for kids, teachers, and families
Great article it’s really informative and creative which helps us to post new updates. it’s really worth it. thanks a lot. If you have more time, please visit:
infected days
He chose the Long Island Oak Light because it was a wonderful natural color with no orange or yellow undertones. It provided a stunning backdrop against which to photograph the rest of the room renovation. He used a spirit level and a nail gun to adhere to the laminate after laying the floor. The final phase involved building a little shelf. Fortunately, he discovered a piece of wood that was just a little bigger than the gap between the laminate and the wall. A thin strip of wood was affixed to one edge, forming an ‘L’ shape.
Very good article worth reading Like to read good articles.
A must try DIY for my next projects.
Thanks for sharing a worth reading article about a href=”https://www.google.ae/”home improvement Thanks a lot
Thanks for sharing a worth reading article about home improvement Thanks a lot
https://www.google.ae/
These Seamless Floor to Wall Wood Panelling, which is so creative and authentic for all, but there are also very beneficial and criticizing guest post backlinks from them in all over the US perfectly.
Very good article. I’d want to thank you for taking the time and effort to write such an intriguing and instructive essay.
Hello, important based on my experience with it, I can safely say that of all the planar diesel heater that I have tried to date, this one destroys the competition. The heater did a great job of keeping warm in my big rooftop tent all night.
The frame was made of extremely basic materials. It doesn’t have to be pretty because the flooring will cover it! It only needs to produce a secure mounting surface for the laminate pieces to rest on. Because I didn’t want to remove the skirting, I chose to work from a strip of wood that was the same depth as the skirting board. Using screws and rawl plugs, I secured this down the length of the wall at the height I wanted the panels to reach.
wao amazing article i love to diy things really appreciate your efforts thanks
Amazing collections. Small place is very difficult to organize. But Smart products can help to manage it easily. For my baby room areas, decoration & organization is a nice set of products.
Amazing blog. Thanks for sharing the information about floors. Get a business growth consultation at KBA
Wonderful collections. It’s hard to keep a small place organized. But Smart products can help to manage it easily. Decorating and organizing my baby’s room is a nice set of products.
Your information is useful to me and many people are looking for it.
Hi!
Amazing blog. Thanks for sharing the information!
Are you looking for a qualified person to complete your homework? We domyhomework are here to help! We are a team of talented writers & academics, who dedicate our time to providing the best service for you. Visit us now!
DIY Seamless Flooring is a new way of laying tile, and it’s about to change the way you do flooring. With this method, you can lay tile without having to worry about grout lines! This is an amazing new technology that will save you time and money, not to mention it looks great! You might be wondering how this works. Visit this https://masterbundles.com/best-modern-powerpoint-templates/ site download modern templates. Well, the tiles are made with a special backing that allows them to stick together and form one seamless piece of tile. This means that no matter how big or small your project is, you can do it yourself.
Amazing, organized and put together with lot of efforts.
Awesome article dear. We are Journalpur provides Daily India News Blog, Investment, Yojana, Business, Wiki and Biography Article.
Keep it up and update more articles here.
Thank you!
Various Flooring Options:
Many options to choose for flooring, such as:
Laminate Flooring
Hardwood Flooring
Vinyl Flooring
Marble flooring indoor
Epoxy Flooring
Tile Flooring
Ceramic flooring
Outdoor decking
I look at this project and understand that I can not master it. I have seen similar furniture on the Furniture Row website, but my friends have not had a very good experience with them. Also, I read the Furniture Row reviews and this is also questionable. Perhaps you know another company where you can find something similar?
I can’t do it myself. I will rent someone help me to make it.
I’m glad you discovered. I will visit often.
If you want your essay written from scratch by a professional writer from scratch, contact us today!
It is a nice one content.Keep sharing such an informational content.If you want to know about mytepezza com then click here:kingdomclue
Im grateful for the article post. Much thanks again.
Its a good content i found to read.thanks for sharing.But if any of you want to have all business news from the world,then click here: allbusinessnews
Your article was very impressive to me. It was unexpected information,but after reading it like this, I found it very interesting.
It looks very good, we note. Greetings from our website.
thank you for sharing your knowledge . i also have a gratefully opportunity for us to write this subject…
Your writing abilities and the design of your blog have definitely blown me away.
soccer random
Amazing steps. I want to decor my living room, working area & kitchen areas. Through this blog. I got lot of inspiration from decor ideas. Thanks for sharing. Please share more blogs.
like wow so beautiful price?
Slate Interiors is considered as one of the top professional interior fit out company in Dubai, UAE. We are a leading interior fit-out firm in Dubai UAE, providing turnkey solutions, well established in United Arab Emirates. Slate provides excellent service for Interior fit out projects for all kinds of business across to whole of the UAE. We deliver a wide range of turnkey interior fit out design solutions in Dubai, UAE. Our skilled professional team can deliver the projects with high quality at the right time that is why our firm is considered as prominent interior fit out company in Dubai.
I have read your blog. It is a very interesting Topic, I really liked it. Thanks for sharing and keeping up the good work.
One Stop Solution: Transform your space with premium wooden/laminate/engineered floors, exterior cladding/decking, high pressure laminate, interior wall paneling, and aluminum windows & doors from the world’s leading brands, all in one convenient location.
Upgrade your home with the timeless elegance of wooden flooring. Visit our website for expert advice and inspiration. Laminate Wooden Flooring
How to Update/Renew Your Cell Phone Number with Indian Overseas Bank, The recommendations of the Reserve Bank of India are followed by the national bank Indian Overseas Bank. The bank has been offering a variety of handy https://ekhan.net/ ekhan.net services and amenities to its public banking clients. Registration for Indian Overseas Bank (IOB) Mobile Banking, How to Update/Renew Your Cell Phone Number with Indian Overseas Bank, The recommendations of the Reserve Bank of India are followed by the national bank Indian Overseas Bank. The bank has been offering a variety of handy services and amenities to its public banking clients. Registration for Indian Overseas Bank (IOB) Mobile Banking.
Taking everything into account I was looking for sonnet-related blog zones and happened onto your site. This post is quite illuminating, and you have produced such an important and massive essay that has given me a player in data. I know you’ll keep it up, and we’ll get a lot of useful and basic information from you. To be sure, thank you for such a lovely collection for your post.
TeachersBadi is a website dedicated to education, students, and teachers.The name ‘TeachersBadi’ reveals the nature of the site. A dedicated Team for teachers, students, and educators is launching and running the site. teachersbadi.in We enjoy sharing primarily educational material and employee and teacher-related content in the educational area.
The company takes extensive measures to ensure that your vehicle reaches its destination in pristine condition. They employ highly trained and experienced drivers who handle your vehicle with utmost care and adhere to strict safety protocols throughout the transportation process https://www.youtube.com/watch?v=PBxN-yhTlQI
Designing kids’ bedrooms is always a delightful experience, and it’s wonderful to witness their evolving tastes and personalities reflected in their space. Whether it’s a nursery-style room or a more functional setup, creating an environment that fosters their growth and imagination is key. And don’t forget to add a touch of Lime Kiln Dust Orlando for a vibrant and playful twist to the room’s decor!
Embarking on a room makeover journey can certainly present its challenges, especially in a small home without much storage space. The domino effect of moving furniture to accommodate changes can create a logistical puzzle. However, with the assistance of efficient and reliable notary private services in Dubai, legal matters and document authentication can be efficiently handled, ensuring smooth transitions amidst the chaos of a home renovation.
Start by conducting research online and gathering information about various auto transport companies. Look for companies that have a strong online presence, including a professional website, positive customer reviews, and a good rating with the Better Business Bureau (BBB).https://www.youtube.com/watch?v=fa75-toDYGQ
Thanks for your helpful information. I have been struggling to find many questions about this issue. I will follow you!
From a startup small enterprise to a well-known brand in the industry, and from a small team to more than 500 writing teams under our umbrella, we have come a long way thanks to the trust and support of our clients. We will continue to provide high-quality online course http://www.meeloun.comassistance services to each and every customer, just as we always have.
You should be a piece of a test for obviously the best webpage page on the web. I will propose this site!
This acquired language proficiency extends to effective communication, both in writing and speech, enabling individuals to express themselves more eloquently and confidently. https://buylocalbooks.com
Thank you for beautiful information. best time to visit egypt The Ramzan Festival is one of the Best festivals to Celebrate in Egypt. It is celebrated in Alexandria, Cairo, and other cities.
As an essential component of applying for studying abroad, the quality of your study abroad essay significantly influences your chances of admission. Therefore, for students aspiring to study abroad, excelling in their study abroad essays is of utmost importance. If you need assistance with essay ghostwriting:http://www.hotessay.net/our_service3.php , you can also reach out to us.
The diagram is very helpful. I am going to try this for my new one.
wow! your diys look soooo beautiful! i like it very much! Essay writing services have alleviated academic pressure for international students to some extent, providing targeted assistance. However, our investigation revealed that this convenience often comes with academic integrity issues. Many international students face academic penalties due to using essay writing services http://www.12y.org/services/ , affecting both their academic journey and future career prospects.